As I travel quite frequently, managing my person mail on a legacy POP3/IMAP based mail server has always proven to be frustrating and inefficient.Long are the days I ve dreamed of not having to use the dreaded leave on server option, and having to wait for all my various devices to download the same messages over and over again.
After investigating a few alternatives, including VMware s Zimbra appliance, a number of mail servers that poorly implement the IMAP protocol, it became clear that Microsoft s Exchange platform was actually surprisingly cost effective and feature rich.
The recently released Exchange 2013 suite looked perfect, so I decided to see how long it would take to learn and configure from scratch not having installed an Exchange server since the days of Exchange 2007.
My Prerequisites
I created a stock-standard Windows 2012 server with the following config:
- Windows 2012 Standard
- 4 Cores
- 16 GB RAM
- 2 x 60Gb disks
- Active Directory installed, configured as a Domain Controller
- All updates and hot fixes installed
This server was a virtual server on VMware s ESX 5 hypervisor (I could have used Hyper-V, but had an ESX host with spare capacity already available)
Highly Technical Planning
I this theory that if software requires a user-guide or installation guide, then the installer or app is not well designed.Using this frequently flawed process, I downloaded the ISO and began the install before reading anything about Exchange 2013.
I discovered that Exchange requires an obscure runtime to be installed, Microsoft s Unified Communications Managed API 4.0 Runtime Installer. Why it s not included in the Exchange installer or on the disk image is beyond me, since it is clearly a requirement, but a quick 240Mb download later and I'm ready to go
 Caveat
Since this instance is purely for my personal use, I don't need a lot of redundancy, hence the installation onto a single server.Sure, it breaks best practices , but with a solid (and tested!) backup regime, this perfectly appropriate for individual use.
You benefit from the features of an enterprise mail platform for minimal infrastructure overhead.
I could easily have just signed up for Exchange Online, Microsoft’s hosted Exchange platform, which arguably would have been cheaper and easier, but I prefer to roll my own infrastructure and retain ownership of my data.
The process
Installing the core Exchange 2013 Server is fairly straight forward just run setup.exe and follow the instructions.I was particularly impressed with the fact that the instructions actually made sense!
As my personal mail is filtered through two filters, I decided to disable the built-in Malware Protection, to save resources, however reports so far in the blogosphere indicate that the built in capabilities are quite efficient.
This process took around 15 minutes from running the app to having Exchange installed and active (without any configuration).
Configuring nearly all key aspects of Exchange is performed via the Exchange Administration Centre (EAP), which is located at https:// name or FQDN>/ecp/
Step 1 Configure Your Accepted Domains
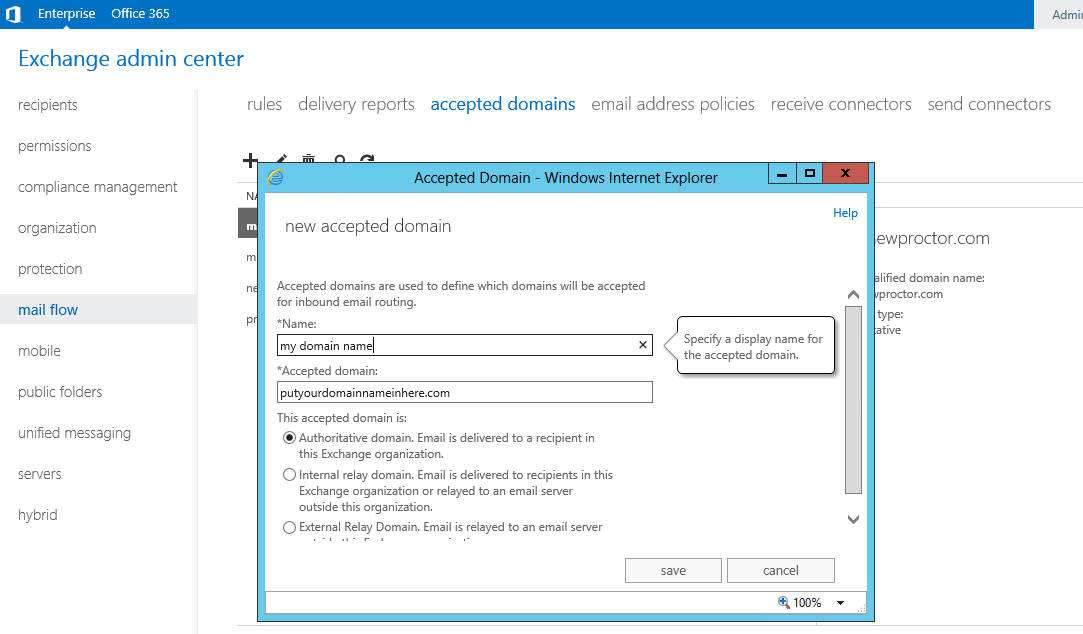
Exchange will automatically create an accepted domain based on the Active Directory forest configured when installing AD.However, you may want to add one or more domain names to be accepted by Exchange for mail.
You can do this by going to ECP > Mail Flow > Accepted Domains
Whilst fairly self-explanatory, the key is to configure each domain name as an authoritative domain, which identified the domain as being able to accept and store mail directly.
Hint: The domain name should be the SMTP recipient domain i.e. if your address is me@here.com, the domain will be here.com
Step 2 (Optional) Configure a default email address policy
By default, Exchange Server 2013 (and presumably earlier versions) already has an email address policy for every domain user that has mail enabled.
This default policy specifies the recipient’s alias as the local portion of their email address.
If desired, you can change how you re the email addresses will display such as my.name@mydomainname.com.au.
There are a number of pre-configured formats presented that you can choose from, or alternatively you can create your own using tokens.
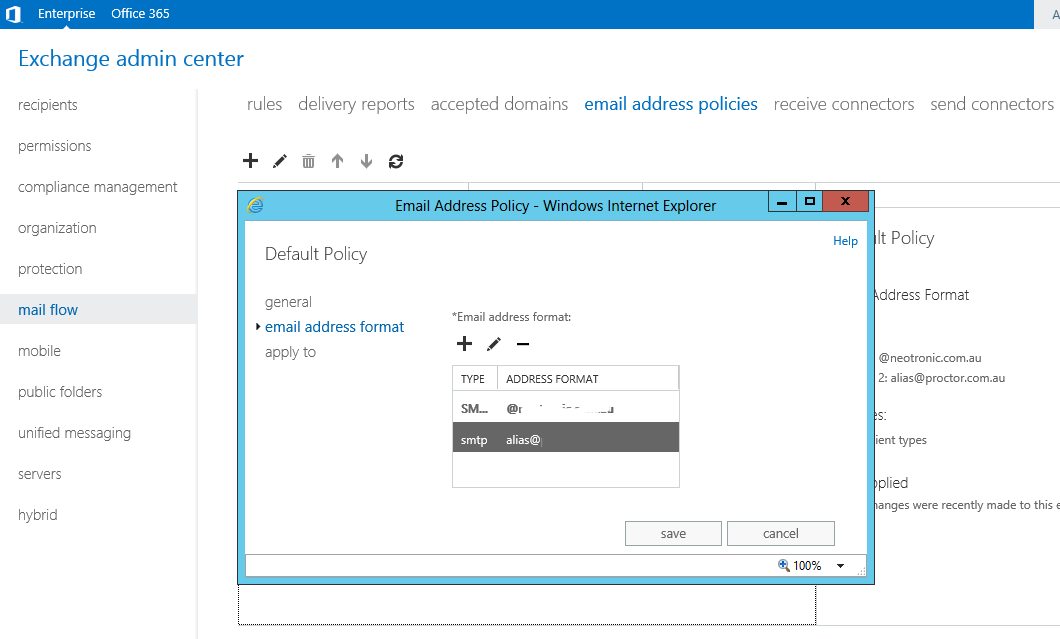
If you want to create your own ‘Custom SMTP Recipient Address’, the following tokens are available.
| Token | Description |
| %g | Given name (first name) |
| %i | Middle initial |
| %s | Surname (last name) |
| %d | Display name |
| %m | Exchange alias |
| %xs | Uses the first x letters of the surname. For example, if x = 2, the first two letters of the surname are used. |
| %xg | Uses the first x letters of the given name. For example, if x = 2, the first two letters of the given name are used. |
Step 3 configure a Send Connector
Assuming you want to be able to deliver email through this server to external SMTP recipients, you now need to create a Send Connector .
Send Connectors are routing instructions that tell Exchange which recipient domains should be sent to which destinations.In most instances, you will need to configure for all recipients.
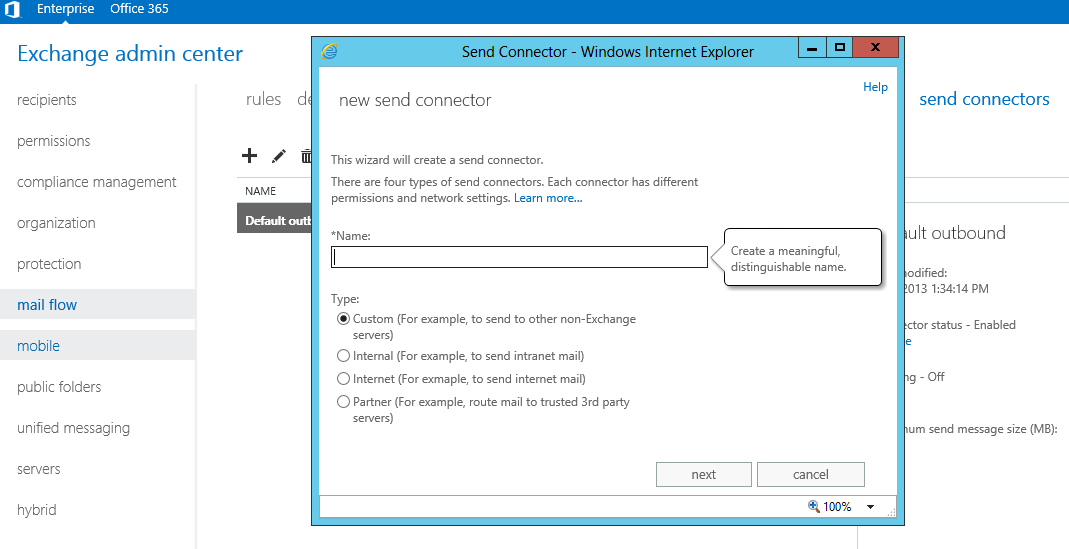
To create a new Send Connector, go to Mail Flow > Send Connectors, and click Add.
On the first page, you will need to specify a name for the connector (such as default be creative!), and select the Type as Internet this tells the connector to use the MX records of the destination SMTP server to determine the best route for delivering mail to that domain name.
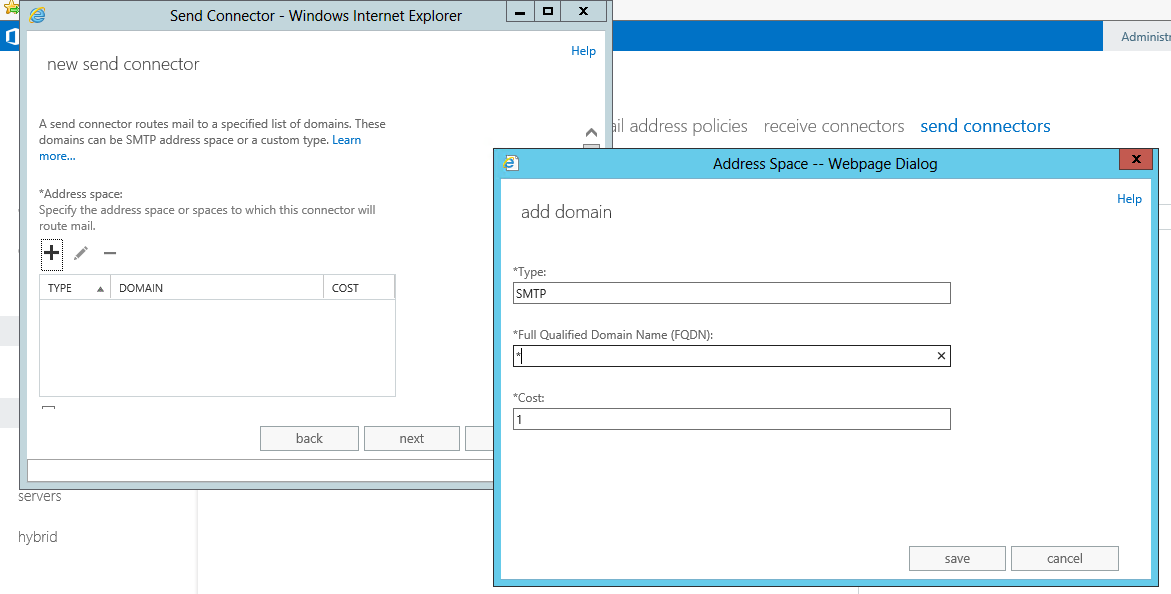
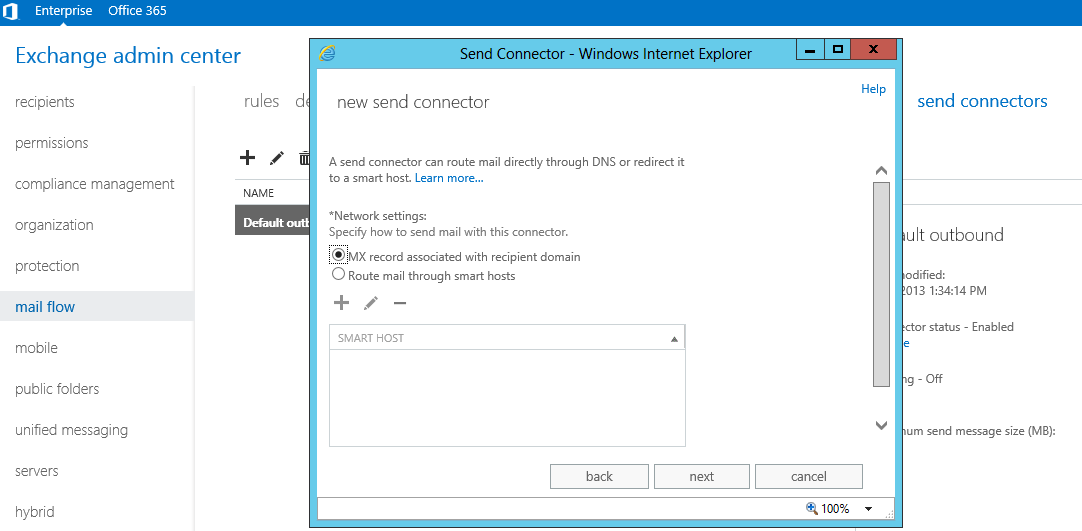
On the next page, as suggested above, leave the default network settings as MX records.You also have the option of selecting a smart host or a specific external host to which SMTP mail can be sent this is useful for environments where you are behind a firewall and need to use your ISP or Company s SMTP server.
Finally, you need to specify the address space for which this route will use.For most setups, simply enter * as the Fully Qualified Domain Name (FQDN), as this will cover all domains.
The Send Connector feature is particularly handy if you have a private or non-routable domain name with mail hosted off-net. You could set up a route for such a domain like myprivatedomain.mydomain.com.au and point it towards an internal SMTP server.
Step 4 Optional Configure an SSL Certificate for OWA
When using Outlook Web Access (which by default is available as /owa/), you will notice that IIS utilizes a self-signed certificate from Microsoft.
Whilst the certificate does encrypt your session, it is not signed by a valid Certification Authority (CA), and thus will present you with a browser warning each time it is used.
I recommend that you create and install your own SSL certificate these are available from a variety of providers such as Verisign, GeoTrust, RapidSSL, Symantec, etc.
Step 5 Optional (but recommended) Lock down Exchange Administration Centre
If you exchange server is internet facing (or even if you don't trust your internal users), it is highly recommended that you disable internet access to the Exchange Administration Centre (EAC).
This is achieved by using a small Exchange cmdlet, Set-ECPVirtualDirectory , which is accessed via the Exchange Management Shell (not Powershell, as I found out the hard way ).
Example Usage:
Set-ECPVirtualDirectory -Identity “MPEX2013Default Web Site” -AdminEnabled $false
You will need to replace the server name and site name with your local instance.
Full Technet details on this cmdlet are available.This is a particularly handy feature, as it results in the /ecp web site returning a 404 error, which you can then enhance using IIS s error handlers.
Last Step – Configure your DNS or Mail Gateway to deliver to the new Exchange Server
Once Exchange is installed and configured, the last step is to configure your DNS or Mail Gateway to direct inbound SMTP (port 25) towards the server.This is not something that can easily be described in detail here, as everyone has different configurations, network designs and dependences, but if you re read this far, I'm sure you know how.
Observations
I discovered that IIS 8 does not have IIS worker process recycling enabled. Normally not a major issue, however in my case it appears that due to the size of my mailbox, using OWA consistency results in the IIS worker process for my login to grow considerably in memory usage.After a few hours of usage, the process seemed to expand to well over 1Gb RAM.
Configuring the appropriate process to recycle every 60 minutes reduced the ram usage to around 300Mb (for a ~6Gb mailbox), and resulted in significant performance improvements. I have not yet noticed any impact when the process recycle kicks off, so all seems well.
The End Result
- Installing Exchange 15 minutes
- Configuring Exchange to accept mail 25 minutes
- Updating DNS to point to new server 5 minutes
- Forgetting to update firewall to allow inbound SMTP to new server and wondering where my mail was going 10 minutes
- Testing 15 minutes
Total cooking time - 60 minutes
Serves 4 accepted domains, 18 mailboxes
