Introduction
You've got your finger on the mouse button ready to pull the trigger and finally order that Raspberry Pi 2 that just came out but you don't know if you've got the time to do the research to learn how to set it up and start programming it. In this first of n part series of articles I will walk you through the process of getting the Pi configured. In future articles we will configure the Pi to program in the C/C++ and Python languages.
We will be interacting with the OS primarily through the command line so a basic knowledge of Linux commands would be helpful but I will keep it simple. A good cheat sheet is alwys helpful so am providing a link to one that contains Linux commands. Linux command line cheat sheet[7]
Getting the OS on the SD card
There are several OS's currently available for the Raspberry Pi, I have tried a few and have found that Raspian Jesse[1] while not the most versatile is the leanest and is the OS we will be using in this tutorial.
Once you have downloaded the Raspian Jesse image the next step will be to install it onto the SD card and for this we will need to download a couple of utilities to format and write the image to the newly formatted card.
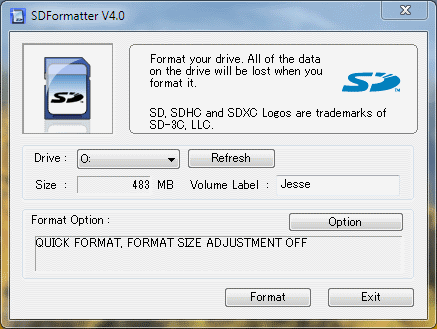
The SD Card Formatter is a free download from the SD Association that will be used to format the card. Just use the default options and supply only the label. In my configuration I am using a 16GB San Disk Micro SD card that I got from newegg for around $8 and it works just fine. This step is optional and used only if you intend on keeping the format as FAT32. I did it anyway just to erase existing data I had on the drive.
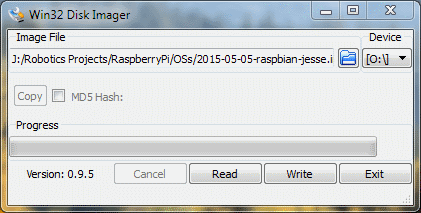
The next thing we need to do is write the newly downloaded image to the SD card and to do this we use the Win32DiskImager utility. It's fairly straight forward; select the SD cards drive and browse to the downloaded Jesse image and click the Write button.
To backup the contents of the SD card shutdown the Pi, remove the SD card and put it into your card reader, bring up the Wine32DiskImager application then select the cards drive as done previously when we wrote the image to the card, browse to the folder where you want the backup to be stored, supply a name for the backup image then click Read.
If you already have the Raspian Wheezy OS on your SD card you can upgrade in place by doing the following at a terminal from within Raspian. It takes 10-15 minutes and when completed you will need to reboot your Pi. This process gives you the bleeding edge version of the OS but I've found them to be stable and they push fairly regularly.
$ sudo apt-get update
$ sudo apt-get upgrade
$ sudo rpi_update
Configuring the Pi
When Win32DiskImager has finished installing the image to the SD card, place the card in the Pi and apply power. When Jesse first boots up it boots to Desktop, automatically logs on as user pi and the localization is configured for the UK.
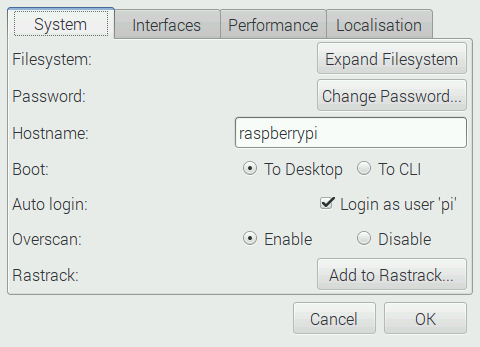
The new Raspian Jesse OS provides a nice GUI for setting various system parameters and can be lauched by browsing to; Mennu->Preferences->Raspberry Pi Configuration, and clicking on the menu item to launch the application. The first thing we need to do is expand the file system so that it utilizes the whole SD card instead of just 4GB, which is the default, unless of course you wish to only use 4GB of the card for the OS and in that case the rest of the card can be used as a drive by creating a partition in the remaining space. If this is to your liking then the GParted (GNOME Partition Editor[4]) is a nice utility that will allow you to manage partitions on the device.
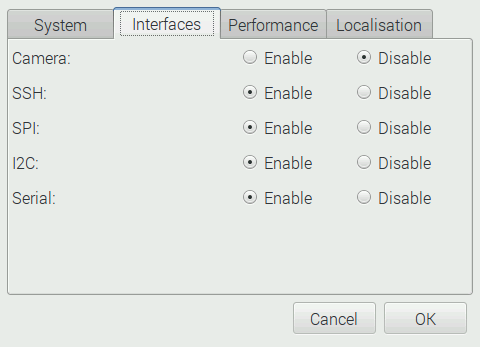
The second tab allows us to enable certain interfaces that will be useful when we start programming the Pi, so I would recommend at least enabling the SSH, if it's not already. The spi and I2C interfaces may be used later when we start programming the Pi, but these can be set at any time and will be discussed in the next article in more detail.
The other tabs can be used to overclock the device and set localization parameters. Because the Pi is a British product the time zone and keyboard setup are set for the UK so you will need to set those parameters for the area in which you reside. Once you are satisfied with the setup you will need to reboot your Pi.
Pi WiFi
Getting WiFi to work on the Pi is straight forward if you have a supported dongle. I tried a couple of different types of WiFi devices and couldn't get the WiFi to work so I purchased a EDIMAX EW-7811Un N150 USB 2.0 Wireless nano Adapter and with this device had it going within minutes.
On the main toolbar, which is docked to the top of the screen unless you've changed it's location there's a network icon that when clicked displays a list of available WiFi networks. Click on the network that you wish to connect to and a window will pop up asking for the network password, once this is entered the icon will change and after a few seconds you will be connected.
A list of supported WiFi devices can be found at http://elinux.org/RPi_USB_Wi-Fi_Adapters .
Mounting a Thumb Drive
An excellent article, How To Mount A USB Flash Disk On The Raspberry Pi [5] explains the process very well but I'll briefly review the steps that I used to get the thumb drive formatted and auto mounted.
I formatted the device in the EXT4 format because I was having a lot of problems with permisssion and haven't had that problem since formatting. This step is optional and if you decide to keep the FAT32 format you will need to modify the entry for the device in fstab accordingly. For a full list of options and an explaination of fstab refer to; debian fstab[11].
Place the thumb drive in one of the USB connectors and bring up a terminal on the Pi then type; ls -l /dev/sd**, which should produce a display sinilar to that in the image below.

Using the above information we can now format and mount the disk using the following cammands;
$ sudo mkfs.ext4 /dev/sda1 -L label
$ sudo mkdir /media/usb
$ sudo chown -R pi:pi /media/usb
$ sudo mount /dev/sda1 /media/usb -o uid=pi,gid=pi
- line 1 - [optional] format the drive to EXT4 format, with the label "label".
- line 2 - Ceate a directory as a mounting point for the thumb drive.
- line 3 - Change ownership so we as humble users can access it.
- line 4 - Manualy mount the device using the mounting point we created in line 2.
This is all well and good but you don't want to have to do this everytime you boot your Pi so we need to configure the system to auto mounted the device. Since everything in Linux is done using the file system we need to modify the /etc/fstab file and add information about our drive.
Enter the following command from a terminal window to modify the fstab file; sudo nano /etc/fstab, and add the last line shown in the image below. When you are done type Ctrl-X and then Y to save and exit the nano editor. A very good beginners tutorial on using the nano editor can be found at How-To-Geek[6]

Note: If your device is formatted with FAT32 replace the bottom line with this;
/dev/sda1 /media/usb vfat auto,user,exec,rw,async 0 0
Now when you boot your Pi the drive will be automatically mounted and ready for use. I use mine to put all my development files including Datasheets and other files that I use for development. Then when I go to another machine all I have to do is unmount it sudo umount /media/usb and I can take it with me to another machine or whatever.
SSH into the Pi
In order to SSH into the Pi and transfer files using the SFTP protocol Download the FileZilla Client [8] application, or use the alternative application you choose that provides SFTP transfer. I'll use FileZilla to do this but I would imagine other clients woudl be similar.
In order to configure FileZilla you will need to know the IP address of your Pi so in a terminal window on the Pi type; ifconfig, you should see something similar to that in the image below.

From the image above we see that the address of the Pi is 192.168.254.15, enter this address in Host textbox in FileZilla, provide your logon information in the appropriate area then save it. If you don't set the IP address as static it will change ocassionally but if it doesn't connect just follow the procedure outlined above or make it static.
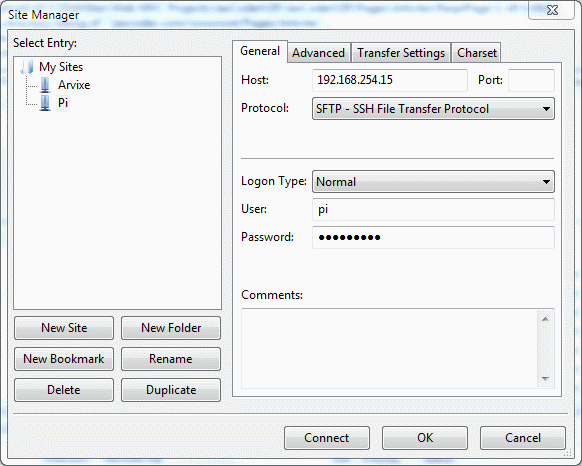
Once you have a connection you will be able to transfer files to/from the Pi but dragging and dropping from one window to the other. Easy peasy!
Trimming the fat
As with just about any OS there is a lot of BS that you just don't want or need and if you plan on doing any serious development on your Pi a lot of fat can be trimmed that is not only unnecessary but just wastes space.
I waded through quite a few site to find out how and what needed to be removed and found the Slimming down an existing Raspbian image [9] and Creating your own minimalistic Rasbian image for the Raspberry Pi [10] articles to be very helpful. This is a very subjective subject since everyone will be using the Pi for different things. But the basic commands to remove packages/applications is done by;
$ sudo apt-get --purge remove app-name
$ sudo apt-get autoremove
$ sudo apt-get clean
Recommended Applications
Below is a list of general purpose applications that I use on a regular basis and just thought I would pass them along. In the next article I will introduce a few more applications that I use for development so be sure to look for Part 2.
What's next
In the next tutorial I will be setting up the development environments for both C/C++ and Python languages. Additionally I will descibe some of the tools that can be used in our embedded development environment.
References
[1] Download Raspian for Raspberry Pi, https://www.raspberrypi.org/downloads/raspbian
[2] SD Formatter 4.0 for SD/SDHC/SDXC, https://www.sdcard.org/downloads/formatter_4
[3] Win32 Disk Imager, http://sourceforge.net/projects/win32diskimager
[4] GNOME Partition Editor, http://gparted.org/livecd.php
[5] How To Mount A USB Flash Disk On The Raspberry Pi, http://www.raspberrypi-spy.co.uk/2014/05/how-to-mount-a-usb-flash-disk-on-the-raspberry-pi
[6] The Beginner’s Guide to Nano, the Linux Command-Line Text Editor, http://www.howtogeek.com/howto/42980/the-beginners-guide-to-nano-the-linux-command-line-text-editor/ [7] Linux command line cheat sheet, http://www.pixelbeat.org/cmdline.html>
[8] FileZilla Client, https://filezilla-project.org/download.php
[9] Slimming an exisiting Raspbian image, http://blog.samat.org/2015/02/05/slimming-an-existing-raspbian-install/
[10 Creating your own minimalistic Rasbian image for the Raspberry Pi, https://brandonb.io/creating-your-own-minimalistic-rasbian-image-for-the-raspberry-pi
[11] fstab, debian wiki, https://wiki.debian.org/fstab
