Hey everyone, it’s been a very long time since I wrote anything at all, my apologies, it had been my exams and I had been very busy these days. But, now I’m back. This time I am writing a guide to setting up your own personal server at home. Typically, I write about stuff from ground up, but for the sake of speed, I will like you to have a bit of background of a few of the things. I will try my best to cover them too, but excuse me if I miss a few things. These are because I want to cover a lot of things in this one single guide, and then I will write about other configurations and updates in a later post.
Introduction and Background
I had been working on ways to allow my family to communicate through proper use of their devices, however, every method required a third-party software to communicate. Plus, it required a working internet connection. If the requirement is just the connectivity and not the Internet-connectivity, I thought why not I create a server for home that would let us to communicate, share items without having to pass it through third-party networks, besides, who trusts them? That was not the main reason, the main reason that I also enjoyed building a server for the family.
In this post, I will walk you guys through building your own web server, you can for sure then update the web application, configure the services as you need! In this post, I will walk you through the following:
- Setting up the server.
- I am using Windows Server 2012 for my purposes. I will walk you through installation of IIS (Microsoft’s web server) and a few other components required. You can install other components as required.
- Setting up an IP address to be used on your server.
- Setting up ASP.NET environment.
- You do have to install ASP.NET components before IIS can execute ASP.NET code in your web application.
- Setting up Web Deploy.
- I don’t do web development on server (AKA hosting) environment. Instead, I will be developing the stuff on my own laptop. Then, I will require a service to deploy the stuff on the server.
- I will walk you through setting up the Web Deploy on server.
- I will walk you through setting up the publish profile file, to be used while publishing the web application to server through Visual Studio.
- Publishing and running the web application.
I assume you have the basic ideas and understanding of how this stuff works, what a server is, how your web applications work, how IP addressing works and what a DNS is. I will try my best to explain these components to you too, but if I miss out anything, excuse me. Sometimes my posts do get hard to understand, if they do, just ping me and I will make things clear, it’s really hard to think of so many things at the same time…😉
Now, I will break the procedure down and will write about them in steps.
Setting up the server
First of all, let’s talk about setting up the server. Nothing special here, just installation of Windows Server. I could have used other servers, but then I would have needed to add patches to my applications and so on. So, instead of this, I would recommend that you just install Windows Server on your machine. You can get an evaluation copy from Microsoft, Try Windows Server 2012. Later, just install the Windows Server, I am sure you know how to do that. Also before you continue, please read the requirements for Windows Server.
You can find the explanation and procedures for installing Windows Server online. Learning procedures are also very much simple. Microsoft itself has invested a lot of good resources online for teaching and fine-tuning IT professionals. So you can learn using Windows Server from there too.
References:
- What’s New in Windows Server 2012 R2 Jump Start
- Windows Server 2012: Web and Application Platform
Configuring the IP address to be used
If you have ever been in networking, then you already know that every device has an IP address that is used to communicate with it. Since, our server will be the hub for our communications. We need to ensure that the IP address doesn’t change. So, we would assign the IP address to our server which we would like to be used throughout the network.
Note: I will later talk about using hostnames and how to setup DNS servers on your servers for friendly URLs. For this post, let’s keep things simple and numeric.
To open the configuration window, follow the steps:
- Open the Network and Sharing center.
- Select “Change adapter settings”
- Select the device that you are connecting through. There may be an Ethernet connection and a Wireless connection available. Select the one that you want to use. Right click → Open the Properties Window.
- We are going to update the IPv4 settings and we are just going to assign the IP address we want the device to use. So, in the list provided, select the option with “Internet Protocol Version 4 (TCP/IPv4)”. Double click.
By default, mostly, “Obtain an IP address automatically” is selected, we are going to override the default settings so we need to change this option to the one that we want. But remember, we don’t want to tinker with the DNS, Subnet mask and the gateway being used. First things that you need to understand are the local addresses in the IPv4 range. A private IP address belongs to the local network instead of the external networks such as Internet. The local IP address ranges are:
- 10.0.0.0 to 10.255.255.255
- 172.16.0.0 to 172.31.255.255
- 192.168.0.0 to 192.168.255.255
So, you can use any of the range from this, and assign this IP to your server. Your router will be able to detect the computer, however, the request won’t be sent to external networks because that is not where the IP address belongs to; local network’s IP address. So, according to my own address, network system and addresses. I will set things to the default ones that my ISP provides me with but will select a random IP address from the local range.

Figure 1: Configuring the IP address for the server.
Later, we will be using a DNS server to configure how we use the service on our devices and so on. Until this step, our server is set up and we can now install the web server to handle the incoming requests and to forward them to a “web application”. Head on to the next step.
Installing the components — and IIS
In Windows Server, you don’t have to get the executables for everything, instead you just enable and disable the services, much like Turning Windows feature on or off. In Windows Server, open your Server Manager.
 Figure 2: Server Manager application in Windows Server.
In that,
- Select “Add roles and features”. This feature is used to add more services to the environment and to add or remove features from the server.
- Select “Role-based or feature-based installation”.
- Select the server. By default there will be just one server listed. If you have multiple, select the one that you want to use for the installation of the feature.
- Select the features and roles that you want to install on your machine.
- For this section, I will just install IIS server. Select “Web Server (IIS)” and install. It is also recommended that you install .NET 4.5 features from the features list.
- Add more features as per requirement of your server and the services that you are going to build for.
- Finally Install the selected components.
I typically do a machine restart after installing every component or service. This is not required all the times however, most of the times you should restart the machine to ensure that the components are installed and are running properly.
Now let’s dissect IIS sections in bits and study what we got there… To start IIS manager, open the Start menu and search for “inetmgr“, it would give you the application for IIS server.

Figure 3: IIS server main page shown.
You can see that this portal now lets you create new sites, connect to applications, configure the server properties, their IP addresses, domains. Even it allows you to get helpful material from peers such as TechNet, ASP.NET official website, IIS official website and much more. Navigate down to the server, by default IIS has a “Default Web Site” web site created in the environment, which is used to test whether the server works or not. You can here configure and update the server itself. You can modify the certificates, HTTP handlers, SMTP management and everything that is related to your server. Usually, everything will be managed automatically, you won’t need to do anything complex. However, in many cases you will personally have to change the state of the machine and the framework.
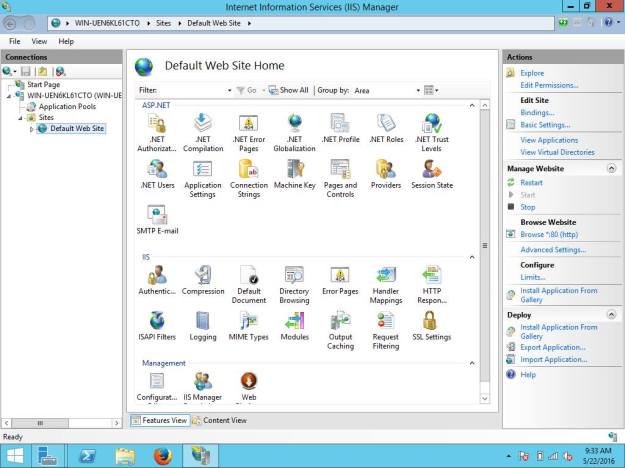
Figure 4: Default Web Site home page visible in IIS server.
I had installed other components related to ASP.NET itself, which may not be visible in your machine at the moment. If everything is similar, great, if not, continue reading as I will also teach you about configuring the ASP.NET framework on Windows Server.
Look to the right panel, it contains everything that you want to do with your application. It contains quick actions such as restarting the application, configuring the application, installing more services from built in galleries and much more.
Web Platform Installer
Another excellent feature to talk about here is the Web Platform Installer. This application allows you to install the best of the Microsoft products in no time. It scans your machine, checks it for updates, new software package releases and allows you to install them by directly downloading the packages on your machine.
Figure 5: Web Platform Installer can be used to install any software package relative to your machine architecture and operating system.
I wanted to talk about this great product by Microsoft, I have really enjoyed it since my days when I was starting learning how to program using WebMatrix. I really miss that tool too, but since Microsoft is no longer updating it, and Visual Studio is a beast, I don’t use or recommend it to anyone.
References:
- Adding Server Roles and Features
- Official IIS website
Setting up ASP.NET environment
Installing the IIS itself is not enough, ASP.NET doesn’t come pre-shipped with it. You need to go to Server Manager and install the ASP.NET components, I suggest you install maximum of these components. Although, they are not required and only those components are required which you are going to use and which would be required in the production application. In the roles section, go to, Web Server → Web Server → Application Development.

Figure 6: Installation of ASP.NET feature on Windows Server.
Select the frameworks that you want to install on your machine. They are required before you can actually publish the stuff on your server. I selected ASP.NET 4.5 and the platform select the dependencies to be installed. I had already installed the framework so it turned that to gray in color to show that the selection is disabled. If you want to select any more features that you want, such as Classic ASP (by the way, why?) then you can select that from the list and then finally go to the final stage and click, “Install”.
This would take some time, depending on many things, such as internet connection, your machine hardware, etc.
I suggest you restart the machine, to ensure things are working properly. Now that everything has been set up, we now need to publish an application to our server that we would be using through that IP address that we just assigned to our servers. But before we do so, it won’t be a good idea to always go back and copy paste or send the files and then replace the files here and there. Even though this is a personal project, things may get really tough and confusing when you have to publish the changes to the server. So, for that sake, we are going to use Web Deploy tool and we are going to connect our development tools with the server itself. You must be familiar with Web Deploy tool, aren’t you?
Setting up Web Deploy
Before continuing to the final stages, I wanted to ensure that all of my changes can be pushed to the servers without having to change and update the content myself. Microsoft Web Deploy is one such feature. It allows you to deploy the content remotely, updating the registries, files and other stuff. However, we are interested in another feature, “Publish Profile” file generation. This is a plain-XML file, used to configure the deployment process of the machines. Currently, Web Deploy 3.6 has been released.
Web Deploy would allow you to publish the changes to your project to your server, hosting environment, in no time! I really love this feature because I have been working on a few updates for my website and Web Deploy proved itself to be very simple, through the procedures like publish profile files where settings are saved in XML, and Visual Studio takes care of connections and publishing. To install Web Deploy, you need to enable the “Windows Deployment Services” role in Server Manager. This role would allow your server to be connected through remote devices for publishing purposes. Later, you can use the Web Platform Installer to install the Web Deploy service.
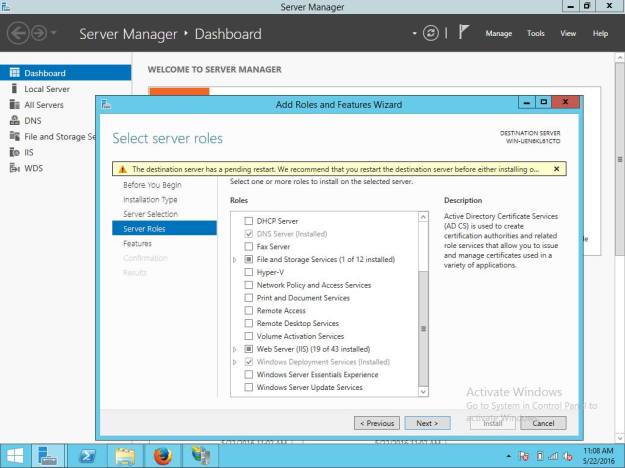
Figure 7: Windows Deployment Services option shown in gray; third last.
Web PI manages most of the dependencies itself. So, if you select a framework or package to be installed, Web PI would itself manage the dependencies that a package requires to be existing on the machine environment.
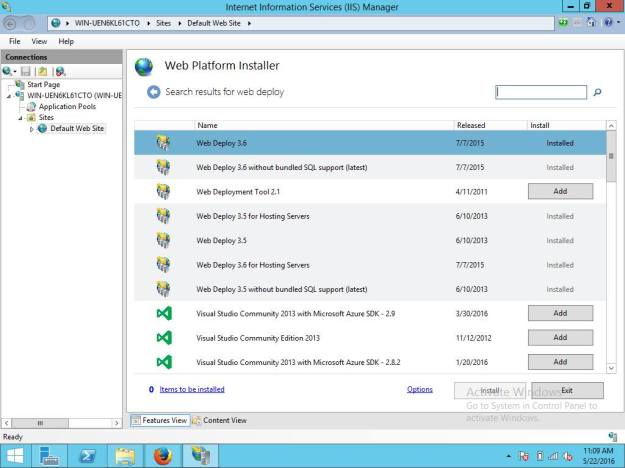
Figure 8: Web PI showing the list of Web Deploy packages found on the servers.
We’re — almost — done now. The final step is to configure the publish profile file. We would be using that file in our development environment to publish the web application.
References:
- Web Deploy
- Installing and Configuring Web Deploy on IIS 8.0 or Later
Configuring deployment options
Every application requires a different directory, thus every web application would require a different profile to be used while deploying the application to the servers. I am going to talk about the default ones. The default web site can be configured to support Web Deploy based remote deployment of the application’s source code.

Figure 9: Configuring the web deploy publishing option in web application in IIS manager.
Next you will select the settings that you want to do for the publishing of the application. They are simple and easy to understand.

Figure 10: Web Deploy configuration window.
I will now walk you through these options that you can configure as per your own needs.
- User: This is the user account that you will use to publish the website on behalf of. You should create a separate user account and then use their configuration as the authentication while publishing. I used the administrator account because I wanted to keep things simple.
- SQL Server connection string: The connection string to be used, for SQL Server.
- MySQL connection string: Same as above, but for MySQL instead.
- URL: This is the location where the server resides.
- Location: This is where you will find this publish profile file once it has been saved.
Once you are happy with the settings, just click, “Setup”. This would process the settings and will finally create the file for you to send over to your development environment. I will leave the development stages and steps for sake of simplicity, instead I will continue to publishing step. I will, however, be adding the references to my previous posts related to ASP.NET programming.
Publishing and running the web application
Once everything has been done, you can just send the publish profile to your development environment to publish the web application. You can send it through any method, any medium as required.
To proceed, select Build → Publish {ProjectName}. This would allow you to select from a bunch of options, what you want to do. Click on “Import” and then select the publish profile file, this would allow you to select the same settings that you have configured from your server.

Figure 11: Publish dialog in Visual Studio.
Select the file that you just pushed to the development environment. VIsual Studio would automatically read the file and would fill the fields.
The actual XML file content are:
<?xml version="1.0" encoding="utf-8"?>
<publishData>
  <publishProfile
     publishUrl="https://WIN-UEN6KL61CTO:8172/msdeploy.axd"
     msdeploySite="Default Web Site"
     destinationAppUrl="http://WIN-UEN6KL61CTO:80/"
     mySQLDBConnectionString=""
     SQLServerDBConnectionString=""
     profileName="Default Settings"
     publishMethod="MSDeploy"
     userName="WIN-UEN6KL61CTO\Administrator" />
</publishData>
These are the similar values that we had. Now, we can see in the following image that Visual Studio uses the same values and builds the procedure itself. It would use these values to publish the web application.

Figure 12: Settings for publish profiles in Visual Studio.
It is not required, but you should at least test the connection. This would allow you to test the connection before pushing the web content to the destination.
Note that the “Password” field is empty. Password was not sent on the wire. We are required to enter the password for that user account; that server password. This step depends on how you design the system to publish the web application, if you use another account which doesn’t require the password, this would be a stupid idea in my opinion. So always keep an account (also, remember to keep an account other than the Admin account) and use its credentials. Use SSL to transfer the content on your production servers. After that, you should be able to submit the web application to the server.
Tuning and configuring
Not all the times a web application would work in its first attempt. You will face many problems, many hurdles. There are many good communities available which you can use to ask for help when you run into trouble. Just ensure that you understand what runtime is your application asking for, and which is available and much more.
I won’t write the ASP.NET code here, instead I will just show the default page content that my application has, before I actually show the rendering result of that page.
<p style="font-size: 10em;">Welcome :-)</p>
That would be enough to test the application.
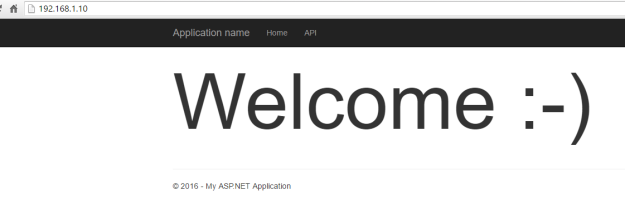
Figure 13: Welcome message shown on the homepage of website.
As expected, notice two things.
- The IP address that we had set up for the server.
- Message that we had wanted to be shown on the browser screen.
This shows that we have now set up the server as we would want to. We can now continue to add more features to it and keep working on them to bring them to devices.😉 Also, did you notice that I also have API in the navigation menu. It means that I will also post stuff about consuming the Web API through native mobile devices. Many things are coming during these 2 months. I would like you guys to let me know if you find that I have missed something from the post.
Points of Interest
I did have to go through a few problems, because of the resources being locked by IIS. Then there were a few problems with the .NET framework mismatch. Anyways, the process was very simple, robust and fast. I enjoyed building the server and the consumption of the web application.
I did not introduce database usage, authentication, which will be handled later in other posts. However, this post was just intended to explain the basic concepts of building up your own custom server for your own purposes. I will be posting other stuff that I find interesting in this process. I am also going to write it up as a guide that you may want to download later from C# Corner. I really like their way of publishing the content, you can get more of their eBooks from their community website.
I hope, you find this post interesting and simple to grasp. Phew! See you next time.
