Introduction
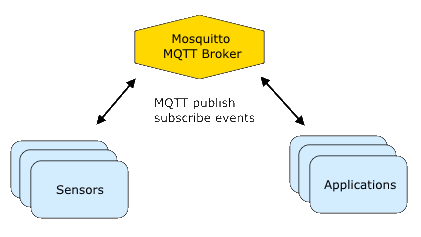
In this, the second article in an ongoing series dedicated to the amazing Raspberry Pi we will be configuring the Pi as an MQTT message broker using Mosquitto. Mosquitto is a lightweight, but powerful publish/subscribe model messaging system that can be installed on a wide varieity of platforms. Our goal in this tutorial is to install, configure and test the software on a Rasspberry Pi 2 and to be able to publish and subscribe to messages on not only the Pi but other copmputers as well.

If you haven't read the first article describing how to load and configure the Operating System you can find it at Raspberry Pi 2, 1 of n - Initial setup or on Code Project . While not required reading I would encourage you to check it out if you are new to Linux or the Pi.
This article is more or less a transcript of the steps I used to set up the Raspberry Pi as an MQTT message broker using Mosquitto. I used the tutorial at SwitchDoc Labs[3] as a reference but modified it to suit my particular needs. In future articles I plan on hanging various devices such as; the ESP8266-12E WiFi module, embedded processor boards such as the Arduino UNO and possibly others, and will hopefully get around to doing it this summer while it's to hot to hike and camp.
Environment
The development environment that I have set up for this project is;
- Windows Desktop runnng a 64-bit Windows 7 OS with an AMD-FX-8350 8 core processor and 32GB of memory.
- Raspberry Pi 2, BCM2709 ARMv7 4-core with 1GB RAM running the Raspian Jesse operating system. There is a new Raspbian Jessie Lite version available at the download site that I originally loaded and configured for this project but it doesn't have a GUI and I plan on using NginX and WebSockets in future articles to provide a front end for controlling various devices so I reverted to using the full version and just stripped the junkware out of it. WiFi on the Pi is provided by a edimax dongle .
- VirtualBox VM running Ubuntu 12.04 LTS that I configured nearly identically to the Pi with but a few items modified that were specific to Ubuntu. Although I have set this up for my own use I will not go into the mechanics of how I did it, I will leave that to you as an extra credit exercise. Good luck grasshopper!
Prerequisite - Setting static IP address
Although this step is optional I highly encourage you to set a static IP address on the Pi[8,11]. If you don't the Pi may select a different IP address when booted and it would be a PITA to have to edit the configuration files every time you boot your Pi. For me it was a painless procedure using an inexpensive edimax dongle. If you're willing to wait an 802.11 dongle may be purchased through ebay for about $2 per unit. I ordered a few of them and they worked fairly well, although I haven't determined if I would use them in a production environment yet.
The procedure described here uses the edimax dongle but should work for any compatible WiFi dongle supported by the Pi. Before we can edit the system files required to configure our network we need to gather some information.
#To display current network info type;
ifconfig
The output should look similar to this;
wlan0   Link encap:Ethernet HWaddr b8:27:eb:a8:cf:a4
        inet addr:192.168.254.20 Bcast:192.168.254.255 Mask:255.255.255.0
        UP BROADCAST RUNNING MULTICAST MTU:1500 Metric:1
        RX packets:161 errors:0 dropped:0 overruns:0 frame:0
        TX packets:227 errors:0 dropped:0 overruns:0 carrier:0
        collisions:0 txqueuelen:1000
        RX bytes:26075 (25.4 KiB) TX bytes:46356 (45.2 KiB)
The inet addr and Mask values are what we're looking for and in my case the addres is 192.168.254.20 and the Mask is 255.255.255.0 which it will be in most cases. Next we need to find the gateway address.
#To display network gateway address type;
netstat -n -r
The output should look something like this;
Kernel IP routing table
Destination     Gateway         Genmask         Flags   MSS Window  irtt Iface
0.0.0.0         192.168.254.254   0.0.0.0         UG        0 0          0 eth0
192.168.254.0     0.0.0.0         255.255.255.0   U         0 0          0 eth0
and from this we get that the Destination or network address is 192.168.254.0 and the gateway address is 192.168.254.254, now we're ready to configure our network.
The first file we need to modify is the wpa_supplicant[12] file. wpa_supplicant[13] implements security protocols for wireless networks.[13]
ctrl_interface=DIR=/var/run/wpa_supplicant GROUP=netdev
update_config=1
network={
    ssid="Your SSID Here"
    psk="YourPresharedKeyHere"
}
Notice that there are no spaces in "network={", this is intentional. Replace the ssid and psk values with your wireless network values, save and close the file. I use nano to edit these files and the procedure to save and exit is ctrl+X and "Y" when asked to save the file.
Next we'll move on to the network interfaces file where we'll configure the wlan0 wireless network adapter. Use the values you collected in the preceding steps and plug them in the appropriate areas in the file as shown below.
allow-hotplug wlan0
iface default inet static
    wpa-roam /etc/wpa_supplicant/wpa_supplicant.conf
    address 192.168.254.20
    netmask 255.255.255.0
    network 192.168.254.0
    gateway 192.168.254.254
Reboot the Pi and attempt to ping from another machine or try to reach a web site using the browser of your choice. IceWeasel, which is Firefox is what comes preinstalled with Jessie. If everything went according to plan then you should be online and ready to continue on, if not revisit the preceding steps or google for the solution that fits your particular hardware configuration.
Installing Mosquitto
Installing Mosquitto is fairly straight forward and we will be configure the broker to listen on port 1883 for testing, it defaults to port 80.
Open a terminal on the Pi and enter the following commands one at a time.
sudo wget http:
sudo apt-key add mosquitto-repo.gpg.key
cd /etc/apt/sources.list.d/
sudo wget http:
sudo apt-get update
sudo apt-get install mosquitto mosquitto-clients
- wget[4] stands for "web get" and is a utility that recursively downloads files and directory structure from a web site. In this case we're getting a GPG, Gnu Privacy Guard Key that allows the provider to encrypt and sign your data and communication using a verstaile key system.
- apt-key[3] is used to manage the list of keys used by apt, the Advanced Packaging Tool to authenticate packages.
- Change Directory and make the repository available to apt.
- Get the repository file, which contains a link to the URL to download the package from.
- Update apt information using apt-get[5]
- Finally install Mosquitto and clients. The clients provide the mosquitto_pub and mosquitto_sub utilities. We'll be using these later in the testing phase!
If all went according to plan Mosquitto should be installed and by default will be started and since we need to configure it we will need to stop it. Refer to the next section to learn how to stop Mosquitto.
Starting/Stopping Mosquitto
When the Pi boots up it automatically starts Mosquitto so we want to learn how to start, stop and restart the application.
#To start the Mosquitto service
sudo /etc/init.d/mosquitto start
#To stop the Mosquitto service
sudo /etc/init.d/mosquitto stop
#To restart the Mosquitto service
sudo /etc/init.d/mosquitto restart
Configuration Prerequisite - Install mqtt_spy
This is also an optional step but I found the mqtt_spy[7] utility to be invaluable in the configuring/testing phase. mqtt-spy is a JavaFX application, so in theory should work on any operating system with an appropriate version of Java 8 installed.
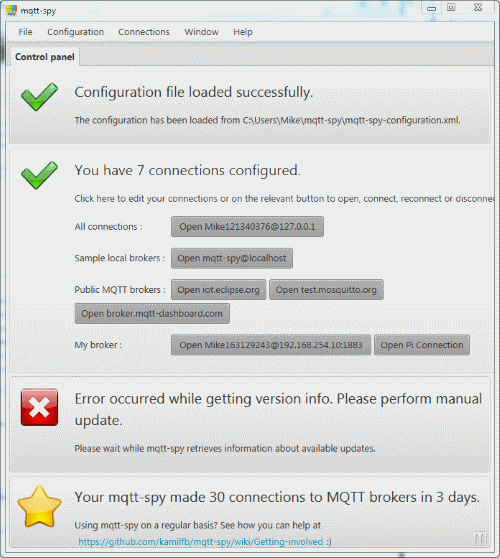
When mqtt_spy first starts up the user is presented with the following window in which a sharp observer will notice that the application thinks that the version I have is not current, but it is? Anyway the section that shows the connections configured is what we are primarily concerned with. The app comes preloaded with several common configurations such as localhost, etc.

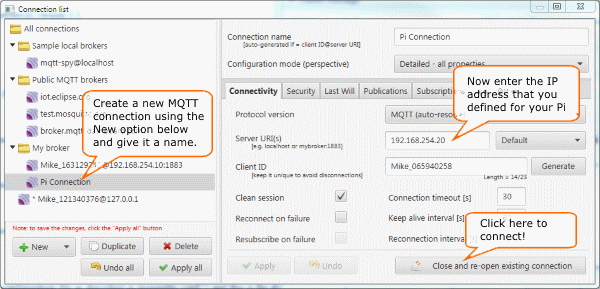
To configure a connection for our purposes select the Connections=>New Connection menu item from the main menu. This will display the window shown and enter the information that is pertenant to your configuration and save with an appropriate name.

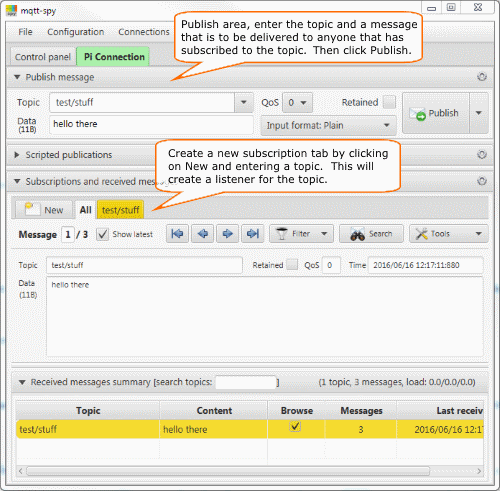
Once the connection is established we can get down to business. As described earlier in this tutorial the MQTT protocol is a publishsubscribe model and as such the window shown below is devided into 2 sections; the top is the publish section and the bottom the subscribe section.
First let's create a new subscription by clicking on the New button and enter the topic information in the dialog that pops up, when you've entered the topic click the subscribe button.
Next we are going to publish a message to the topic we just configured so in the publish section enter the topic, a message and click the Publish button. The message should be displayed in the Data textbox in the Subscription section. Voila that's all there is to it, ain't it cool?

I will refer to the mqtt_spy utility thoughout the remainder of this tutorial if you didn't install it ignore it as I will also supply the Mosquitto client command line commands to test the configuration from a Linux terminal. When configuring mqtt_spy click on the connection button in the main window to disconnect, this will cause the button to turn red, make the appropriate changes then click on the connection button again and if the connection is succesful the button will turn green.
Configuring Mosquitto
In the following sections we will discuss the various ways that Mosquitto may be configured to run and the techniques in which we will use to test the configuration. When Mosquitto starts it looks in the /etc/mosquitto/conf.d directory for any files[10] with the .conf extension and if found uses them to configure Mosquitto. We will create a file /etc/mosquitto/conf.d/mosquitto.conf and enter the data outlined in the code sections that follow.
Configuring Mosquitto - no security
This is the basic configuration with no security, listening to IP address localhost on port 80. Edit the /etc/mosquitto/conf.d/mosquitto.conf file, using the editor of your choosing, save and restart Mosquitto.
# Boolean value that determines whether clients that connect without providing a username are
# allowed to connect. If set to false then another means of connection should be created to
# control authenticated client access. Defaults to true.
allow_anonymous true
#
# Listen for incoming network connection on the specified port. A second optional argument
# allows the listener to be bound to a specific ip address/hostname. If this variable is used
# and neither the global bind_address nor port options are used then the default listener will
# not be started.
# listener port [bind address/host]
listener 1883 192.168.254.20
Testing Mosquitto configuration - no security
Using the mqtt_spy utility just enter the IP address in the Server URI textbox, apply and connect. Then go to the pub/sub window and enter the appropriate information.
When testing from the command line you will need to open 2 windows; one for publishing and another for subscripting. Enter the following where topic = 'hello/world' on port 1883.
#In the publish terminal window
sudo mosquitto_pub -d -t hello/world -m 'The message'

#In the subscribeterminal window
sudo mosquitto_sub -d -t hello/world
Configuring Mosquitto - with password authentication
In order to use password authentication we need to edit the mosquitto.conf file and add the password_file directive with the path to the pwfile.
# Boolean value that determines whether clients that connect without providing a username are
# allowed to connect. If set to false then another means of connection should be created to
# control authenticated client access. Defaults to true.
allow_anonymous false
#
# Listen for incoming network connection on the specified port. A second optional argument
# allows the listener to be bound to a specific ip address/hostname. If this variable is used
# and neither the global bind_address nor port options are used then the default listener will
# not be started.
#listener port [bind address/host]
listener 1883 192.168.254.20
#
# Set the path to a password file. If defined, the contents of the file are used to control
# client access to the broker. The file can be created using the mosquitto_passwd(1) utility.
# If mosquitto is compiled without TLS support (it is recommended that TLS support is
# included), then the password file should be a text file with each line in the format
# "username:password", where the colon and password are optional but recommended.
# If allow_anonymous is set to false, only users defined in this file will be able to connect.
# Setting allow_anonymous to true when password_fileis defined is valid and could be used with
# acl_file to have e.g. read only guest/anonymous accounts and defined users that can publish.
#password_file file path
password_file /etc/mosquitto/pwfile
Next we need to create the pwfile using the mosquitto_passwd utility, do so by entering the following in a terminal window.
sudo mosquitto_passwd -c /etc/mosquitto/pwfile username
You will be prompted to enter a password and another to confirm.
Mosquitto Testing - with password authentication
Using mqtt_spy select the menu option Connections=>Manage Connections, then select the Security tab, the the User auth. tab. Check the Enable User authentication cehckbox and enter the username passwords that you used when configuring the pwfile. Then connect and configure the pub/sub infommation.
Using the pub/sub terminals enter the following commands;
#In the publish terminal window
sudo mosquitto_pub -d -t hello/world -p 1883 -u 'username' -P 'password' -m 'The message'

#In the subscribeterminal window
sudo mosquitto_sub -d -t hello/world -p 1883 -u 'username' -P 'password'
Summary
I found Mosquitto easy to work with, powerful with plenty of documentation and tutorials enough to get me started and intuitive enough that I could install and configure it in a short period of time. Did it serveral times for this tutorial and it was a snap, therefore my intention is to use this in future articles and the home IoT project that will be the ultimate goal of this series.
References
[1]mosquitto.org, Mosquitto, An open source MQTT v3.1/v3.1.1 Broker
[2]raspberry.org, Raspbian Jesse Lite
[3]switchdoc.com, Tutorial: IOT / Installing and Testing Mosquitto MQTT on the Raspberry Pi
[4]computerhope.com, Linux and Unix wget command
[5]man.he.net, apt-key reference
[6]help.ubuntu.com, Apt-Get
[7]github.com, mqtt_spy
[8]jeffgeerling, Setting a Static IP address with Raspbian Jessie Lite on the Raspberry Pi
[9]mosquitto.org, documentation
[10]mosquitto.org, conf file documentation
[11]modmpi.com, Tutorial - How to give your Raspberry Pi a Static IP Address
[12]wi.fi, Example wpa_supplicant configuration file
[13]wikipedia.org, wpa_supplicant
[14]github.com, kamilfb/mqtt_spy
