Introduction
In this article, we quickly look into how to build Angular component to use HTML control and bind it to model. Before starting with this article, I would recommend you setup your development for Angular 2 and download the source code from my previous article available here.
I would like to get feedback on this article. Please feel free to share your comments or you can also email me at shettyashwin@outlook.com. If you like this article, please don't forget to rate it.
Prerequisites
Angular 2 development environment and source code available here.
Let's Get Started
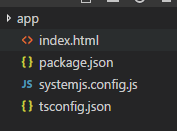
Ok, let's get started. Copy the source from my previous article source code (app, index.html, package.json, systemjs.config.js, tsconfig.json) to new folder. I have created a folder with name firstComponent and moved my source code here. Your folder should look like this:

Since in this article, we are dealing with HTML input control, we need to add forms component to our app. Open package.json in an editor and @angular/forms to dependencies section.
"@angular/forms": "~2.4.0",
We need to map this dependency with systemjs. Open systemjs.config.js in an editor and add angular/forms mapping in the map section.
'@angular/forms': 'node_modules/@angular/forms/bundles/forms.umd.js',
Run npm update command to get the npm packages. Since we have just added dependencies, npm update will resolve forms dependencies. We now have the required dependencies, let's create a control which takes student's first name, last name & age as an input and displays the same value below. We will name this control as student-form. Create a folder view at root and add student-form.html inside it. Below is the HTML syntax for the same.
<div>
    Student First Name :- <input type="text"><br/>
    Student Last Name :- <input  type="text"><br/>
    Student Age :- <input  type="text"><br/>
</div>
At line 2, 3 & 4, we have textbox in which user will fill in details. We need to map this textbox to a model inside the app folder. Create a new file with name student.model.ts inside app folder. Copy the following source code to student.model.ts.
export class StudentModel {
    FirstName : string = "";
    LastName : string = "";
    Age : number = 0;
}
We are using an export keyword here to make sure this class is accessible outside. To map model, View and logic, we will be creating a new student.component.ts. This will have a mapping to component logic, model & HTML.
import { Component } from '@angular/core';
import { StudentModel } from './student.model'

@Component({
  selector: 'student-form',
  templateUrl: '../view/student-form.html'
})

export class StudentComponent {
    Student : StudentModel = new StudentModel();
}
At line 2, we are loading and mapping student model to StudentModel object. Using @component, we are defining component name and HTML template at line 5 & 6. At line 9, we are mapping StudentModel object to Student which will be accessible at the view level. We are using an export keyword to make StudentComponent accessible outside. We need to map this component to Module which will work as a collection of components, it is similar to namespace that we have in Dotnet and package in Java.
Create a new file inside app folder with name student.module.ts and add the following code to it:
import { NgModule }      from '@angular/core';
import { BrowserModule } from '@angular/platform-browser';
import { StudentComponent }  from './student.component';
import {FormsModule} from '@angular/forms'

@NgModule({
  imports:      [ BrowserModule, FormsModule],
  declarations: [ StudentComponent ],
  bootstrap:    [ StudentComponent ]
})

export class AppModule { }
At line 3, we are importing and mapping student component. We need to mark form dependency to our component, so at line 4, we have imported formsModule and injected the same at line 7. StudentComponent also needs to be updated at declaration and bootstrap level. We will also have to update main.ts with the newly added module. Below is the update main.ts.
import { platformBrowserDynamic } from '@angular/platform-browser-dynamic';
import { AppModule } from './student.module';

platformBrowserDynamic().bootstrapModule(AppModule);
At line 2, we have mapped student.module. Time to update student-form.html and map it to student model. We will be using ngmodel to map model to a textbox and curly bracket to render text at the bottom of control.
<div>
    Student First Name :- <input [(ngModel)] = "Student.FirstName" type="text"><br/>
    Student Last Name :- <input [(ngModel)] = "Student.LastName" type="text"><br/>
    Student Age :- <input [(ngModel)] = "Student.Age"  type="text"><br/>

    {{Student.FirstName}}<br/>
    {{Student.LastName}} <br/>
    {{Student.Age}}
</div>
I have highlighted text which needs to be updated. Below is the final folder structure.

Finally, we need to update our component name in index.html. Replace my-app with student-form. Here is the updated HTML.
<html>
<head>
  <script src="node_modules/core-js/client/shim.min.js"></script>
  <script src="node_modules/zone.js/dist/zone.js"></script>
  <script src="node_modules/reflect-metadata/Reflect.js"></script>
  <script src="node_modules/systemjs/dist/system.src.js"></script>
  <script src="systemjs.config.js"></script>
  <script>
    System.import('applicationStartup').catch(function (err) {
      console.error(err);
    });
  </script>
</head>
<body>
  <student-form>Loading...</student-form>
</body>
</html>
Now to see final output, open command prompt, navigate to root folder and execute npm start. You should now be able to see textbox control and on typing text inside textbox, you should be able to see typed text at the bottom of the page.

Reference
