What is Binding?
Data binding is a mechanism that was used by Angular2 for showing data on the UI and receiving input from user. So the logic of component (class in ts file) can interact with the UI (HTML/ template file) easier.
Ok, Can You Show Me How to Display Data on UI?
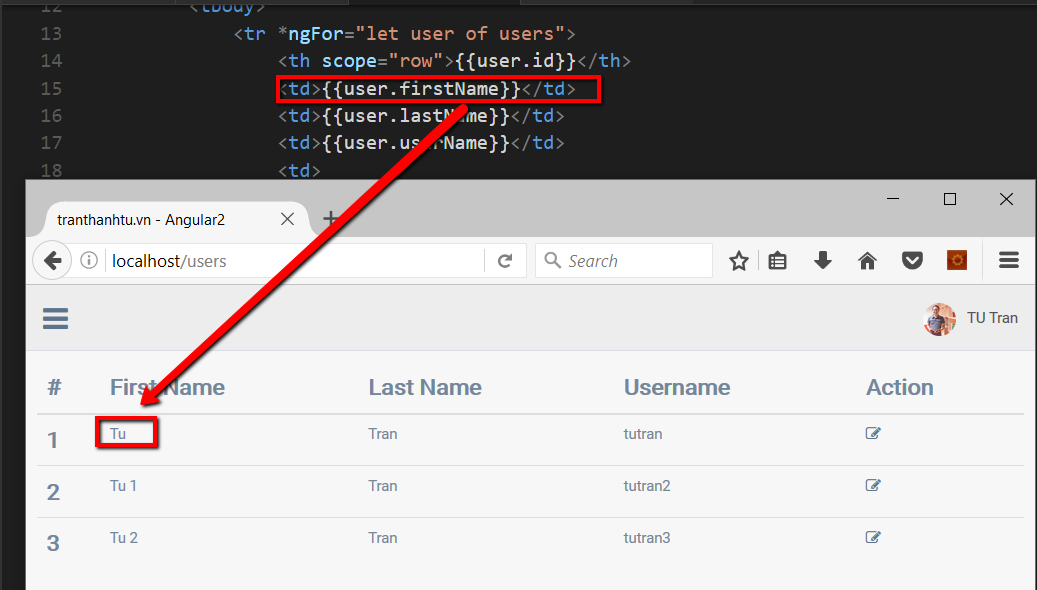
Look at users.html file, there is a loop statement, looping through the collection of data and printing it out to the browser:
<tr *ngFor="let user of users">
	<th scope="row">{{user.id}}</th>
	<td>{{user.firstName}}</td>
	<td>{{user.lastName}}</td>
	<td>{{user.userName}}</td>
	<td>
		<a title=""><i class="fa fa-edit"></i></a>
	</td>
</tr>
In this code, we use {{user.userName}} for showing value of userName to UI or one-way binding.
How Many Types of Data Binding Can We Use in Angular2?
Mostly 3 types were used. They are:
- One way binding: For showing data on UI only.
- Two-way binding: This is for showing data on UI and receiving back modified data from UI.
- Event binding
Can You Explain More About One-way Binding?
In one-way binding, we mostly use this for displaying data to the UI.
We use "{{name_of_variable}}" pattern for this case.
As a sample above, in users.html file, we show the firstName of user by "{{user.firstName}}" pattern.

Is There Any Other Way For Showing Data to UI (One-way Binding)?
Beside using "{{}}", we can use "[name of property]='value'" pattern.
In the sample below, I change from:
<td>{{user.firstName}}</td>
to:
<td [innerText]="user.firstName"></td>
And the output in the browser is the same:

Look closer at the generated HTML, we have:

We see that the generated HTML for "First Name" is not the same with HTML for "User Name" (and others).
For some cases, we can use this and update other attributes of generated element as:
<td [style.backgroundColor]="user.color" [innerText]="user.firstName"></td>
This will change the UI to:

We Have 2 Ways for Using One-way Binding, When Should I Use the First or Second?
Each type of binding has it own purpose.
For the first type of binding, we should use for those cases:
<img src="http://tranthanhtu.vn{{user.avatar}}" />
We can also do this using the second type of binding. But it is more complex.
For the second type of binding, we should use for those cases:
<td [style.backgroundColor]="user.color"></td>
For those cases, we cannot do it by using the first.
What About Two-way Binding?
We use two-way binding for displaying data on UI and receive the user input.
As sample below, we will display the summary of the selected user. First name and last name of selected user can be edited. Those changes will be updated immediately.
In users.html, add this HTML below the "edit" icon:
<a title="" (click)="onPreviewClicked(user)">
<i class="fa fa-eye-slash"></i></a>
In Users class (in users.ts), we have:
export class Users {
    public currentSelected: any = null;
    public onPreviewClicked(user: any) {
        this.currentSelected = user;
    }
}
We also add this HTML below the current table in users.html:
<div *ngIf="currentSelected">
	<h3>Summary of {{currentSelected.firstName}}</h3>
	<form class="form-horizontal form-label-left">
		<div class="form-group">
			<label>First Name</label>
			<input class="form-control"
			[(ngModel)]="currentSelected.firstName" name="first" />
		</div>
		<div class="form-group">
			<label>Last Name</label>
			<input class="form-control"
			[(ngModel)]="currentSelected.lastName" name="last" />
		</div>
	</form>
</div>
When you click on the "Preview" icon. "First name" and "Last name" of selected user will be displayed:

Your change will be updated automatically:

In summary, we use [(ngModel)]="currentSelected.firstName" for two-way binding data between UI and logic of component.
How About Event Binding?
In the above sample, we bind (click) event to "onPreviewClicked" method in component.
We use this format (click)="onPreviewClicked(user)" for binding event as in:
<a title="" (click)="onPreviewClicked(user)">
<i class="fa fa-eye-slash"></i></a>
Ok, I Understand, Can You Help Me Summarize Binding in Angular?
We have 3 types of binding:
- One-way binding: for showing data to UI
- Two--way binding: for showing data to UI and input from user
- Event binding: Use this for binding specified event, such as: (click), ....
Thank for reading.
Note: Please like and share with your friends if you think this is a useful article, I would really appreciate it.
