Introduction
My company needed me to programmatically add a custom paper size (a printer form) to the default printer and set the printer to use the custom paper size. After looking around, the best alternative we could find was to make use of the printing and print spooling Win32 API functions found in winspool.drv. The functions used in the project are AddForm, DeleteForm, DocumentProperties, GetPrinter and SetPrinter along with some others. The target platform is WinNT / 2000 / XP although there was already some support for earlier versions of Windows added before I began working on the project. I've never tried to use that section of code but I'm pretty sure that it will only add the custom paper size and not set the printer to use it.
Challenges
Calling these from C# required a little bit more knowledge of marshaling techniques than I had under my belt as I was only able to get as far as getting a handle to the default printer using the winspool functions GetDefaultPrinter and OpenPrinter before requiring some help. At that point, we opened a support case with Microsoft and they sent a nice C# project with the working AddForm calls. However, when we asked about setting the printer to use the newly created form, the best they could do was provide a VB.NET project. So, I ported VB.NET over to C#. Our last requirement was to signal the previously open applications of the settings change and this was done using SendMessageTimeout from user32.dll.
Implementation
Rather than make a call to the Win32 GetDefaultPrinter function (which you have to call twice, once to get the size of the string and another time to get the string) there is an easier way to get the default printer name provided in the .NET platform:
using System.Drawing.Printing;
...
PrintDocument pd = new PrintDocument();
string sPrinterName = pd.PrinterSettings.PrinterName;
After getting the printer name, get a handle to the printer:
bool bGotPrinter = OpenPrinter(printerName, out hPrinter, ref defaults);
At this point, we can delete the custom paper size by name:
DeleteForm(hPrinter, paperName);
And create the paper size:
FormInfo1 formInfo = new FormInfo1();
formInfo.Flags = 0;
formInfo.pName = paperName;
formInfo.Size.width = (int)(widthMm * 1000.0);
formInfo.Size.height = (int)(heightMm * 1000.0);
formInfo.ImageableArea.left = 0;
formInfo.ImageableArea.right = formInfo.Size.width;
formInfo.ImageableArea.top = 0;
formInfo.ImageableArea.bottom = formInfo.Size.height;
Add the paper size to the printer's list of available paper sizes:
bool bFormAdded = AddForm(hPrinter, 1, ref formInfo);
I'll leave setting the printer to use the newly added form and signaling open apps of the settings change out for now. Have a look at the demo project, it's all there.
Caveat
This project is currently set up to add a custom paper size of 104 mm*4000 mm to the default printer. It attempts to do this in the Form1_Load event of Test.cs. If you run this on a computer with a default printer that doesn't support these dimensions, the paper size will not show up in the list of available paper sizes for your default printer and no exceptions will be generated. If you'd like to test run a test that will work, specify a smaller paper size that your printer will support. You can convert millimeters to inches by multiplying the millimeters by 25.4. I didn't take the time to add any 'add custom paper size in inches' functionality to this project. It could be done very easily by dividing the inches by 25.4 and passing off to the 'add custom paper size by mm' function which already exists.
Check to See If It Worked
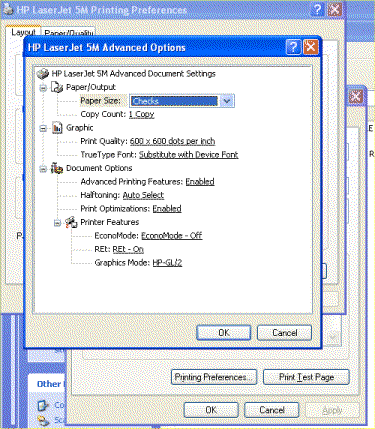
The project is set to open small form with single 'Open Dialog' button after adding the custom paper size. Clicking the button opens a print dialog window. To see the list of available printer sizes for the default printer, click the properties button (opens the Properties window) and then the advanced button (opens advanced options window). You can now see the list of available paper sizes for the printer.
To check that it worked from Windows XP, open the printers and faxes window (start menu, printers and faxes), right click on your default printer (the one with the check box next to it) and select properties (opens Properties window), click the printing preferences button (opens Preferences window), click the advanced button (opens Advanced Options window) and then you can see a list of paper sizes.
License
This article has no explicit license attached to it, but may contain usage terms in the article text or the download files themselves. If in doubt, please contact the author via the discussion board below.
A list of licenses authors might use can be found here.
