Introduction
In previous article we have learned create a real-time chat application using SignalR and Bootstrap, till now we learned creation of group chat, Creation of Private Chat, Title Bar Notification Alert system, Message Count and Clear Chat History. And now we are going to learn most trending feature in Chat Application which is “Emoji” or “Smiley” which make our application more interactive. And another important and useful feature sending attachments through chat, in file attachment we can send pictures/images, Word, PDF, Excel and text file. And also we can show/download the pictures/document files.
Emoji is a small digital image or icon used to express an idea or emotion in electronic communication, emoji liven up your text messages with tiny smiley faces. We are going to learn implementation of Emoji in easiest way. There are number of Emoji Package available, but here we are going to integrate “EmojinOne”. In my opinions this is the best smiley package which is easily available on web. And also we are going to implement “SlimScroll” Jquey Plugin which provides interactive content scrollbar.
For those who missed the First article please refer the article “SignalR Chat App With ASP.NET WebForm And BootStrap - Part One” and you can also download the project file.
For those who missed the last article please refer the last article “SignalR Chat App With ASP.NET WebForm And BootStrap - Part Two” and you can also download the project file, so we will continue with the last article’s project file.
Integration of Emoji:
As we are going to continue with our last project file, first we will integrate the Emoji, and it’s required the following reference files:
- emojionearea.js
- emojionearea.css
- emojionearea.min.css
You can download Emoji Reference files which is available on cdnjs.com. Add CSS files in “Content” directory and Javascript files in “Scripts” Folder. After adding these files in project, add these files in “Chat.aspx” Design Page inside the header tag.
<!--
<link href="Content/emojionearea.min.css" rel="stylesheet" />
<script src="Scripts/emojionearea.js"></script>
After adding these files, now we have to define Emoji area from where we can add emoji, so here we are defining message textbox as Emoji area. Simply writing the Jquery function as follow:
$(function () {

       $("#txtMessage").emojioneArea();

 });
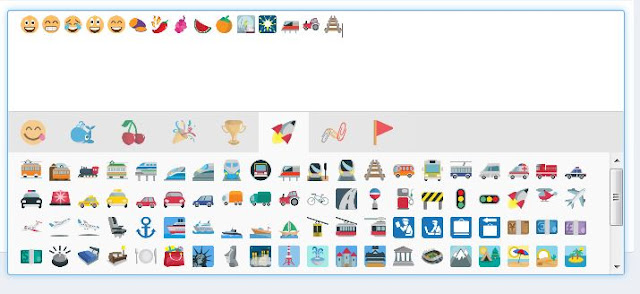
Now run your project you will see the Emoji Box with Message Textbox look like as follow:

Same we have to apply with Private Chat Box; we are creating private chat Box Dynamically and embedding this code using Jquery, so we have to define the code dynamically because each time the Id of ChatBox Div will change so on the basis of dynamic id we have to find the Message Textbox and apply the function:
$('#PriChatDiv').append($div);
var msgTextbox = $div.find("#txtPrivateMessage");
$(msgTextbox).emojioneArea();
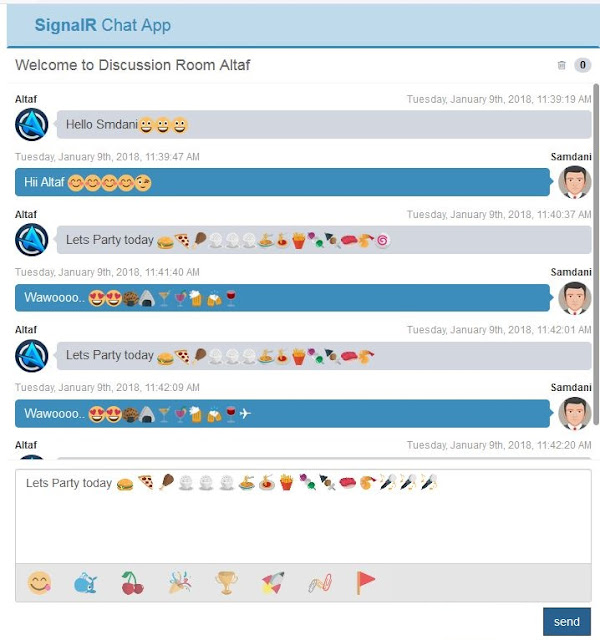
Again run the project and the see the output Emoji will apply in private chat box too. Now we have to parse these emoji in our chat, when we received the message which contains Emoji it get parsed, there are few methods of conversion / parsing of emoji here we are using “.unicodeToImage(str)” method for parsing emoji, it will convert smiley Unicode into image.
function ParseEmoji(div) {
            var input = $(div).html();

            var output = emojione.unicodeToImage(input);

            $(div).html(output);
        }
Here we are using online Emoji image resources, if you want to use these resources locally, then you have to download the EmojiOne Smiley Package and change the resource path in “emojionearea.js” file.
Example:
var cdn_base = "https://cdnjs.cloudflare.com/ajax/libs/emojione/";
If we use these resources locally it will increase your app performance by decreasing the loading time of images. The output after adding Emoji will look like as follow:

Adding Feature of Sending Picture / File Attachment:
Send Picture files through the chat, it will add extra ordinary feature to our app, we can send images, word, document, Text file, PDF File and Excel file. Here we are adding separate button for send attachment, we will use Ajax Tool “AsyncFileUpload”. So here we need to add AjaxToolkit in our project reference, we have already explained adding package in project using Nuget Package Manager in previous article. So add the package using Nuget Package Manager:
PM> Install-Package AjaxControlToolkit -Version 17.1.1
Now write the code for Attachment button, As we are using AsyncFileUpload for file upload but we are not showing it as we are wrapping File Upload inside the button, so user can only see the button and when it click on attachment button FileUpload events will fired, the design code for attachment button:
<span class="upload-btn-wrapper">

     <button id="btnFile" class="btn btn-default btn-flat"><i class="glyphicon glyphicon-paperclip"></i></button>

       <ajaxToolkit:AsyncFileUpload OnClientUploadComplete="uploadComplete" runat="server" ID="AsyncFileUpload1" ThrobberID="imgLoader" OnUploadedComplete="FileUploadComplete" OnClientUploadStarted="uploadStarted" />

   </span>
There are Three Events generated by the “AsyncFileUpload” while click on FileUpload, in which two events are Client Side event and one is Server Side event, “OnUploadedComplete” is the server side event where we are storing files in a particular directory:
protected void FileUploadComplete(object sender, EventArgs e)
{
    string filename = System.IO.Path.GetFileName(AsyncFileUpload1.FileName);
    AsyncFileUpload1.SaveAs(Server.MapPath(this.UploadFolderPath) + filename);
}
First it will call client side event “OnClientUploadStarted”, as we are using temporary HTML image tag for display and loading the image, while loading the image we are displaying it for the time being for getting image properties which we are using further while displaying image in chat, so in this function we are clearing temporary image path:
function uploadStarted() {

   $get("imgDisplay").style.display = "none";

}
There are two functions where we are validating upload file by checking the extension of requested file, this function validate only Image and Document files, you can add some more extension as per your need, code for File Validation:
function IsValidateFile(fileF) {
    var allowedFiles = [".doc", ".docx", ".pdf", ".txt", ".xlsx", ".xls", ".png", ".jpg", ".gif"];
    var regex = new RegExp("([a-zA-Z0-9\s_\\.\-:])+(" + allowedFiles.join('|') + ")$");
    if (!regex.test(fileF.toLowerCase())) {
        alert("Please upload files having extensions: " + allowedFiles.join(', ') + " only.");
        return false;
    }
    return true;
}
Here we are separating Image file and document file as we are going to assign separate design for both, for image file we are showing image preview in chat, and for document file we just showing the document icon:
function IsImageFile(fileF) {
    var ImageFiles = [".png", ".jpg", ".gif"];
    var regex = new RegExp("(" + ImageFiles.join('|') + ")$");
    if (!regex.test(fileF.toLowerCase())) {
        return false;
    }
    return true;
}
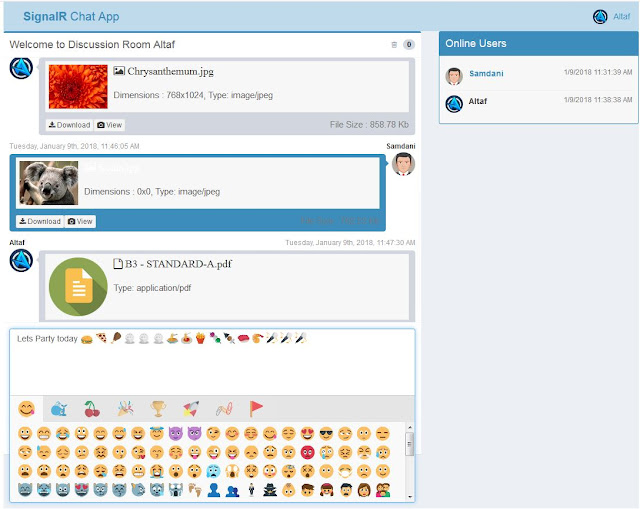
After uploading the image/ document file we displaying in chat, and also showing file properties such as file size image dimension and file type, user can view the full image also can download the image / document.
function uploadComplete(sender, args) {
    var imgDisplay = $get("imgDisplay");
    imgDisplay.src = "images/loading.gif";
    imgDisplay.style.cssText = "";
    var img = new Image();
    img.onload = function () {
        imgDisplay.style.cssText = "Display:none;";
        imgDisplay.src = img.src;
    };

    imgDisplay.src = "<%# ResolveUrl(UploadFolderPath) %>" + args.get_fileName();
var chatHub = $.connection.chatHub;
var userName = $('#hdUserName').val();
var date = GetCurrentDateTime(new Date());
var sizeKB = (args.get_length() / 1024).toFixed(2);

var msg1;

if (IsValidateFile(args.get_fileName())) {
    if (IsImageFile(args.get_fileName())) {
        msg1 =
            '<div class="box-body">' +
            '<div class="attachment-block clearfix">' +
            '<a><img id="imgC" style="width:100px;" class="attachment-img" src="' + imgDisplay.src + '" alt="Attachment Image"></a>' +
            '<div class="attachment-pushed"> ' +
            '<h4 class="attachment-heading"><i class="fa fa-image">  ' + args.get_fileName() + ' </i></h4> <br />' +
            '<div id="at" class="attachment-text"> Dimensions : ' + imgDisplay.height + 'x' + imgDisplay.width + ', Type: ' + args.get_contentType() +

            '</div>' +
            '</div>' +
            '</div>' +
            '<a id="btnDownload" href="' + imgDisplay.src + '" class="btn btn-default btn-xs" download="' + args.get_fileName() + '"><i class="fa fa fa-download"></i> Download</a>' +
            '<button type="button" id="ShowModelImg"  value="' + imgDisplay.src + '"  class="btn btn-default btn-xs"><i class="fa fa-camera"></i> View</button>' +
            '<span class="pull-right text-muted">File Size : ' + sizeKB + ' Kb</span>' +
            '</div>';
    }
    else {

        msg1 =
            '<div class="box-body">' +
            '<div class="attachment-block clearfix">' +
            '<a><img id="imgC" style="width:100px;" class="attachment-img" src="images/file-icon.png" alt="Attachment Image"></a>' +
            '<div class="attachment-pushed"> ' +
            '<h4 class="attachment-heading"><i class="fa fa-file-o">  ' + args.get_fileName() + ' </i></h4> <br />' +
            '<div id="at" class="attachment-text"> Type: ' + args.get_contentType() +

            '</div>' +
            '</div>' +
            '</div>' +
            '<a id="btnDownload" href="' + imgDisplay.src + '" class="btn btn-default btn-xs" download="' + args.get_fileName() + '"><i class="fa fa fa-download"></i> Download</a>' +
            '<a href="' + imgDisplay.src + '" target="_blank" class="btn btn-default btn-xs"><i class="fa fa-camera"></i> View</a>' +
            '<span class="pull-right text-muted">File Size : ' + sizeKB + ' Kb</span>' +
            '</div>';
    }
    chatHub.server.sendMessageToAll(userName, msg1, date);

}
imgDisplay.src = '';
}
When we click view button the image file will open in Modal popup, for this we are using Booststrap Modal, we are passing image path in button value and applying this path to the image inside the modal and then showing the modal.
$(document).on('click', '#ShowModelImg', function () {
    $get("ImgModal").src = this.value;
    $('#ShowPictureModal').modal('show');
});
When the number of message increase in ChatBox the default browser vertical scrollbar will apply to the Chatbox, but here we will add something stylish scrollbar so will add Jquery “SlimScroll” in Chatbox. Will add this through the Nuget Package Manager:
PM> Install-Package Jquery.slimScroll -Version 1.3.1
Add SlimScroll JavaScript file in header tag of design page.
<!--Jquery slimScroll -->
<script type="text/javascript" src="Scripts/jquery.slimscroll.min.js"></script>
$('#divChatWindow').slimScroll({
height: height
});
var ScrollHeight = $('#' + ctrId).find('#divMessage')[0].scrollHeight;
$('#' + ctrId).find('#divMessage').slimScroll({
height: ScrollHeight
});
We have apply SlimScroll in both chat boxes in private chat box as well as in group chat box, after applying you can see the effect of SlimScroll look like:

Output:
Now run the project and you will the final output will be look like below:

Conclusion
Here we learned the integration of Emoji in Private Chat and Group Chat with SignalR and sending attachment through chat by using Ajax Toolkit component “AsyncFileUpload”. So we learned the integration of AsyncFileUpload and its concepts such as client side events and server side event. And also Getting file Properties and displaying uploaded file properties, display image file in Modal popup, Downloading files and also Jquery Plugin “SlimScroll” Integration in Scroll bar. So this is the final article of Chat application.
Hope this will help you and you would this article, if you think we can add more feature in our this project so please suggest if I like it I will write another article with some more new features, please don’t forget to download attached Project source code for your reference and to see the complete source, thank you for reading...
Please give your valuable feedback in the comment section.
