Continuing where we left off on the previous day, we created an outline effect using shaders that will allow us to, the next thing we need to do is to be able to interact with the game object in our game, so we can highlight it and pick it up.
Today, we’re going to focus on the next steps, applying the outline effect on our Ball game object.
Let’s get started!
Applying the Outline Material to Game Objects
The first thing we need to do is create the event triggers that will run a function whenever our controller triggers an event.
We’ve looked a bit into this in the past when creating the VR FPS.
Working with our Event Trigger is straightforward, we need to:
- Specify specific even triggers like Pointer Enter or Pointer Down that’ll respond to player’s inputs.
- When events get triggered, we would run function(s) that we specified in our components.
Let’s get started on the highlighting part.
Right now, we already have a shader that will allow us to highlight our game object, but how do we interact with it? Let’s find out.
We’re going to create a simple script that will allow us that we’ll use to control our throwing coding.
For now, let’s just implement the show and hide outline material so we can set something up for our event triggers.
- Select
Ball and create a new script. Let’s call it Throwable.
Here’s what Throwable looks like:
using System.Collections;
using UnityEngine;
public class Throwable : MonoBehaviour
{
private Material _outlineMaterial;
private const string OutlineWidthKey = "_Outline";
private const float OutlineWidthValue = 0.03f;
void Start ()
{
_outlineMaterial = GetComponent<Renderer>().materials[1];
_outlineMaterial.SetFloat(OutlineWidthKey, 0);
}
public void ShowOutlineMaterial()
{
_outlineMaterial.SetFloat(OutlineWidthKey, OutlineWidthValue);
}
public void HideOutlineMaterial()
{
_outlineMaterial.SetFloat(OutlineWidthKey, 0);
}
}
Looking at the Variables
We have three fields that we are introducing:
private Material _outlineMaterial – holds a reference to our outline material that we want to change.private const string OutlineWidthKey = “_Outline” – a constant we use to reference the width outline material we use for our shader.private const float OutlineWidthValue = 0.03f – a constant used to reference the size that we use for the shader. In this case, we set it to be 0.03f.
Now before we move on, where did I get the value _Outline from in my code? Good question!
It turns out that when we create shaders in Unity, we can reference the variables used for our shader from our material.
In our case, if we look at our Shader (either at the code or as the shader attached to the material), you’ll see that we actually have 2 variables. Specifically, here’s the code snippet:
Shader "Outlined/Silhouette Only" {
Properties {
_OutlineColor ("Outline Color", Color) = (0,0,0,1)
_Outline ("Outline width", Range (0.0, 0.03)) = .005
}
What we’re looking at is _OutlineColor to reference our color and _Outline to reference our width.
Walking Through the Code
Now let’s go through the code. There’s nothing too complex with this… yet!
- As usual, in
Start() we initialize our code. There’s nothing new here. We get our outline material (which we set it as the 2nd material in our game object) and we set the outline width to be 0. More on this later. - Next, we have a
public function called ShowOutlineMaterial(), this function is used for us to set our outline border to be our constant width. Specifically, because the value we set out outline width in our shader is a float, we just call setFloat(“key”, “value”) on our material to set the value. HideOutlineMaterial() is the opposite of the previous function. It is used to hide our outline.
Using Our Throwable Script
Now that we have a basic script to trigger, let’s add them into our game.
- In
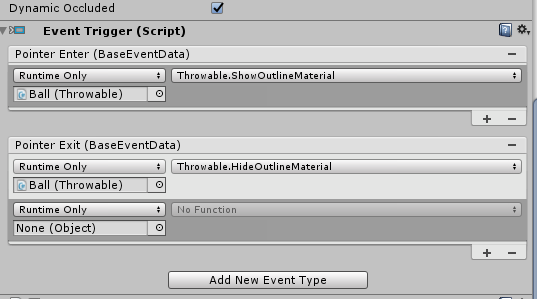
Ball, add a new Event Trigger - In the Event Trigger script component, click New Event Trigger and add Pointer Enter and Pointer Exit.
- Now we need to add the reference to our functions in. For Pointer Enter, click the exit button and then hit the + button to add the associated game object and script to use. Select
Ball as the game object. For the function, select Throwable > ShowOutlineMaterial. - Next, we need to do something similar for Pointer Exit and select
Ball as the game object and select Throwable > HideOutlineMaterial.
When we’re done, we should have something like this:

Now if we were to go ahead and play the game, whenever we move our pointer to the ball, we’ll show our outline effect and whenever we were to leave the pointer, the outline would disappear.

Neat, right?
Note: Please ignore the blue color. I didn’t like how we had a white floor when I was experimenting with things and decided to create a Blue material and dragged it to the floor to change the color. This was purely an aesthetic change and not anything else.
Conclusion
After today, we now know how to apply materials on to game objects, specifically the outline material we created in the previous post.
Alongside of that, we refreshed again on how we can use the Event Triggers to allow us to easily interact with the game objects. It’s just that useful!
Now that we have the highlighting done, in the next post, we’re going to finally learn how to grab and throw the object in our game! See you then!
