Introduction
One of my favourite desktop gadgets is/was Google Deskbar, but because Google staff decided to stop its development, I've decide to build up a clone of it.
Looking at its GUI, the first problem that emerges is the toggle like button for menu displaying. I've Googled a lot seeking a similar if not equal component but without success, so I've started to think about the way that I must follow to develop a component with the same look and feel.
A first choice was, naturally, to use a ToggleButton but also this component is not directly available in .NET, but only as a COM component. Using a COM component can, if not needed, reduce the cleanness of the code. Some tests have revealed that a component with a toggle-like feel is available as a special appearance of a checkbox. So we can start coding...
The Code
public partial class ButtonMenu : CheckBox
In the constructor, I set up basic look oriented properties:
this.Appearance = Appearance.Button;
this.TextAlign = System.Drawing.ContentAlignment.MiddleCenter;
this.FlatStyle = FlatStyle.Popup;
Using CheckBox as base class grants me the ability to reduce the code I need to write to reach my goal. The only code I need to add will be menu-specific.... Well put in this menu!
private ContextMenuStrip menu=null;
public ContextMenuStrip Menu
{
get
{
return menu;
}
set
{
if(menu!=null)
menu.Closed -= menu_Closed;
menu = value;
if(menu != null)
menu.Closed += menu_Closed;
}
}
Using a property gives me two advantages:
- I can change it at design time
- I can administer in a simple way the adding and the removing of event handler
In the precedent code, we have introduced the method menu_Closed. It's something like:
private bool frombutton = false;
void menu_Closed(object sender, ToolStripDropDownClosedEventArgs e)
{
if(!frombutton)
Checked = false;
}
The boolean flag frombutton is used to check the reason of menu closing, in details it's true if menu has been closed due to a button event and it's false if it's closed by focus lost. The main method is simple... after you have understood the behavior of the Show method:
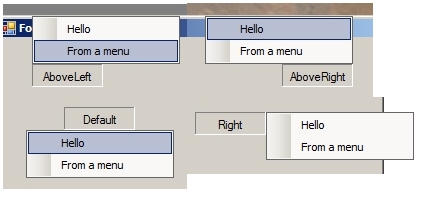
private void DisplayMenu()
{
if (menu == null)
return;
Point offset = new Point();
switch (direction)
{
case ToolStripDropDownDirection.AboveLeft:
offset.X = menu.Width;
offset.Y = 0;
break;
case ToolStripDropDownDirection.AboveRight:
offset.X = this.Width-menu.Width;
offset.Y = 0;
break;
case ToolStripDropDownDirection.BelowLeft:
offset.X = menu.Width;
offset.Y = this.Height;
break;
case ToolStripDropDownDirection.BelowRight:
offset.X = this.Width - menu.Width;
offset.Y = this.Height;
break;
case ToolStripDropDownDirection.Default:
offset.X = (this.Width - menu.Width)/2;
offset.Y = this.Height;
break;
case ToolStripDropDownDirection.Left:
offset.X = 0;
offset.Y = 0;
break;
case ToolStripDropDownDirection.Right:
offset.X = this.Width;
offset.Y = 0;
break;
}
menu.Show(this, offset, direction);
In the code above, direction is a value in ToolStripDropDownDirection enumeration accessible with a standard get/set pair.
Usage
As code, also the instructions are really simple, after you've added ButtonMenu component to toolbox, drag it on your form and set Menu property from property page (or via code). Enjoy. EDIT: I've merged code for autoplacing written by BlackTigerAP (I've done a little "case compression" to reduce code replication. I've added a new property public ButtonMenuStyle Style to switch between flat and button styles from design. Of course:
public enum ButtonMenuStyle
{
  Flat = 0,
  Button = 1,
}
