Introduction
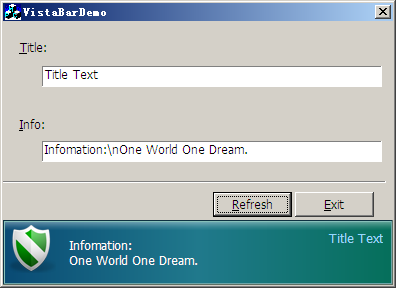
Windows Vista's Explorer has a new UI which has a detailed information bar located on the bottom. On Windows XP, we knew here is a task panel to show information, just as we all know, it is something complicated to use. So, I tried to implement a lite Vista infobar. This demo is just a simple one, it has some functions missing.
Background
In general, our Vista Info Bar has an icon/picture in the left, a detailed information following this icon, and a title on the right-top. But this control is more funny to implement:
- A PNG's gradient zone: To use PNG, we choose the powerful
CxImage library. The demo project has cxImage supported, if you want to compile it yourself, just visit this page. - One-pixel border: For better experience of this control, we used two border rectangle, each is one-pixel style.
- Three steps gradient: Usually, we draw a gradient with two basic colors, but, here, we use three basic colors.
Coding Thoughts
Here are two C++ classes for this implementation: CxImageEx (for CxImage extension of loading the PNG gradient zone from a buffer: GRAD_BAR presents here) and CVistaBar (based on CStatic).
To do a real gradient drawing, we use GradientFill() exports from msimg32.dll:
hinst_msimg32 = LoadLibrary( "msimg32.dll" );
if( hinst_msimg32 ){
dllfunc_GradientFill =
((LPFNDLLFUNC) GetProcAddress( hinst_msimg32, "GradientFill" ));
}
The three steps background zone is designed by the following codes:
void CVistaBar::DrawGradientFill(CDC *pDCMem, CRect *pRect, BackFillMode FillMode)
{
TRIVERTEX rcVertex[4];
rcVertex[0].x=pRect->left;
rcVertex[0].y=pRect->top;
rcVertex[0].Red=GetRValue(m_crA)<<8;
rcVertex[0].Green=GetGValue(m_crA)<<8;
rcVertex[0].Blue=GetBValue(m_crA)<<8;
rcVertex[0].Alpha=0x0000;
rcVertex[1].x=pRect->right /2;
rcVertex[1].y=pRect->bottom;
rcVertex[1].Red=GetRValue(m_crB)<<8;
rcVertex[1].Green=GetGValue(m_crB)<<8;
rcVertex[1].Blue=GetBValue(m_crB)<<8;
rcVertex[1].Alpha=0;
rcVertex[2].x=pRect->right /2;
rcVertex[2].y=pRect->top;
rcVertex[2].Red=GetRValue(m_crB)<<8;
rcVertex[2].Green=GetGValue(m_crB)<<8;
rcVertex[2].Blue=GetBValue(m_crB)<<8;
rcVertex[2].Alpha=0;
rcVertex[3].x=pRect->right;
rcVertex[3].y=pRect->bottom;
rcVertex[3].Red=GetRValue(m_crC)<<8;
rcVertex[3].Green=GetGValue(m_crC)<<8;
rcVertex[3].Blue=GetBValue(m_crC)<<8;
rcVertex[3].Alpha=0;
GRADIENT_RECT grect;
grect.UpperLeft=0;
grect.LowerRight=1;
dllfunc_GradientFill( *pDCMem ,rcVertex,2,&grect,1,
(FillMode == HGradient) ? GRADIENT_FILL_RECT_H : GRADIENT_FILL_RECT_V);
dllfunc_GradientFill( *pDCMem ,&rcVertex[2],2,&grect,1,
(FillMode == HGradient) ? GRADIENT_FILL_RECT_H : GRADIENT_FILL_RECT_V);
}
OnPaint() we do all of the drawing stuff:
... ...
DrawGradientFill(&dc, &rrc, HGradient);
if(m_nResID)
m_Draw.Draw(dc.m_hDC, 5, 5);
rcTitle.SetRect(nSpaceX, rc.top + 10, rc.right - 10, rc.bottom - 5);
COLORREF clrOldText = dc.SetTextColor(m_crTitleColor);
pOldFont = dc.SelectObject(&fnTitle);
int nOldMode = dc.SetBkMode(TRANSPARENT);
dc.DrawText((LPCTSTR)m_strTitle,
m_strTitle.GetLength(), &rcTitle,DT_RIGHT|DT_TOP);
dc.SetBkMode(nOldMode);
dc.SetTextColor(clrOldText);
dc.SelectObject(pOldFont);
rcDetail.SetRect(nSpaceX, rc.top + 10 + 8, rc.right - 15, rc.bottom - 5);
clrOldText = dc.SetTextColor(m_crDetailColor);
pOldFont = dc.SelectObject(&fnDetail);
nOldMode = dc.SetBkMode(TRANSPARENT);
dc.DrawText((LPCTSTR)m_strDetail,
m_strDetail.GetLength(),
&rcDetail,
DT_LEFT|DT_TOP);
dc.SetBkMode(nOldMode);
dc.SetTextColor(clrOldText);
dc.SelectObject(pOldFont);
m_DrawGEffect.Draw(dc.m_hDC, rrc.top + 2, rrc.left + 2, rrc.Width()-4, 16);
dc.Draw3dRect(rrc, RGB(13, 49, 65), RGB(94, 112, 100));
dc.Draw3dRect(rrc2, RGB(135, 192, 185), RGB(109, 165, 168));
SetPhotoInfo(), set the icon:
void CVistaBar::SetPhotoInfo(UINT uID, CString strGroup, DWORD dwImgType)
{
m_nResID = uID;
m_Draw.LoadResource(FindResource(NULL,MAKEINTRESOURCE(uID), strGroup),
dwImgType);
}
SetDisplayInfo(), reset the information to be displayed:
void CVistaBar::SetDisplayInfo(CString &strTitle, CString &strDetail)
{
m_strTitle = strTitle;
m_strDetail = strDetail;
}
RedrawItem(), refresh the item:
void CVistaBar::RedrawItem()
{
Invalidate(FALSE);
}
How to Use
This demo project is an MFC dialog project. So it may be very easy to know how to use this control:
Add vistabar.h, vistabar.cpp, ximageex.h, ximageex.cpp to your project
Put a static to your project, and use CVistaBar as the class of its variable
Set the icon:
m_cVistaInfoBar.SetPhotoInfo
(IDR_VISTA_IMGS_GREEN, _T("VISTA_IMGS"), CXIMAGE_FORMAT_PNG);
Set the info with a title:
CString        strTitle, strInfo;

GetDlgItemText(IDE_TITLE, strTitle);
GetDlgItemText(IDE_INFO, strInfo);

strInfo.Replace("\\n", "\n");

m_cVistaInfoBar.SetDisplayInfo(strTitle, strInfo);
m_cVistaInfoBar.RedrawItem();
Furthermore, you may need cximage.dll, cximage.lib and its headers. For more information, see demo project.
Comments
This control has some limitations, and I just want to show you some funny stuff. You can also improve it.
This control is a part of Avlgomgr, which is a multi-boot program for a Windows user. If you want more information about it, you can find it here.
stone.lf suggested that I share this control and I want to say thanks to her.
Wish you like this control and enjoy.
History
- 2006-10-12: Initial release
