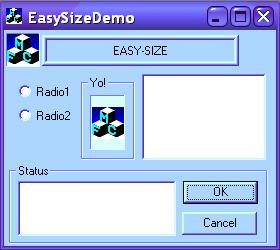
In this article, you will learn to design your dialog the way you want it to look in the resource editor, and then define how the controls will behave when the dialog is resized using one single macro for each control.


Introduction
Have you ever thought of how annoying it actually was to spend a lot of time doing a basic GUI for your simple applications instead of focusing on the actual 'content'? Take, for example, a resizing dialog or property page. You need to write code for each control that will tell it where to go when the thing is resized, and this can take up a lot of time. Now I know that I'm not the first one to give a solution to this (CResizableDialog), but this article is on my approach.
Description
Basically, all you need to do is design your dialog the way you want it to look in the resource editor (don't forget to make it resizable), and then define how the controls will behave when the dialog is resized using one single macro for each control.
Usage
Note that all this works exactly the same way with both CDialog and CPropertyPage:
#include EasySize.h to your stdafx.h (or put it in your include directory and #include <EasySize.h> , which I recommend).- Add
DECLARE_EASYSIZE anywhere in your class declaration:
class CEasySizeDemoDlg : public CDialog
{
DECLARE_EASYSIZE
...
- Create an
OnInitDialog handler if it doesn't already exist, and put this in the end of it: "INIT_EASYSIZE;":
BOOL CEasySizeDemoDlg::OnInitDialog()
{
CDialog::OnInitDialog();
...
INIT_EASYSIZE;
return TRUE;
}
- Create an
OnSize handler and add the UPDATE_EASYSIZE; macro to it:
void CEasySizeDemoDlg::OnSize(UINT nType, int cx, int cy)
{
    CDialog::OnSize(nType, cx, cy);
    UPDATE_EASYSIZE;
}
- Optional - If you want your dialog to have a minimum size, then create an
OnSizing handler and add the EASYSIZE_MINSIZE macro as below:
void CEasySizeDemoDlg::OnSizing(UINT fwSide, LPRECT pRect)
{
CDialog::OnSizing(fwSide, pRect);
EASYSIZE_MINSIZE(280,250,fwSide,pRect);
}
- Now you have to create the "EasySize Map" (or whatever you want to call it) in which you will specify the behavior of each dialog item. It can be placed anywhere inside your class implementation. The map looks like this:
BEGIN_EASYSIZE_MAP(class_name)
    ...
    EASYSIZE(control,left,top,right,bottom,options)
    ...
END_EASYSIZE_MAP
The map from the demo application looks like this:
...
END_MESSAGE_MAP()
BEGIN_EASYSIZE_MAP(CEasySizeDemoDlg)
EASYSIZE(IDC_TITLE,ES_BORDER,ES_BORDER,
ES_BORDER,ES_KEEPSIZE,ES_HCENTER)
EASYSIZE(IDC_RADIO1,ES_BORDER,ES_BORDER,
ES_KEEPSIZE,ES_KEEPSIZE,0)
EASYSIZE(IDC_RADIO2,ES_BORDER,ES_BORDER,
ES_KEEPSIZE,ES_KEEPSIZE,0)
EASYSIZE(IDC_CONTENT,ES_BORDER,ES_BORDER,
ES_BORDER,ES_BORDER,0)
EASYSIZE(IDC_STATUSFRAME,ES_BORDER,ES_KEEPSIZE,
ES_BORDER,ES_BORDER,0)
EASYSIZE(IDC_STATUS,ES_BORDER,ES_KEEPSIZE,
ES_BORDER,ES_BORDER,0)
EASYSIZE(IDOK,ES_KEEPSIZE,ES_KEEPSIZE,
ES_BORDER,ES_BORDER,0)
EASYSIZE(IDCANCEL,ES_KEEPSIZE,ES_KEEPSIZE,
ES_BORDER,ES_BORDER,0)
EASYSIZE(IDC_MYICON1,ES_BORDER,IDC_RADIO2,IDC_CONTENT,
IDC_STATUSFRAME,ES_HCENTER|ES_VCENTER)
EASYSIZE(IDC_MYICON2,ES_BORDER,ES_BORDER,IDC_TITLE,
ES_KEEPSIZE,ES_HCENTER)
END_EASYSIZE_MAP
...
Looks confusing? It's not once you get the point (and I know I'm not good at explaining it). Read on.
EASYSIZE Macro
The EASYSIZE macro is used in the EasySize Map to specify what behavior your controls will have on dialog resize. It looks like this:
EASYSIZE(control,left,top,right,bottom,options)
control is the ID of the dialog item you want re-positioned (which will be referred to as the 'current control' further on).
left, top, right and bottom can be either the ID of another control in the dialog (not the current control), or one of the special values, ES_BORDER and ES_KEEPSIZE.
Basically, if you specify an ID, the distance from the current control and the item designated by the ID will remain the same when the dialog is resized: The current control will 'stick' to the other item. ES_BORDER works the same way as if you had specified a control ID, except that it's the distance between the current control and the dialog border that will be kept constant. Specifying ES_KEEPSIZE in, let's say left, will keep the width of the current control the same, and will make the current control right-aligned to whatever you specified in right. The width (or height, if you specified ES_KEEPSIZE in top or bottom) of the current control will always remain what it is in the dialog resource. (I know this explanation sucks, but look at the demo application if you are confused or post your question in the board below). Obviously, ES_KEEPSIZE cannot be specified in both "left and right" or "top and bottom".
options can be a combination of ES_HCENTER, ES_VCENTER and 0 (use 0 if you don't want any of the other). ES_HCENTER horizontally centers the control between the two items specified in left and right (both of those cannot be ES_KEEPSIZE!). The width of the current control will always remain the same as in the dialog resource. ES_VCENTER works the same way, but for vertical centering (using top and bottom, and where the height will remain constant).
Conclusion
Well, I hope you figured out how this works, because it really can make your life easier. Note that using these macros will probably make your compiled code slightly bigger and slower than if you had coded the resizing routines manually, but in most cases, the change is so small that you will not even notice it.
History
- 11th December, 2001: Initial version
Last update - Just corrected a few typos
License
This article has no explicit license attached to it, but may contain usage terms in the article text or the download files themselves. If in doubt, please contact the author via the discussion board below.
A list of licenses authors might use can be found here.
