Introduction
This article presents quick and clear steps for the click once deployment techniques for the Infrastructure and Developer/Deployment Team. It covers the web server setup, directory structure, file share and permission tips on the deployment server and basic steps for the developers to deploy and general troubleshooting.
ClickOnce is simple to configure and use without leaving the Visual Studio environment. It is easy to deploy the windows based client application using the interactive tool. The application can be distributed to install and to receive updates in the forms of URL, URI and CD media.
ClickOnce is definitely an advantage over the previous generation of Install and Updater tools provided by Microsoft. There is no need to add a setup/MSI project or struggle with the manifest tool by Application Updater Block anymore.
Upon the install, it creates a shortcut under Programs-->CompanyName-->Product directory. The user should also be able to Remove or Repair the application using Windows "Add or Remove Program" utility.
Deployment Web Server Setup

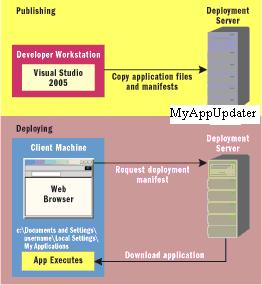
In this example, the deployment server is "MyAppUpdater". It has limited access to all the users but it has shared directory with permissions to the developers as, \\MyAppUpdater\ApplicationUpdater\ to host the deployment files.

There is no need to create the subdirectory or browse to the directory. ClickOnce from the VS2005 IDE creates them automatically for us. Follow the steps below for a quick guide to the deployment.
Publish from Visual Studio 2005
When ready to deploy the application, browse to the property of the StartUp Project, choose Publish tab.

- Publishing Location can be a file path to the \\MyAppUpdater\ApplicationUpdater\MyDeploymentDirectory
- Install URL is the published URL used by the installer.
- "Application is available offline as well" is the most used option.
Now click on "Application Files" button to setup the application you would like this publish version to include.

Make appropriate selection for the DLLs if they are needed to copy (Include) or Prerequisite.
Click on "Prerequisites" button next:

.NET Framework is a prerequisite for .NET application to run on client machine which does not have .NET Framework installed. When installing this application, ClickOnce checks to see if DOTNETFX2.0 is not installed and installs it. Eliminate the extra steps needed otherwise to download and install the DOTNETFX to the client machines.
Click on "Updates" button to setup the download option.

You can choose either Before or After application starts option to control the user experience. The application should check for updates to control if this deployment would receive any updates to the products when published to the Publishing Location.
Now click on "Options" button to setup additional information for the install and update like Support URL, Product and Publisher name, etc.

Most commonly used options are selected in the image below.
"Deployment web page", by default it is always publish.htm, *** a tip is to configure the deployment web server such that the default page is publish.htm, it would save extra keystrokes each time there is an attempt to install from the server or deploy to the server.***
Click on "Publish Now" button. It should start deploying the application on the deployment server. When finished, it would then launch the Installation URL.

You are ready to distribute the Installation URL to the user or if CD Installation is selected, it would publish in the CD and it is ready to be distributed.
Troubleshooting
This application has failed to start because the application configuration is incorrect.

This is the most commonly seen error. Fix to this is, change the app.config file encoding to "utf-8" instead of default "Windows-1252" as displayed below:

For other kinds of error, you might need to open the Event Viewer.
Another most common error is when trying to deploy IIS does not allow the files to be downloaded.
The reason being, IIS does not allow to downloading file with .config, .deploy, .application extension for security reasons. Modify the MIME Types for this website to allow these extensions by registering the MIME types for the file extension type as displayed below:

Give away the Installation URL, http://applicationUpdater.UltimateProductComapny.com/ProductLaunchKit/ to the users to install for the first time, after that each time the user opens the app, it would check for the auto update and download if a new one is available.
Happy installing, updating and distributing the smart Windows based client application you write. :)
