Introduction
This is my first article on CodeProject, so be patient with me if I've made some mistakes.
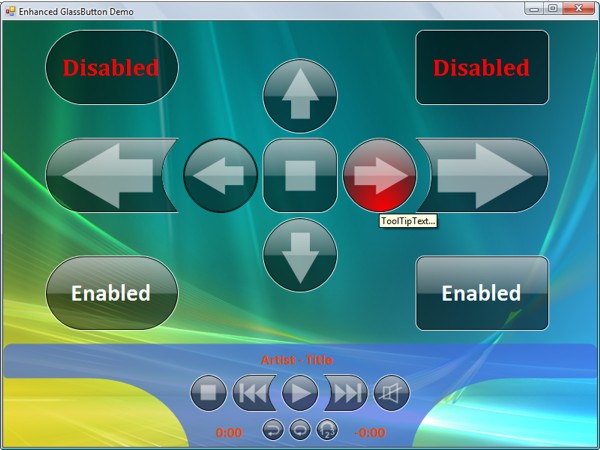
The control from this article is based on the GlassButton from Lukasz Swiatkowski. He created a very cool control, simply with GDI+, which looks similar to the Glass buttons from the Aero-GUI in WinVista. I've made some enhancements so that the control has some cool functions, and I also made some performance improvements, and have found a great trick to increase the performance dramatically if you are using the GlassButton on a Form with the background image set.
Background
My reason to create these improvements was that I'm currently working on my Diploma project where one part is a multimedia player where I want a cool design and so the GlassButton was the best candidate to be used for the player buttons, but my design needs some "specials" and so I improved the original GlassButton so it could do these "specials".
How to Use the EnhancedGlassButton?
To use the control as given here, you simply need to download the given DLL and include it into your Visual Studio Toolbar; then use the button as you would a normal Button, with the Designer or within the code.
Short Description of the Enhancements and Other Properties of the GlassButton
AlternativeFocusBorderColor:
- If the alternative
Focusborder is chosen, the outer border will be drawn in this color (looks very nice in my app).
AlternativeForm & -Direction:
- The button will be drawn with the alternative form and direction as you see on the screenshot.
AnimateGlow:
- If
false, the glow isn't animated, and the performance is improved if you are using more than one GlassButton on your form.
CornerRadius:
- Defines a user-defined corner radius. The maximum radius is calculated as Width/Height / 2, and if selected, the button will be round.
GlowColor:
- The color of the glow which appears on the control when it is hovered.
ShineColor
- The color of the shine on the upper half of the control which simulates the 3D effect.
ShowFocusBorder:
- If
true -> normal behavior - If
false -> normal focus border is not drawn and the alternative focus border will be drawn (necessary for alternative form or round buttons)
ShowSpecialSymbol, SpecialSymbol, SpecialSymbolColor:
- Draws a special symbol with the selected color on the control (Arrows, Play, Pause,... some symbols need to be improved if the button size is big - will be done in the next release [if you have a better symbol, mail me!]), as you see on the screenshot.
ToolTipText:
- If not empty, a ToolTip will be created automatically on the control.
Improvements if You Are Using the Button With Background Images
If you have a Form with a BackgroundImage and some GlassButtons, you will notice that the performance goes down rapidly. This is because of the rendering of the transparency of the image at every redraw.
To improve this, you could pre-render the background image to the correct size and with a transparency-channel, as shown in the following code:
Image backgroundImage;
SuspendLayout();
if (this.BackgroundImage != null && this.Height > 0 && this.Width > 0)
{
if (this.backgroundImage == null)
this.backgroundImage = this.BackgroundImage;
Bitmap renderBmp = new Bitmap(this.Width, this .Height,
System.Drawing.Imaging.PixelFormat.Format32bppPArgb);
Graphics g = Graphics.FromImage(renderBmp);
g.DrawImage(this.backgroundImage, 0, 0, this.Width, this.Height);
this.BackgroundImage = renderBmp;
g.Dispose();
}
ResumeLayout();
If you put the code above into your Load and Resize functions, the BackgroundImage will be pre-rendered and the drawing will be up to ten times faster (don't forget to make the background image variable global)!
How to Create the Special Designs
To create the designs, I use simple GraphicPaths and draw the button with them, as seen in the following code:
if (alternativeForm)
{
if (alternativeFormDirection == Direction.Left)
{
path.AddArc(l, t, h, h, 90, 180);
path.AddLine(l + h, t, l + w, t);
path.AddCurve(new Point[5] {
new Point(l + w, t),
new Point(l + w - h / 6, t + h / 4),
new Point((int)(l + w - (double)(h / 4.7)), t + h / 2),
new Point(l + w - h / 6, t + 3 * h / 4),
new Point(l + w, t + h) });
path.AddLine(l + h, t + h, l + w, t + h);
}
else
{
}
}
Using the same method, I've created the symbols on the button.
Use Or Edit the Code
You can feel free to use this class / code in any application or extend it a second time, but if you make extensions, please keep the comment-header in the GlassButton.cs as it is and only extend it with your name.
If you make some cool extensions, please let me know by leaving a note in the comments section below, maybe I could use them too ;).
Points of Interest
What I noticed when I was creating the new design was that I was able to smooth out drawings on the control with anti-aliasing, but if you try to cut unused space from your control with the region, you will get "nice stairs"...
History
- V1.0 (13.03.2007) - Main release
