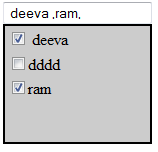
Introduction
In this article, I will show you how to create a multi-select control in ASP.NET. I will keep this article short and sweet so you can just use the code
in your applications. Previously I referred to many codes for a multiselect dropdown but I found they were all a little complex to implement. So I decided to try it on my own.
Let's see how I implemented this.
Background
First, you must install AJAX controls in Visual Studio. I am using VS2010. This is because I am using the popup control extender to implement this control.
Using the code
Place a textbox in Design view and assign the popup extender for that textbox. An important thing to note here is you must place your textbox control within the UpdatePanel.
Afterwards, you create a panel and within this panel, you put a checkboxlist. You then assign this panel to the PopupControlID property of the popup extender.
Now take a look at this code:
<%@ Page Language="C#" AutoEventWireup="true"
   CodeFile="multidropdown.aspx.cs" Inherits="_Default" %>

<%@ Register Assembly="AjaxControlToolkit"
  Namespace="AjaxControlToolkit" TagPrefix="asp" %>
<!DOCTYPE html PUBLIC "-//W3C//DTD XHTML 1.0 Transitional//EN"
   "http://www.w3.org/TR/xhtml1/DTD/xhtml1-transitional.dtd">
<html xmlns="http://www.w3.org/1999/xhtml">
<head runat="server">
    <title></title>
</head>
<body>
    <form id="form1" runat="server">
    <div>
        <asp:ToolkitScriptManager runat="server">
        </asp:ToolkitScriptManager>

        <asp:UpdatePanel ID="updatepanel1" runat="server">

            <ContentTemplate>

                <asp:TextBox ID="TextBox1" runat="server"></asp:TextBox>

                <asp:PopupControlExtender
                    ID="TextBox1_PopupControlExtender" runat="server"
                    Enabled="True" ExtenderControlID=""
                    TargetControlID="TextBox1"
                    PopupControlID="Panel1" OffsetY="22">
                </asp:PopupControlExtender>

                <asp:Panel ID="Panel1" runat="server"
                     Height="116px" Width="145px"
                     BorderStyle="Solid" BorderWidth="2px"
                     Direction="LeftToRight"
                     ScrollBars="Auto" BackColor="#CCCCCC"
                     Style="display: none">

                    <asp:CheckBoxList ID="CheckBoxList1" runat="server"
                          DataSourceID="SqlDataSource1" DataTextField="holiday_name"
                         DataValueField="holiday_name" AutoPostBack="True"
                        OnSelectedIndexChanged="CheckBoxList1_SelectedIndexChanged">
                    </asp:CheckBoxList>

                    <asp:SqlDataSource ID="SqlDataSource1"
                          runat="server" ConnectionString="<%$
                          ConnectionStrings:employeedbConnectionString %>"
                        SelectCommand="SELECT [holiday_name] FROM [tblholidaymas]">
                     </asp:SqlDataSource>
                </asp:Panel>
            </ContentTemplate>
        </asp:UpdatePanel>
    </div>
    </form>
</body>
</html>
Here, you select the datasource from your SQL Server database.

Finally, we need to do one more modification in the code-behind. Each time we click the checkboxlist, the selected value will be added to the textbox control.
So in the selected index changed event, you will place this code:
using System;
using System.Collections.Generic;
using System.Linq;
using System.Web;
using System.Web.UI;
using System.Web.UI.WebControls;

public partial class _Default : System.Web.UI.Page
{
    protected void Page_Load(object sender, EventArgs e)
    {

    }

    protected void CheckBoxList1_SelectedIndexChanged(object sender, EventArgs e)
    {
        string name = "";
        for (int i = 0; i < CheckBoxList1.Items.Count; i++)
        {
            if (CheckBoxList1.Items[i].Selected)
            {
                name += CheckBoxList1.Items[i].Text + ",";
            }
        }
        TextBox1.Text = name;
    }
}
That's all.
