Introduction
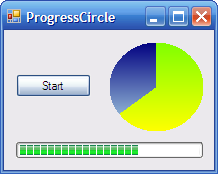
In this article I will show you a custom progress control that I made as an alternative to the regular Visual Studio ProgressBar component. So, we will discuss:
- How to create a custom component
- How to create custom events and properties to show them in the properties window
- How to use the Paint event and graphics for drawing and how to use a gradient brush
Background
A custom control inherits from a UserControl. A UserControl has an event called Paint, that is called every time the control needs to be redrawn. We will be using this event to draw the progress. Creating this component is pretty much easy: we just need to draw an ellipse (that will be the remaining time) and a pie (that will be the elapsed time), as the code below:
e.Graphics.FillEllipse(t_oBrushRemainingTime, t_oRectangle);
e.Graphics.FillPie(t_oBrushElapsedTime, t_oRectangle, -90f,
   (float)(360 * m_iElapsedTime / m_iTotalTime));
Most of the things that can be drawn using Graphics need a rectangle that are the bounds of the painting. This rectangle is defined as the same size of the component.
Rectangle t_oRectangle = new Rectangle(0, 0, this.Width, this.Height);
To create a gradient visual effect, before painting the ellipse and pie, two different brush variables are defined to create different visual effect for the remaining time and the elapsed time, as shown below:
Brush t_oBrushRemainingTime = new LinearGradientBrush(t_oRectangle,
    m_oColor1RemainingTime, m_oColor2RemainingTime, m_eLinearGradientMode);
Brush t_oBrushElapsedTime = new LinearGradientBrush(t_oRectangle,
    m_oColor1ElapsedTime, m_oColor2ElapsedTime, m_eLinearGradientMode);
We will keep tracking of two variables: m_iElapsedTime (that keeps the actual value — the same as Value property in the ProgressBar) and m_iTotalTime (that keeps the amount of time — the same as Maximum property in the ProgressBar). These two variables are used to compute the the angle of the pie that represents the elapsed time. As anyone knows, a full circle has 360° angle. To get the actual angle, we just make m_iElapsedTime / m_iTotalTime * 360.
The only method written is the Increment() method. It has an integer as argument that is the number that will be added to m_iElapsedTime. But before that, we just check if the m_iElapsedTime is greater than m_iTotalTime. If so, this means the task is complete and the method returns. If not greater, it is checked if the value to be added plus the m_iElapsedTime is greater or equal than m_iTotalTime. If so, we do m_iElapsedTime equal m_iTotalTime, update the control and raise both events, the PCIncremented and PCComplete. If not greater, we increment m_iElapsedTime, update the component and raise PCIncremented event. See code below:
if (m_iElapsedTime > m_iTotalTime)
    return;

if (m_iElapsedTime + a_iValue >= m_iTotalTime)
{
    m_iElapsedTime = m_iTotalTime;
    this.Refresh();
    if (m_EventIncremented != null)
        m_EventIncremented(this, null);
    if (m_EventCompleted != null)
        m_EventCompleted(this, null);
}
else
{
    m_iElapsedTime += a_iValue;
    this.Refresh();
    if (m_EventIncremented != null)
        m_EventIncremented(this, null);
}
To create those custom events (PCIncremented and PCComplete), we created a delegate called EventHandler. Having this delegate, now we declare two variables of type EventHandler called m_EventIncremented and m_EventCompleted, with the modifier event, as shown below:
public delegate void EventHandler(object sender, string message);
public event EventHandler m_EventIncremented;
public event EventHandler m_EventCompleted;
To raise an event, we just need to check if the variable is initialized and then call it. See below:
if (m_EventCompleted != null)
    m_EventCompleted(this, null);
To make these events browsable in the events list in the properties window, we need to create properties for them and put a few attributes before it within brackets. The main attribute is Category() and sets the category in which it will be shown when in categorized order. The other attribute is Description(), that shows a brief description in the bottom of properties window. The properties of the two custom events with their respective attributes are shown below:
[Category("ProgressCircle"), Description(
    "Event raised everytime the component is incremented." +
    "Author: Sergio Augusto Bitencourt Petrovcic")]
public event EventHandler PCIncremented
{
    add { m_EventIncremented += new EventHandler(value); }
    remove { m_EventIncremented -= new EventHandler(value); }
}

[Category("ProgressCircle"), Description(
    "Event raised when the component get completed." +
    "Author: Sergio Augusto Bitencourt Petrovcic")]
public event EventHandler PCCompleted
{
    add { m_EventCompleted += new EventHandler(value); }
    remove { m_EventCompleted -= new EventHandler(value); }
}
Using the Code
The source code has two projects. The first one implements the component and generates an assembly. The second one is a test project, that has the first one as reference. So, if we open the main form of the test project and see the toolbox, we are going to see the component there. We just need to drag and drop into the form.
If you want to use this component at your own project, you only need to add the component to your project's toolbox. Just right click the toolbox and click Choose Items. Then click browse and search for ProgressCircle.dll. Click Open and Ok. After that, just drag and drop to your form.
To configure the component, you can use the properties window to change colors of the gradient of the remaining and elapsed time, change the linear gradient mode, the total and elapsed time of the component and set events. As your task flows, just call Increment() passing as parameter tha value to be incremented. That's all! Just simple as that.
History
* April 2008 - First publish.
Copyright © 2007 Sergio A. B. Petrovcic. All rights reserved. Do not publish to other sites without my express permission. Link to this article in accordance with this site's policies and procedures.

