With the release of MVC 3, the updated project templates and the Razor view engine, we have several new features and tool improvements at our disposal. I wanted to see how hard it would be to get a quick mash-up of some ASP.NET goodness and the Google Maps API. For this project, I’m going to walkthrough creating a new project in ASP.NET using MVC 3 in Visual Studio 2010. You’ll need to have the RTM build of MVC 3 (which contains other ASP.NET enhancements, btw).
Getting Started
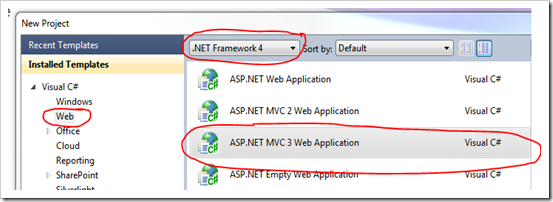
Once installed, it’s fairly easy to invoke the New Project dialog and select ASP.NET MVC 3 Web Application from the Web templates. If you don’t see the project type listed, make sure that you are targeting the correct framework.

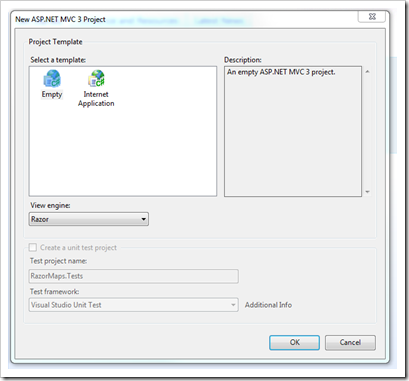
I named my project RazorMaps. When we click ok, we are then presented with a bit of a wizard to select our options for the project. This is a simple but good improvement over the previous MVC bits because it rolls up the wizard, test project creation and multiple templates (empty versus the “internet application”) and let us select the view engine.

 For simplicity sake, here I’ve just selected an Empty template and no test project.
Most of the project pieces feel familiar, in fact, there’s no noticeable changes to the MVC project at a root level and all the expected folders are there.
It’s nice to see that jQuery is added by default to the _layout.cshtml file, and to see that jQuery UI is included in the project.
As of my writing this, it’s also the latest bits for the jQuery library, and they have the vsdoc file updated (AWESOME! No more renaming the old one and replacing the library!), and there are other libraries in the mix as well (enabling unobtrusive validation, etc.).
A Simple Home Page
We need to get a view set up so that we have something to look at. The base project doesn’t include the controller or the view we’re going to want, so we’ll start there.
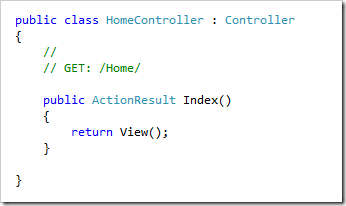
Right-click on controllers, Add > Controller and name it HomeController. We get our basic controller up-and-running and the code for our first ActionResult (our home page) is free:

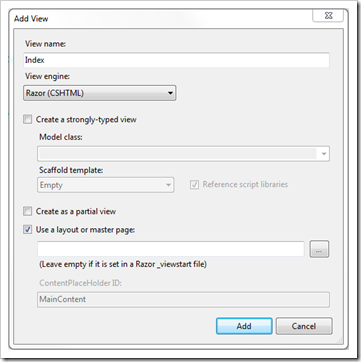
Next, right-click anywhere in the Index method and select Add View from the context menu. If the View Name is Index then you shouldn’t need to change anything else. We’re using the Razor view engine and we already have our layout specified in _viewstart.

Press F5 to see your lovely work!
Hello, Google Maps
We have a couple of things that we need to do to get the basic, no-frills map up-and-running. Though I worked from the simple tutorial on the Google Maps Javascript API page, I’m going to try to MVC this up as much as possible and look at some of the features of the Razor view engine.
We know that we need to add the Google Maps script to our page, and we can see from the tutorial that you also need to have a couple of styles. Because we are using layouts in Razor and don’t want these on every page we create, we’ll take advantage of Razor Sections in our layout.
Open up _Layout.cshtml and add the following lines of code to the <head> portion of the document:
@RenderSection("Scripts", false)
<style type="text/css">
   @RenderSection("Styles", false)
</style>
We’re adding two optional RenderSections here. This is very similar to creating content sections when using master pages.
Next, pop back into our index.cshtml file so that we can add the juicy bits to get the map loading.
Fleshing Out the Page
Right at the top of the file, you’re going to want to add the following code:
@{
   ViewBag.Title = "MVC 3 and Google Maps";
}

@section Scripts {
   <script type="text/javascript" src="http://maps.google.com/maps/api/js?sensor=false">
   </script>
}

@section Styles {
   html { height: 100% }
   body { height: 100%; margin: 0px; padding: 0px }
   #map_canvas { height: 80% }
}
The ViewBag is a dynamic expression and evaluated at runtime. The “Title” property is filled into our layout template with the @ViewBag.Title expression.
Next, we have our two sections; the first adds the map script to our page, the second applies and specifies the styles we need to get the map rendering correctly.
The rest of the page consists of:
- A
div element (to host the map) - An
initialize function that sets up the map, and - A jQuery shortcut to invoke the
initialize function when the page is ready
Here’s the code:
<h2>Hello, Google Maps</h2>

<div id="map_canvas" style="width:80%; height:80%"></div>

<script type="text/javascript">

   function initialize() {
       var latlng = new google.maps.LatLng(40.716948, -74.003563);
       var options = { zoom: 14, center: latlng,
			mapTypeId: google.maps.MapTypeId.ROADMAP };
       var map = new google.maps.Map(document.getElementById("map_canvas"), options);
   }

   $(function () {
       initialize();
   });

</script>
And there you have it! Press F5 again and the map loads.
Conclusion
If you have a good handle on ASP.NET MVC and you understood MasterPages, the switch to the Razor engine and templates is going to be easy and refreshing. Integrating per-page code, via Razor section rendering, is straightforward and keeps our templates clean.
Updated script libraries and improved templates and a ton of feature enhancements round out this release nicely.
