Are you New to BizTalk Enterprise Service Bus (ESB) 2.1 Toolkit?
Refer to my Hello ESB article which takes you on an introduction route.
Introduction
In this article, you will learn how to use BRI to determine which Itinerary to attach to a message, based on the message contents. Here we are looking at the message contents and determining which Itinerary to attach for the message. You will also learn how to code an ESB complaint orchestration to consume messages from the ESB bus.
Problem Statement
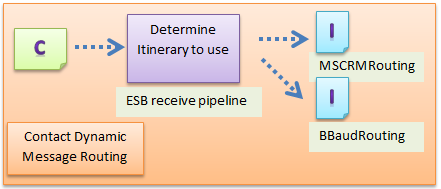
How would you determine which Itinerary to attach to a Contact message by looking at its contents dynamically?
A CRM Contact is routed to either MS CRM system or a BlackBaud CRM system using Itineraries based on the ContactID (which is part of the message itself). A Contact is represented with the symbol 'C' and an Itinerary is represented with the symbol 'I'.

What are the Different Ways to Assign an Itinerary to an Incoming Message?
The 3 different ways to assign an Itinerary to a message are 'Advanced Service client', 'Adaptive Service Client'and 'Service Proxy'. The following notes explains them in further detail.
- Advanced Service Client: A client specifies the
Itinerary in the WCF/SOAP header request itself. - Adaptive Service Client: Client resolves
Itinerary via resolver service and then sends it in a WCF/SOAP Header request. - Service Proxy:
Itinerary is resolved on the server’s ESB On-Ramp receiving port via configurable resolver.
NOTE that in this article, we are using the Service Proxy approach.
The Contact Message
The Contact XML message:
<ns0:Contact xmlns:ns0="http://ContactCanonical.Contact">
  <contactid>101</contactid>
  <name>
    <firstname>John</firstname>
    <middlename>F</middlename>
    <lastname>Doe</lastname>
  </name>
  <addresses>

<address type="home">
      <street>707 Richmon Trl</street>
      <city>Plano</city>
      <state>TX</state>
      <zip>75033</zip>
    </address>


<address type="work">
      <street>2232 N Walnut Ave</street>
      <city>Dallas</city>
      <state>TX</state>
      <zip>75041</zip>
    </address>

  </addresses>
  <phones>
    <phone type="work">
      <number>234-232-WORK</number>
    </phone>
    <phone type="home">
      <number>435-434-HOME</number>
    </phone>
  </phones>
NOTE the ContactID in the Contact XML message.
Determining the Itinerary to Attach to the Contact Message
A policy and a set of rules is used to determine which Itinerary needs to be selected for the Contact message.
You would specify this policy in the ESB receive pipeline on the receive location. This would determine which Itinerary to use for the Contact message.
NOTE that any XML schema instance (XML document) that passes through the ESB must have the document type on Rule engine set to 'Microsoft.Practices.ESB.ResolverProviderMessage'. For additional information, please see the links in the references section.

Understanding the Itinerary
Note that there are two Itineraries (one for each CRM) in this example, but only one has been described here, since they are almost similar.

- ESB On-Ramp: An ESB on-ramp receives the
Contact message. - Orchestration Extender: The
Contact message is consumed by the orchestration configured in the orchestration extender. - Off-ramp extender: Notice the use of
BRE extender. Note that this is a BRE and not BRI (which is used to select an Itinerary). Here BRE is used to set outbound properties. See the next section below. - ESB Off-Ramp: The message is routed to a dynamic BizTalk Server send port, which is also referred to as an ESB off-ramp.
Understanding the BRE resolver in the Itinerary
The BRE resolver is used to retrieve the Outbound transport properties from the Business Rules Engine (BRE) policy. Observe the settings in the screen shot.

The data returned by the resolver contains the transport properties.
<Resolver>
  <name>Resolver.TransportLocation</name>
  <value>C:\ESBSource\ContactSubscription\Output\MSCRM_%MessageID%.xml</value>
</resolver>
<resolver>
  <name>Resolver.TransportNamespace</name>
  <value>
</resolver>
<resolver>
  <name>Resolver.TransportType</name>
  <value>FILE</value>
</resolver>
Steps to Develop a BizTalk ESB Compatible Orchestration
Step 1: Message Box Binding
A logical receive port, bound directly to the message box is required for receiving ESB messages. Notice the filter settings required for the activatable receive shape.

Step 2: Coding the Meat of the Orchestration
itineraryWrapper = new Microsoft.Practices.ESB.Itinerary.SerializableItineraryWrapper();
itineraryStepWrapper = new Microsoft.Practices.ESB.
Itinerary.SerializableItineraryStepWrapper();
itineraryWrapper.Itinerary = Microsoft.Practices.ESB.
Itinerary.ItineraryOMFactory.Create(msgInbound);
itineraryStepWrapper.ItineraryStep =
itineraryWrapper.Itinerary.GetItineraryStep(msgInbound);
hasNextService = itineraryWrapper.Itinerary.HasNextService();

The hasNextService flag is used to determine whether to send the message back to ESB bus for further Itinerary processing. In our example, if the flag is false, no message is placed on the ESB bus.
Step 3: Promoting the Correlation Properties of the Outgoing Message
A logical send port, bound directly to the message box is required for sending ESB messages. Notice the correlation properties required to be set for the send shape.

Step 4: esb.config Entries
Locate the esb.config under C:\Program Files (x86)\Microsoft BizTalk ESB Toolkit 2.1, find the XML tag itineraryServices and add the following:
<itineraryService id="e2710ecc-1dcd-49e0-b6a0-fd318227d24c"
name="ContactOperation.ProcessMSCRMSubscription" stage="None"
scope="Orchestration" type="ContactOperation.ProcessMSCRMSubscription,
ContactOperation, Version=1.0.0.0, Culture=neutral,
PublicKeyToken=2710b190689828fa" />

<itineraryService id="b506da17-126d-41b1-8bff-664a59e91570"
name="ContactOperation.ProcessBBAUDSubscription" stage="None"
scope="Orchestration" type="ContactOperation.ProcessBBAUDSubscription,
ContactOperation, Version=1.0.0.0, Culture=neutral,
PublicKeyToken=2710b190689828fa" />
Takeaways
The use of BRI to resolve and attach an Itinerary to a message, by looking at the message contents. In the example, we have attached an Itinerary to the Contact message based on the value of the ContactID.
Downloadable Code
There is no code provided with this article, since this is left as an exercise for the developer.
References for Further Reading
