Introduction
SharePoint Designer’s Data View Web part is a great control. I use it a lot when customizing list views. One thing I don’t like is the lack of attachment support. With Data View, you can only detect if an item has attachments or not. You can’t display them or get any information about them.
As I understand, Microsoft does not recommend any recursion while enumerating lists, and maybe this is the reason you can’t browse an item’s attachments.
I solved this issue in two ways. One is using the Lists.asmx Web Service and is for an authenticated environment, and the other is with a custom generic handler (ashx) page.
SharePoint (WSS 3.0 and MOSS 2007) has a Lists.asmx Web Service which you can use for accessing SharePoint objects. The good thing is that you can use this Web Service from JavaScript. So, you can request some information from SharePoint directly from your JavaScript functions. What are the requirements? You have to be authenticated if you want this to work.
You have a lot of resources on the web for accessing the Lists.asmx Web Service from JavaScript. I tested two of them, and they both worked. One resource is Darren Johnston’s blog, which uses his own APIs for SharePoint communication, and the other is Glenc’s blog, which uses a prototype for HTTP XML requests and his own script. At the end, I finished up with Darren’s API, which is very easy to use and is very powerful.
Step 1
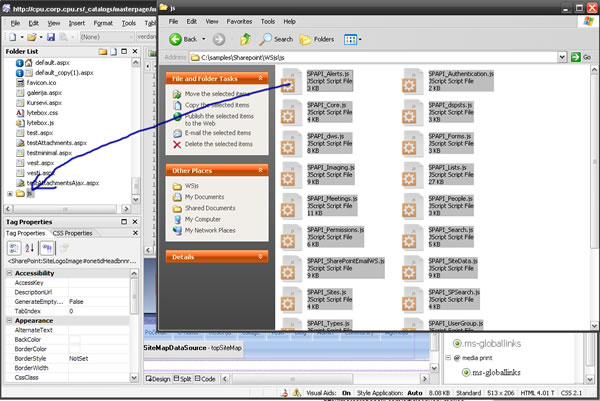
First, you need to download the JavaScript Web Service API for Office Live and SharePoint (1.0.1) from Darren’s blog or download zip above ('cause Darren's site seams to be dead).After that, you need to unpack it to some folder on your SharePoint site. I created a new folder in the SharePoint Designer, called js, and dropped all my JavaScript files into the folder:

Step 2
The next step is to create a new page in the SharePoint designer. You can do that by going to the New>Page menu option. Optionally, you can select to create a page from the master page (picture 2):

Step 3
In order to create a Data View Web Part, you need to create custom content for the web page (see picture 3):

Your master page will look a little different, but that’s OK. I just have a custom master page. The flow is the same.
Step 4
Now, we can add a Data View Web Part. To do so, you can go to Insert>SharePoint Controls>Data View. Your page should be looking like this:

Step 5
The next step is to select a list you want to display. In my case, it is list called Vesti (which is Serbian for News). You can select any list you like (one with attachments would be great). You can select a list by going to the Data Source Library, selecting the list, and then clicking the Show Data button:

Step 6
From the Data Source Details tab, you can select the list columns you want to display and just drag them to your Web Part (place on the page that says “Click a data source in the Data Source Library…”). Now, our page should look like this:

Step 7
OK, we have our Data View now. We will now add the display attachments option. First, we will go to the code of our page (just click Code in the lower left corner of the page). Paste this code in the head section of the page (the one surrounded by <asp:Content id="Content1" runat="server" contentplaceholderid="head">):
<script src="js/SPAPI_Core.js"></script>
<script src="js/SPAPI_Lists.js"></script>
<script>
function getAttachments(List,ID){
var lists = new SPAPI_Lists('http://YourSharepointSite');
var items = lists.getAttachmentCollection(List,ID);
if (items.status == 200){
var rows = items.responseXML.getElementsByTagName('Attachment');
var str="";
for (var i=0; i<rows.length; i++){
temp=rows[i].childNodes[0].nodeValue;
ext=temp.substring(temp.lastIndexOf('.')+1);
switch(ext){
case "jpg":
case "png":
case "gif":
bdy='<img src="'+temp+'" alt="'+temp+'" border="0" />';
break;
default:
bdy=temp;
}
str+='<a href="'+temp+'" target="_blank">'+bdy+'</a>'+"<br />";
}
document.getElementById("att"+ID).innerHTML = str;
}else{
alert('There was an error: ' + items.statusText);
}
}
</script>
Don’t forget to enter your site name. Our function here requests an attachment collection from the SharePoint Web Service. Then, it selects all the attachment nodes, and depending on the extension, it creates only textual links (all files other than images) or image links (if the attachment is an image).
Step 8
Now, go back to the Design view. Select a column where you want to display the attachments (for example, I chose the Body column). Click on it, then click on the Split button (for Split View); see this picture:

Then, just paste this code below the column data (<xsl:value-of select="@Body" disable-output-escaping="yes"/> in my example; in your example, @Body would be your column name):
<xsl:if test="normalize-space(@Attachments) != '0'">
  <div id="att{@ID}" style="padding: 10px;"></div>
  <script type="text/javascript">
    getAttachments("YourListName",<xsl:value-of select="@ID"/>);
  </script>
</xsl:if>
In this code, if the item has attachments (<xsl:if test="normalize-space(@Attachments) != '0'">), we will call the getAttachments JavaScript function with the ListName parameter – enter your own, and the ID which will be automatically populated. We have a div container above. We need it to display our attachments.
That’s it. Now, you can preview it.

