Introduction
This article is a logical continuation of my article A low-level audio player in C# in which I presented an application that uses the waveout API in C# through Interop to play a WAV file in a continuous loop.
This time I will explain how to create a framework for implementing audio effects and how to extend the basic player to use it.
Audio Effects Framework
The idea of the framework is to provide some helper classes for implementing audio effects. In order to keep things simple, the framework was designed to help you implement effects that don’t modify the length of the sound data, although it can be easily extended to support other kinds of effects.
The basic effect class is called InPlaceEffect. The term in-place means that a single memory buffer is used for input and output. InPlaceEffect is an abstract class; derived classes must implement two methods: Connect and Process.
The Connect method is called when the host application wants to know whether the effect can process samples in a particular format. Sample formats are described by the WaveFormat structure, which holds common properties such as sampling rate, bit depth and number of channels.
Once an effect has been connected, the host application repeatedly calls the Process method passing in buffers with audio data. The audio effect should read data from the buffer and overwrite it with the modified data. In our sample application, the code that applies effects looks like this:
private void Filler(IntPtr data, int size)
{
byte[] b = new byte[size];
foreach(EffectInfo nfo in m_Effects)
nfo.Effect.Process(b, 0, b.Length);
}
The InPlaceEffect class does not help you much when it comes to processing audio samples because you still have to deal with all possible sample formats. The InPlaceEffectFloat class was designed to alleviate this situation. This class implements the Process method to convert each sample to floating point format, call a virtual method to process the sample and then convert the sample back to its original format. This approach is indeed far from being computationally efficient, but it lets you concentrate on your own algorithm by making the code much cleaner. “Real-life” audio effects typically deal with each format in a particular way in order to achieve maximum performance.
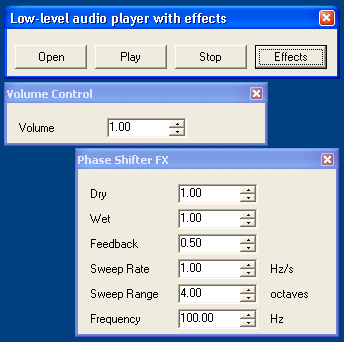
Another important aspect of the effect is the user interface that allows you to control the effect’s parameters. The FxForm class works in conjunction with the FxParameter attribute to create on the fly a user interface for your effect.
The FxParameter attribute is defined like this:
[AttributeUsage(AttributeTargets.Property, AllowMultiple = false)]
public class FxParameterAttribute : Attribute
{
    public readonly string Name;
    public readonly float LowerBound;
    public readonly float UpperBound;
    public readonly float Increment;

    public readonly string Unit;
    public FxParameterAttribute(string name, float lowerBound,
        float upperBound, float increment, string unit)
    {
        Name = name;
        LowerBound = lowerBound;
        UpperBound = upperBound;
        Increment = increment;
        Unit = unit;
    }
    public FxParameterAttribute(string name, float lowerBound,
        float upperBound, float increment) :
        this(name, lowerBound, upperBound, increment, string.Empty)
    {
    }
}
This attribute holds all the necessary information to display a NumericUpDown control that allows you to modify the parameter. At runtime, our framework automatically creates a form, based on the information from the attributes defined in the effect’s properties. The FxForm class then uses Reflection to enumerate properties and create the controls accordingly, like this:
private void CreateFxControls()
{
Type t = Effect.GetType();
object[] attrs = t.GetCustomAttributes
(typeof(DescriptionAttribute), true);
if (attrs.Length > 0)
Text = ((DescriptionAttribute)attrs[0]).Description;
int y = 15;
foreach (PropertyInfo prop in t.GetProperties())
{
attrs = prop.GetCustomAttributes
(typeof(FxParameterAttribute), false);
if (attrs.Length > 0)
{
FxParameterAttribute param = (FxParameterAttribute)attrs[0];
y += 25;
}
}
this.ClientSize = new Size(this.ClientSize.Width, y);
}
Other attributes could be defined to display other controls, such as check boxes or sliders. This is left as an exercise to the reader.
A Basic Effect: Volume Control
The code for the volume control is extremely simple since we just have to multiply each sample by a constant value. This approach works well for our purposes, but more sophisticated volume controls usually include some code to prevent zipper noise and to apply dithering at lower volume levels.
[Description("Volume Control")]
public class VolumeEffect : InPlaceEffectFloat
{
    private float m_Volume = 1.0f;

    [FxParameter("Volume", 0, 2.0f, 0.05f)]
    public float Volume
    {
        get { return m_Volume; }
        set
        {
            lock(this)
            m_Volume = value;
        }
    }

    public override bool Connect(WaveFormat format)
    {
        return true;
    }
    protected override float ProcessMono(float x)
    {
        return x * m_Volume;
    }
    protected override void ProcessStereo
            (ref float left, ref float right)
    {
        left *= m_Volume;
        right *= m_Volume;
    }
}
A More Complex Effect: Phase Shifter
The “Phase Shifter”, also known as “Phaser”, is a cool audio effect that can be described as a “breathing effect”. More information about how a Phaser works can be found here. I decided to implement a Phaser because this effect is not included with the standard DirectX effects.
As with the volume control, I derived this effect from the InPlaceEffectFloat class. The source code for the PhaseShiftEffect class can be found in the files that accompany this article.
Conclusion
In this article I explained how to extend a low-level audio player to implement support for audio effects.
A modified version of this sample that implements support for DirectX plug-ins is included with the Adapt-X SDK, which is a commercial product that can be found at https://www.softpile.com/adapt-x-engine-sdk/.
