Introduction
How many sites have you seen that requires you to login? I guess the answer to this question is "almost all of them".
Well, the idea behind this article is to understand how ASP.NET lets us create sites with an authentication and
authorization mechanism in place and how we can use ASP.NET server controls to quickly and efficiently implement this.
Background
When we are working on applications where authentication and authorization is a key requirement, then we will
find the ASP.NET roles and membership feature very useful. Authentication means validating users. In this step,
we verify user credentials to check whether the person tying to log in is the right one or not. Authorization
on the other hand is keeping track of what the current user is allowed to see and what should be hidden from him.
It is more like keeping a register to what to show and what not to show to the user.
Whenever a user logs in, he will have to authenticate himself with his credentials. Once he is authenticated,
he will be authorized to see resources/pages of the website. Mostly these two concepts go together and ASP.NET provides us with
some server controls that provide a lot of boilerplate functionality out of the box. If we use ASP.NET's authentication and authorization mechanism,
then we can focus on what should be authorized and who should be authenticated rather than worrying about how to do that.
Using the Code
ASP.NET provides a lot of control that facilitate the authentication mechanism. Some of the controls that ASP.NET provides for authentication are:
Login: this lets the user login using his credentialsPasswordRecovery: This control lets the user recover his password.CreateUserWizard: This control lets the user to create an account on the website.ChangePasword: This control will allow users to change their passwords.LoginStatus: This will show whether the user is logged in or not.LoginName: This will display the logged in user's name.
For the authorization part, Roles is the mechanism that ASP.NET uses to authorize users. Each user belongs to
one or many roles and the web pages of our site are configured against roles. So if a user belongs to a role that
is allowed to view a certain page, he will be able to.
Let us now write a small application to see these controls and concepts in action. We will develop a small website that has three types of users - free users, regular users, and premium
users. Each type of user will be able to see their respective list of downloads and the download list of the inferior role, i.e., premium could see regular list and free
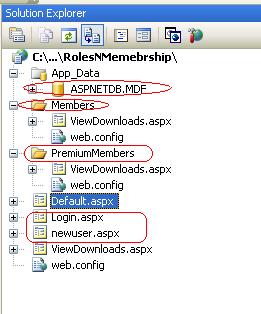
list, regular could see free list, tec. So let us first create the hierarchy of web pages to achieve this.

So we have created separate folders for each role and the top level will contain the files for free users. Now we
will configure these folders' access. We want two Roles in our application: Regular and Premium, rest of the
users will be considered free users.
Let us create the Roles using WSAT (Web Site Administration Tool).

Once we have the Roles created, we can create the access rules.

This can be done via WSAT or could be done directly from web.config. Following is the
web.config configured for "Premium Users".
="1.0"="utf-8"
<configuration xmlns="http://schemas.microsoft.com/.NetConfiguration/v2.0">
<system.web>
<authorization>
<allow roles="Premium" />
<deny users="*" />
</authorization>
</system.web>
</configuration>
<pre lang="xml">
Once we have done that, we have ensured that the respective folders can only be accessed if the user belongs to
a Role.
So now obviously the next step would be to create users and assign them Roles.
Before creating users, let's understand that we can use two types of authentication:
- Windows authentication: In this type, the users are authenticated on their
Windows username and password. This method is
least recommended in an internet scenario. In an internet scenario, we should always use "Forms based authentication".
- Forms based authentication: In this type of authentication, the user will explicitly have to provide his credentials and these credentials, once
verified by the server, will let the user to log in.
So we will be using forms based authentication. We can create users from WSAT and assign them roles.

Apart from that, we will also create users from the application front-end using ASP.NET server controls.
We will
have a CreateUserWizard control for that.
Note: We can use the Membership class to perform user management tasks from
within the code, such as creating, deleting, or modifying user accounts.

To assign roles, we will have to do this:
protected void CreateUserWizard1_CreatedUser(object sender, EventArgs e)
{
    if (RadioButtonList1.SelectedValue == "0")
    {
        string username = CreateUserWizard1.UserName;
        Roles.AddUserToRole(username, "Regular");
    }
    else if (RadioButtonList1.SelectedValue == "1")
    {
        string username = CreateUserWizard1.UserName;
        Roles.AddUserToRole(username, "Premium");
    }
}
We will use a Login control to let the user log in.

We have also added controls like LoginStatus and LoginName in the navigation region to display the login status and logged in user's name.

Now let us see what pages are there in our application and which user can access which page (apart from
the home page).

This can be accessed by any user who is not logged in and all Regular and Premium users.

This page can only be accessed by Regular and Premium users.

This page can only be accessed by Premium users.
Now we have a basic web application working with Roles configured. This application uses all the ASP.NET provided features for authentication and authorization.
Points of Interest
This article talked about the authentication and authorization mechanism provided by ASP.NET. This article is written from a
beginner's point of view. This should not be treated as a comprehensive tutorial on Roles and Membership in ASP.NET but as a
starting point for learning ASP.NET Roles and Membership.
History
- 05 March 2012: First version.
