Introduction
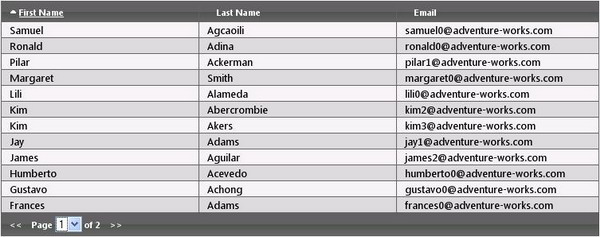
In this article, I’ll make a short introduction to the jTemplates jQuery plug-in, and will try to demonstrate how to build the following grid with it as a base.
Source code
The source code contains a web application with the implementation of a grid based on jTemplates. The grid supports sorting, paging, and row edit. The web application also contains a Web Service that simulates the interaction with the database.
jTemplates introduction
jTemplates is a template engine, written as a jQuery plug-in. jTemplates is very effective at rendering HTML on the client side. It makes it way easier to write and read HTML rendering code. The plug-in website can be accessed here: http://jtemplates.tpython.com/.
Why do we need at all to render HTML on the client side? There could be many reasons. First of all, it gives you the possibility to build rich web applications. Second, it could be used as a replacement of AJAX for updating parts of the page in certain conditions.
How does it work? First, you need to make sure you reference all required JavaScript files in the page you want to use it. There is the jQuery file and the jTemplates plug-in file. After downloading the files, add these lines to the page:
<script type="text/javascript" src="jquery.js"></script>
<script type="text/javascript" src="jquery-jtemplates.js"></script>
Now you need to define the template that will be used to render the HTML. There are a few ways to do it. It can be defined as a JavaScript string variable, or stored in any of the HTML elements (like hidden input, for example), or defined in a separate file. One nice feature is that you can include other templates in your template. Let’s say you need to render a table with two columns and store the template in a div. Then, the html will look like this:
<div id="templateHolder" style="visibility:hidden;">
    <table border="1">
        <tr>
            <th>
                First Name
            </th>
            <th>
                Last Name
            </th>
        </tr>
        {#foreach $T as record}
          <tr>
              <td>
                  {$T.record.FirstName}
              </td>
              <td>
                  {$T.record.Email}
              </td>
          </tr>
        {#/for}
    </table>
</div>
<div id="jTemplateDemo">
</div>
Where the templateHolder div will just hold the template and should be hidden, and the jTemplateDemo div will be used for rendering the template inside it. Below is the JavaScript code that will make all this work:
$(document).ready(function() {
    var data = [
                  { ID: 1, FirstName: 'Anne', Email: 'anne@domain.com' },
                  { ID: 2, FirstName: 'Amelie', Email: 'amelie@domain.com' },
                  { ID: 3, FirstName: 'Polly', Email: 'polly@domain.com' },
                  { ID: 4, FirstName: 'Alice', Email: 'alice@domain.com' },
                  { ID: 5, FirstName: 'Martha', Email: 'martha@domain.com' }
               ];

    $("#jTemplateDemo").setTemplate($("#templateHolder").html());
    $("#jTemplateDemo").processTemplate(data);
});
Here is the final result:

jTemplates also supports “for” and “if” operators. Also, inside the “foreach” operator, you can access the following variables:
$index - index of the element in the table$iteration - ID of the iteration (the next number begins from 0)$first - is this the first iteration?$last - is this the last iteration?$total - the total number of iterations
jTemplate user control overview
After starting working with jTemplates, I very quickly found that storing the jTemplate inside HTML elements, or even worse, in a JavaScript variable makes the HTML look a little messy. So, I ended up storing the template in separate files or inside the jTemplate user control I developed. The jTemplate control is very simple, and it basically does the following things:
- Allows to store the template inside the control.
- Allows to define a JavaScript code that will be executed right after the template is set.
- It processes the template with the data in case, on the server side, the
DataSource property was assigned and the DataBind method was called.
The control uses the Json.NET library to transform objects to their JSON representation on the server side:
The grid – How it was implemented
To implement the grid, I used the jTemplate user control. Inside its Template property, I defined the following template:
<Template>
    <table class="JTable">
    <tr class="head">
        {#foreach $T.Columns as column}
        <td>
            <span>  </span>
            <label class="ColumnLabel"
               for="{$T.column.ColumnName}">{$T.column.ColumnTitle}</label>
        </td>
        {#/for}
    </tr>
    {#foreach $T.Rows as row}
    <tr class="row {#if (($T.row$index + 1) % 2 == 0)}alt{#/if}"
               customerid="$T.row.ID" index="{$T.row$index}">
        {#foreach $T.row.Values as row}
        <td>{$T.row.Value}</td>
        {#/for}
    </tr>
    {#/for}
    <tr class="footer">
        <td colspan="{$T.Columns.length}">
            <label class="PagingButton PreviousPage"><<</label>
            Page <select class="PageSelector">
                {#for index = 1 to $T.PageNumber}
                <option{#if $T.index == $T.PageIndex + 1}
                   selected="selected"{#/if}>{$T.index}</option>
                {#/for}
            </select> of {$T.PageNumber}
               <label class="PagingButton NextPage">>></label>
        </td>
    </tr>
    </table>
</Template>
As you can see, the template is very straightforward and easy to read. The beauty of this template is that you can modify it the way you want, and you have total control over what’s rendered.
Also, I had to write some JavaScript code in the InitializationJavaScript property. The JavaScript code is for adding interactivity to the rendered HTML. If you check the code, you’ll see that the actual work with jTemplates is limited to one line and is a call to the processTemplate function inside the grid refresh method.
The DataSource property of the user control is assigned on the server side, and the template is processed using this data after the page load. However, later, the interaction with the server side is done only through Web Services. The reason for doing this is that I wanted to eliminate the delay between the page load and the grid load.
Things that can be improved
I think moving the JavaScript code to a separate file is a good idea. This way, you could reuse the control across different pages, and do not have to copy the JavaScript code over and over again. The only thing you’ll have to do in the InitializationJavaScript property is to extend the control object with the JavaScript class you will define in the separate file.
