This is the third installment in a series of articles in which I attempt to answer the question How much better would I be as a developer now, if I could have listened to the thought processes of other developers when they were writing applications?
Introduction
I remember, as a young developer, being in awe of people who could sit down and code, seemingly without any effort. Systems would seem to flow out of their fingers, effortlessly crafted, elegant, and refined. It felt like I was witnessing Michelangelo in the Sistine Chapel or Mozart sitting down in front of a fresh stave. Of course, with experience, I now know that what I was seeing was developers doing what developers do. Some were doing it well, and really understood the craft of development, while others were producing work that was less elegant and less well written. Over the years, I have been privileged enough to learn from some amazing developers but I keep coming back to the same basic question, time after time, namely…
How much better would I be as a developer now, if I could have listened to the thought processes of other developers when they were writing applications?
In this series of articles, I’m going to take you through what I’m thinking while I develop an application. The code that accompanies the article will be written as a “warts and all” development so you can see how I take something from the initial requirements phase through to something I would be happy for others to use. This means that the articles will show every mistake I make and the shortcuts I take while I’m fleshing ideas out. I’m not going to claim I’m a great developer here, but I am competent and experienced enough that this should help people who are new to the field get over their awe a lot earlier, and gain confidence in themselves.
Setting the Scene
This article is the follow up to Part 1 and Part 2 where we introduced the MVP for the HTTP GET operation. We are now going to look at the decision process behind creating a user interface, and create the basic interface.
Source Code
The code for this article can be downloaded from https://github.com/ohanlon/goldlight.xlcr/tree/article3.
Choosing a Technology
In Part 2, I mentioned that I have not chosen a User Interface technology for our application. I have reached a natural point to rectify this situation and pick a technology that I am going to use for the application. I have to admit that part of my decision making process is going to have to include you, the reader, as the target audience. I cannot make any assumptions that you know the same interface stacks that I do, so whatever technology I choose will also rely on me introducing and teaching sufficient basic of that stack for you to follow along with me.
I have some requirements that are going to help choose the stack for me.
- As many people will be using the application and they could be running the application on platforms other than Windows, I can't choose a technology that limits me to Windows.
- I am aware that many people reading this article really don't like XAML based application development. I don't want to alienate those readers so I have to steer clear of technologies that are based around XAML.
- The technology has to play well with .NET because of our C# functionality.
- The technology should be available now.
These requirements immediately rule out WPF (Windows only), Windows Forms (Windows only), Xamarin Forms (XAML), .NET Multi-platform App UI (coming in .NET 6), WinUI (Windows only) and QT (.NET).
The multi-platform nature is suggesting to me that we need to use a web based technology of some description. I want to use one that I'm familiar with so this leaves me with a choice of ASP.NET Core, Angular, Vue, React and Blazor. Most of these technologies will require me to create a web server to provide access to the C# code I have already written so they are all equal on this front. The purely web based technologies will require me to create a set of APIs that the front end will call, which will then interact with the existing C# code. If I go with server side Blazor, then I can use the C# code without adding that layer of indirection in place. If I use client side Blazor, then I can host all of my code directly in the browser. From this, I appear to have reached a decision. I am going to use Blazor to provide the user interface, but I still need to decide whether to use server-side Blazor or client-side Blazor.
According to Microsoft:
Quote:
"Blazor lets you build interactive web UIs using C# instead of JavaScript. Blazor apps are composed of reusable web UI components implemented using C#, HTML, and CSS. Both client and server code is written in C#, allowing you to share code and libraries."
There are, effectively, two types of Blazor application available to us. I could build a client side Blazor application which downloads the .NET assemblies into a Mono runtime hosted in the browser, so everything runs entirely client side. Alternatively, I can write a server side Blazor application where the server is a standard web server and the client interacts with the server via SignalR.
While I love the idea of a web assembly version of the application, the thought that is going through my head here is that the actual GET requests, etc. would be treated as a client side request, so they would be subject to CORS policies because the HTTP requests are implemented as fetch requests by the browser. This leaves me with server side Blazor. As the request is issued from the server side, it is not subject to CORS constraints.
Note: I could work around the CORS issue by introducing a proxy server to act between the application and the remote servers but for the sake of simplicity, I'm choosing not to do so.
Potential Enhancement
It is sitting in the back of my mind that, if I get the time with this application, I could encapsulate the Blazor server app as an Electron application. That is outside the scope of this article but is definitely one I can use later on if necessary.
Adding the Blazor app
If I am using Visual Studio 2019 or JetBrains, I can choose to add my UI component to my project using the Add New Project and choosing the Blazor server template. If I do this, I'm going to make sure I switch HTTPS support off because I don't need it at the moment.
Alternatively, I could use the techniques I covered in the introduction to this series and create the server using the following command.
dotnet new Goldlight.Xlcr.Ui -o BlazorApp --no-https
If you follow this approach, don't forget to add the project into the solution.
Before I start adding functionality, I want to see what our Blazor application looks like "out the box" so to speak. A quick build and run, and this is what I see (if you're in an IDE, it helps to make the UI application the startup object).
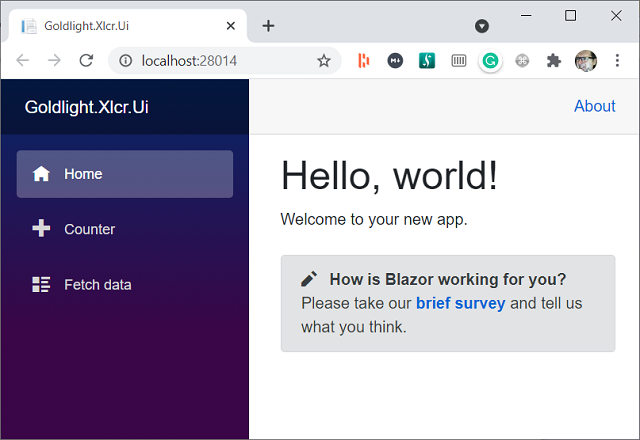
This is the boilerplate for a Blazor application showing off how to add and reference components.
Connecting Code Together
Obviously, I need to add a project reference to the goldlight.xlcr.core project inside our UI application. This is what my project file looks like with this addition.
<Project Sdk="Microsoft.NET.Sdk.Web">

  <PropertyGroup>
    <TargetFramework>net5.0</TargetFramework>
  </PropertyGroup>

  <ItemGroup>
    <ProjectReference Include="..\goldlight.xlcr.core\goldlight.xlcr.core.csproj" />
  </ItemGroup>

</Project>
When I wrote the GetRequest class, I always had it in mind that the request would be created in each page it was needed. In order to do this, I need to register the GetRequest class inside the ConfigureServices method in Startup.cs. To do this, I simply add the following line:
services.AddScoped<GetRequest>();
I am going to use the home page to test the GetRequest out. The file I need to change is inside the Pages folder, and it is called Index.razor.
This is what the page looks like currently:
@page "/"

<h1>Hello, world!</h1>

Welcome to your new app.

<SurveyPrompt Title="How is Blazor working for you?" />
I am going to get rid of everything in this page, except for the @page "/" directive. This is used by the Blazor routing engine to identify what route we will use to get to this page. As I mould the application, I will revisit routing in more depth.
The first things I am going to add are the HTML elements I am going to be using to perform a basic HTTP get operation. I am going to add a textbox and a button that will trigger the get request. This is what I am going to add first.
@page "/"

<input type="text" placeholder="Enter address to search for" />
<button>Go</button>
If I run the application now, I get, well I don't get what I thought I would get. I get the following exception.
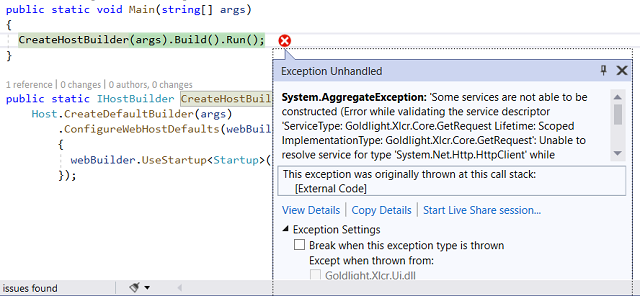
The reason I am seeing this is because I forgot that HttpClient does not automatically get registered in Blazor applications. What I am going to have to do now is add the http client. Back in my Startup class, I am going to augment my GetRequest registration to include the relevant registration like this:
services.AddHttpClient().AddScoped<GetRequest>();
I should now be able to run the application and see the textbox and button that I expected to see.
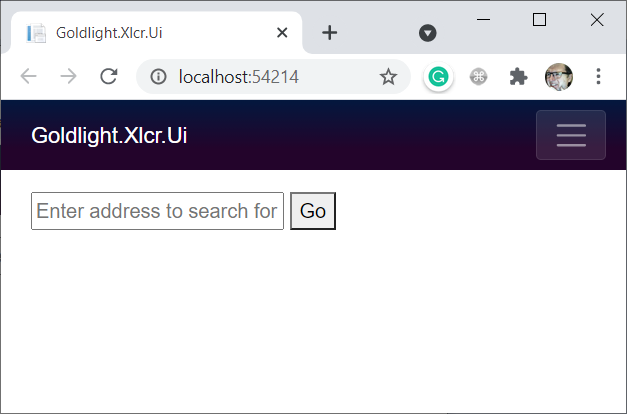
Now that I know that the page can be displayed, I am ready to turn my attention to actually calling the GetRequest class. As I am using dependency injection to inject the GetRequest operation, I am also going to have to add this to the page. The way I am going to do this is to use another @ directive to perform some action. In the page, I simply add this to inject the relevant class.
@inject Goldlight.Xlcr.Core.GetRequest Get
What this @inject statement is saying is that I have injected an instance of GetRequest into my page into a variable called Get.
Obviously, right now, I have nothing to connect the Go button up to the Execute method. In the razor page, I am going to add a section that is wrapped @code { }. This is going to allow me to add C# page directly onto the web page; a rather smart feature of Blazor. Before I add any code in though, I have to think about how I am going to do the search. I have a textbox so it would be useful if I could directly tie the value of the textbox into a property. I also want to create an asyncronous operation that gets triggered by the button click.
This is what this @code section will look like:
@code {
  private string searchAddress;
  private async Task ExecuteGet()
  {
      HttpResponseMessage result = await Get.Execute(searchAddress);
  }
}
Obviously, I want to hook this up to the textbox and button. In order to hook searchAddress up to the textbox, I am going to use the @bind declaration to tell Blazor what I want to bind the textbox input to. Similarly, I am going to use the @onclick declaration to bind the click event of the button to the ExecuteGet method.
The whole razor page looks like this at the moment.
@page "/"

@inject Goldlight.Xlcr.Core.GetRequest Get

<input type="text" placeholder="Enter address to search for" @bind="searchAddress" />
<button @onclick="ExecuteGet">Go</button>

@code {
  private string searchAddress;
  private async Task ExecuteGet()
  {
      HttpResponseMessage result = await Get.Execute(searchAddress);
  }
}
I should be able to run this now and test the functionality. I won't be able to see any output on the page at the moment but I can put a breakpoint on the HttpResponseMessage line and ensure the call works.

It would be useful for us to display the results of the search. To do this, I first add a property inside my code section. As this is the search result, I am just going to call this searchResult. To populate this, I am going to get the content as a string from the result variable like this:
searchResult = await result.Content.ReadAsStringAsync();
Finally, I need somewhere to display the result. To do this, I am going to use a div statement, and bind in the searchResult using syntax that looks like this:
<div>@searchResult</div>
Now when I run the application and search, I see the following:
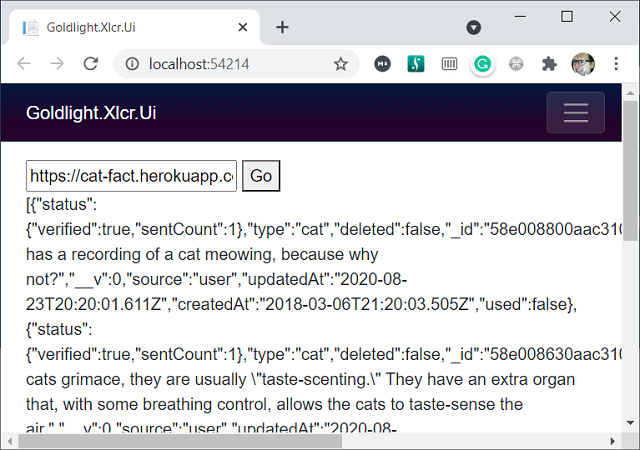
It certainly seems as though I have the basics of hooking up GetRequest to the page, but it's not very friendly right now. The user can click Go, even if the textbox is empty, so I want to add some simple checking to this. To do this, I can hook the disabled attribute from the button up to whether the textbox is empty or contains whitespace like this.
<button @onclick="ExecuteGet" disabled="@string.IsNullOrWhiteSpace(searchAddress)">Go</button>
Now for me to test this. Great, when I run this, the button is disabled. Ahhh, there's a problem. No matter what I put into this textbox, the button is staying disabled and I'm sure I have the logic right. What happens if I shift the focus away from the textbox? Ah, the button is enabled now.
The reason this has happened is because the bind is tied into the onchange event which is not fired until the textbox loses focus. What I actually want is for the evaluation to happen when I change the text, so I have to hook the bind up to the oninput event instead. Fortunately, Blazor provides a bind:event attribute that will let me do just that. With this adjustment, my code now looks like this.
@page "/"

@inject Goldlight.Xlcr.Core.GetRequest Get

<input type="text" placeholder="Enter address to search for"
 @bind="searchAddress" @bind:event="oninput" />
<button @onclick="ExecuteGet"
 disabled="@string.IsNullOrWhiteSpace(searchAddress)">Go</button>
<div>@searchResult</div>

@code {
  private string searchAddress;
  private string searchResult;
  private async Task ExecuteGet()
  {
      HttpResponseMessage result = await Get.Execute(searchAddress);
      searchResult = await result.Content.ReadAsStringAsync();
  }
}
Now, when I run the application, the button is enabled as soon as there is a character in the textbox and disabled when it is empty. I know that this is a naive implementation because we could have absolute garbage in this box, but it is enough for the moment.
Adding Some Style
Something I'm not particularly happy with right now is the layout of the textbox and the button beside it. I would like them to fill the width of the content area. What I want to be able to do is to apply CSS to this part of the layout to make things work the way I'd like. Blazor uses FlexBox layouts so I can use this to my advantage to control the way the page looks. The first thing I need to do is wrap the input and button fields into div elements. I am going to add an outer div with a d-flex class, which creates a simple flexbox container. The reason I want to do this is because I want to have the textbox and button appear side by side.
With the simple container in place, I am going to wrap the button into its own div and the input into a separate div. The input div needs to "flex" to fill the space. As this is the only item that needs to grow to fill its container, I am going to use a trick with a class of flex-grow-1. This shortcut basically says how much the container will grow by, in proportion to any other flexible items in the container. By default the flex is 0 so, as we haven't set an explicit flex size on our button, we will fill the available space.
I have run the application and realised that the input textbox still isn't stretching. While it appears that the size for the input box should be correct, the reality is that it is only going to be as large as the input text. What I want to do now is override the width of the input box. I'm not the biggest fan of adding styles directly to elements so I am going to create a CSS file to hold the styling. Before I add the stylesheet, I am going to add a class called search to my input element so that I can add a matching value in the CSS file.
In order to add a local stylesheet to just this view, I need to add a css file that matches the razor filename, just with .css at the end. I know this sentence sounds confusing but it's really straightforward. If I add a file called Index.razor.css, then this automatically gets added to as a resource when we hit the Index page. I just need to add a simple style to this file, so the stylesheet will look like this:
input.search {
  width: 100%;
}
Now, when I run the application, the textbox stretches to fill the available space as I would expect:
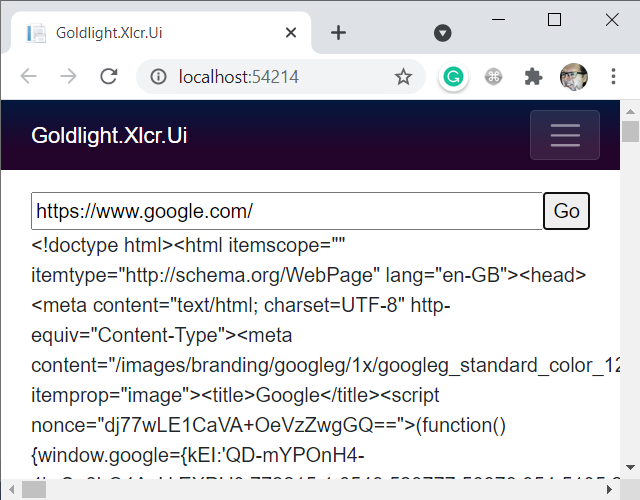
The actual razor file now looks like this:
@page "/"

@inject Goldlight.Xlcr.Core.GetRequest Get

<div class="d-flex">
  <div class="flex-grow-1">
    <input class="search" type="text"
     placeholder="Enter address to search for" @bind="searchAddress" @bind:event="oninput" />
  </div>
  <div>
    <button @onclick="ExecuteGet"
     disabled="@string.IsNullOrWhiteSpace(searchAddress)">Go</button>
  </div>
</div>
<div>@searchResult</div>

@code {
  private string searchAddress;
  private string searchResult;
  private async Task ExecuteGet()
  {
    HttpResponseMessage result = await Get.Execute(searchAddress);
    searchResult = await result.Content.ReadAsStringAsync();
  }
}
Conclusion
We now have a very basic page that lets us get simple APIs. I have chosen to end this article at this point to give you time to digest Blazor and to play around with what is, a simple project. In the next article, I will be going more in depth into Blazor and looking at how I can use tabs to allow me to add multiple HTTP requests. I really do hope you are enjoying this series as much as I am, and that this gives you insight into my thought processes.
History
- 20th May, 2021: Initial version
