This is one of a series of posts that discuss the key challenges encountered when migrating existing ASP.NET apps hosted on Windows to Linux Docker containers. One of those challenges was Windows Fonts, which this post is dedicated to.
Introduction
During a recent project, there was a requirement to migrate existing ASP.NET apps hosted on Windows to Linux Docker containers. Throughout this migration, numerous challenges arose, and a significant amount of time was dedicated to the migration process. In this post, as well as in subsequent posts with similar titles, I will outline briefly some of the key challenges that were encountered. One of those challenges was Windows Fonts, which this post is dedicated to.
TL;DR
Add the below lines to your Dockerfile on the target runtime container before running your application entry point to install Microsoft Core Fonts:
RUN apt update
RUN apt -y install fontconfig
RUN apt -y install ttf-mscorefonts-installer
RUN fc-cache -f
A Bit of History
Back in 1996, Microsoft started the project “Core fonts for the Web” to create a standard pack of fonts for the Internet and for their Windows operating systems. This pack includes the fonts Arial, Comic Sans MS, Courier New, Times New Roman and a few others. Over the years, these fonts gained a lot of popularity across Microsoft Windows and Office users. Unfortunately, they are not shipped with Linux.
Microsoft Core Fonts
While porting Windows ASP.NET Core applications to Linux, you might encounter issues in your application if you are using one of Microsoft Windows' core fonts. Fortunately, installing Microsoft Office fonts on Linux is not a challenging task. Follow the steps below to download and install Microsoft Core Fonts on Linux.
Open a terminal window and enter the below command to refresh your package list:
apt update
Now install the fontconfig utility using the below command:
apt install fontconfig
(Optional) You can list the installed fonts by executing the below command:
fc-list
After execution, you should receive output like this:
/usr/share/fonts/truetype/dejavu/DejaVuSerif-Bold.ttf: DejaVu Serif:style=Bold
/usr/share/fonts/truetype/dejavu/DejaVuSansMono.ttf: DejaVu Sans Mono:style=Book
/usr/share/fonts/truetype/dejavu/DejaVuSans.ttf: DejaVu Sans:style=Book
/usr/share/fonts/truetype/dejavu/DejaVuSans-Bold.ttf: DejaVu Sans:style=Bold
/usr/share/fonts/truetype/dejavu/DejaVuSansMono-Bold.ttf: DejaVu Sans Mono:style=Bold
/usr/share/fonts/truetype/dejavu/DejaVuSerif.ttf: DejaVu Serif:style=Book
As you can see from the above list, no Windows fonts are available in the list.
(Optional) You can test availability of any font by executing the below command:
fc-match Arial
You can see an output like the below indicates the fonts matching the pattern “Arial”, which is not available in our case:
DejaVuSans.ttf: "DejaVu Sans" "Book"
Now install the “Windows Fonts Installer” package by executing the below command:
apt install ttf-mscorefonts-installer
Next, flush and rebuild the fonts cache by executing the below command:
fc-cache -f -v
(Optional) Review the font list again by executing:
fc-list
Which will output a very long list of available fonts (output truncated for clarity):
/usr/share/fonts/truetype/msttcorefonts/Times_New_Roman_Italic.ttf: Times New Roman:style=Italic,ursive,kurzíva,kursiv,Πλάγια,Kursivoitu,Italique,Dőlt,Corsivo,Cursief,kursywa,Itálico,Курсив,İtalik,Poševno,nghiêng,Etzana
/usr/share/fonts/truetype/msttcorefonts/georgiaz.ttf: Georgia:style=Bold Italic,Negreta ursive,tučné kurzíva,fed kursiv,Fett Kursiv,Έντονα Πλάγια,Negrita Cursiva,Lihavoitu Kursivoi,Gras Italique,Félkövér dőlt,Grassetto Corsivo,Vet Cursief,Halvfet Kursiv,Pogrubiona kursywa,Negrito Itálico,Полужирный Курсив,Tučná kurzíva,Fet Kursiv,Kalın İtalik,Krepko poševno,Lodi etzana
(Optional) Try matching Arial font again by executing below command:
fc-match Arial
Now you can see the below match results, which indicates success in our case:
Arial.ttf: "Arial" "Regular"
You successfully installed Microsoft Core Fonts in your Linux machine, hooray! You can start using them in your application right away!
The Steep Price Tag of Calibri! Exploring the Costly Solutions
Unfortunately, the above explanation does not cover the installation of Calibri, as it is not part of the core package. This font, introduced in Microsoft Office 2007, is not available for free. Fortunately, we have two (or three!) options to consider:
Option 1: Carlito, The Real Bargain!
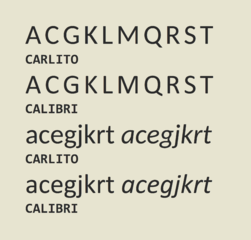
You can install Carlito, which was designed by Google for free use, and which has a very similar Latin, Greek, and Cyrillic glyphs compared to Calibri:

To install Carlito, execute the below command:
apt install -y fonts-crosextra-carlito
Option 2: Calibri, FTW!
Using Carlito for glyphs other than Latin is definitely not recommended. However, there is a legal way to obtain Calibri by installing the old view-only version of PowerPoint, which is available for free. But be aware that this option comes with a cost, as it requires a total package size of around 60MB and involves additional challenging steps.
To start, carefully, follow the following steps:
Install the wget tool to download the required apps:
apt install wget
Download Microsoft PowerPoint Viewer (total length around 60M):
wget https://archive.org/download/PowerPointViewer_201801/PowerPointViewer.exe
Install the cabextract tool to extract the downloaded PowerPoint package:
apt install cabextract
Now extract the package using below command:
cabextract PowerPointViewer.exe -F ppviewer.cab
The fonts are available in the extracted CAB file, create a folder for your fonts, and extract both TTF and TTF files to your new directory:
mkdir -p ~/.fonts/ppviewer/
cabextract ppviewer.cab -F '*.TTC' -d ~/.fonts/ppviewer/
cabextract ppviewer.cab -F '*.TTF' -d ~/.fonts/ppviewer/
You can see the below output which indicates success in our case:
Extracting cabinet: ppviewer.cab
  extracting /root/.fonts/ppviewer//CAMBRIA.TTC
  extracting /root/.fonts/ppviewer//MEIRYO.TTC
  extracting /root/.fonts/ppviewer//MEIRYOB.TTC
All done, no errors.
Extracting cabinet: ppviewer.cab
  extracting /root/.fonts/ppviewer//CALIBRI.TTF
  extracting /root/.fonts/ppviewer//CALIBRIB.TTF
  extracting /root/.fonts/ppviewer//CALIBRII.TTF
(truncated)
Now you can check the list of installed fonts by executing the below:
fc-list
Also, you can match Calibri or any other font of the Microsoft fonts by executing the below:
fc-match Calibri
Which outputs:
CALIBRI.TTF: "Calibri" "Regular"
After finishing, you can cleanup by deleting the downloaded package as well as the extract CAB file:
rm PowerPointViewer.exe
rm ppviewer.cab
Windows Vista Font Installer
The same steps in option 2 can be executed faster by using the “Windows Vista Fonts Installer” script, which has full explanation here:
Uninstall the Microsoft Core Fonts
Finally, to uninstall the Microsoft Core Fonts, you can use the below script. Be sure to flush and clear fonts cache after execution:
apt autoremove ttf-mscorefonts-installer --purge
Then, We Came to the End!
“Yet for all the depression, no one ever quit”. So, keep smiling, stay curious, and remember that knowledge grows exponentially when it is shared.
Have a great day!
History
- 4th March, 2024: Initial version
