Introduction
This document provides an overview on how to configure various (On-Premise) caching systems and integrate them with your Entity Framework Core queries, to improve the performance through-put and alleviate unnecessary database (select) calls.
Purpose
Your solution maybe in a situation, where you now need to scale up, or move away from an in- memory caching approach (for e.g. IMemoryCache) to a more robust, production grade caching system. One that will allow you to add extra nodes to your cluster when needed, or keep the integrity of your data, after a server reboot, or replicate your cached data across multiple locations.
Scope
The scope of this document is to quickly convey the configuration steps for the caching system, but more importantly how to use them with .Net Core and not compromise the SOLID principal, if you switch caching mechanism in the future (your services still inherit from IDistributedCache).
Prerequisites
Why Incorporate a Distributed Caching Mechanism into Your Solution
Distributed Caching is a technique where we maintain the cache as an external service, that multiple app servers can use. This is different from In-Memory Caching where we cache the data in the app server’s memory (making it volatile on reboots). Distributed caching can greatly improve the performance and scalability of an app and is a great choice when we host our application on multiple servers or in the cloud.
1. Improved Performance
- Reduced Latency: Caching frequently accessed data in memory significantly reduces access times compared to fetching data from a slower backend data store or database.
- Quick Data Retrieval: Distributed caches provide quick access to cached data, reducing the time it takes to serve requests.
2. Scalability
- Horizontal Scaling: Distributed caches can scale horizontally by adding more nodes to the cache cluster. This allows the cache to handle increased load without significant performance degradation.
- Load Distribution: By distributing the cached data across multiple nodes, the load is evenly spread, preventing any single node from becoming a bottleneck.
3. High Availability and Fault Tolerance
- Replication: Distributed caches like Redis and NCache support data replication across multiple nodes, ensuring that data is not lost if a node fails.
- Failover Support: In case of node failures, the cache can automatically failover to replica nodes, ensuring continuous availability.
4. Cost Efficiency
- Reduced Backend Load: By offloading frequent read operations to the cache, the load on backend databases and services is reduced, potentially lowering costs associated with database scaling and performance optimization.
- Efficient Resource Utilization: Memory is generally faster and cheaper for read operations compared to persistent storage, providing a cost-effective solution for high-read scenarios.
5. Flexibility and Features
- Advanced Data Structures: Distributed caches like Redis offer a variety of data structures such as strings, hashes, lists, sets, and sorted sets, which can be used to efficiently store and retrieve different types of data.
- TTL and Expiry Policies: Caches support time-to-live (TTL) and expiration policies, allowing you to automatically invalidate and remove stale data.
- Pub/Sub and Other Features: Some caches, like Redis, offer additional features such as publish/subscribe messaging, Lua scripting, and transactions, adding more flexibility to your application architecture.
6. Support for Various Use Cases
- Session Storage: Storing user sessions in a distributed cache ensures that session data is available across multiple application instances, facilitating load balancing and horizontal scaling.
- Content Caching: Frequently accessed static content, such as images, HTML, and configuration data, can be cached to reduce latency and backend load.
- Database Caching: Caching database query results can significantly improve application performance by reducing the number of database reads.
- Distributed Locking: Distributed caches can be used for distributed locking mechanisms to synchronize access to shared resources in a distributed environment.
7. Consistency and Data Integrity
- Atomic Operations: Distributed caches like Redis provide atomic operations, ensuring that data integrity is maintained even when multiple clients are accessing and modifying the cache concurrently.
- Eviction Policies: Various eviction policies (e.g., LRU, LFU) help manage the cache size and ensure that the most relevant data remains in memory.
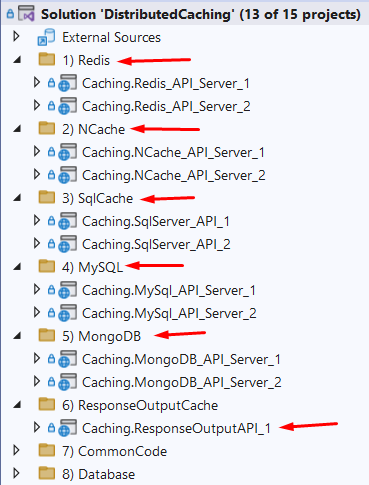
Project Structure
Below, you can see the solution layout, with multiple projects per Caching System. This is so we can run multiple requests at the same time, where one server will find that the cache is empty for a key (cache miss), then query the database and populate the cache. The second server call will find data in the cache (cache hit) and return that without going to the database.
There is only one project for the Response Output Caching example, as the data is cached on the respective server (not at the distributed caching system level). So, a second server API call with Response Output Caching will not know about the first server’s cache. But I have included it as I believe it is a good mechanism to use in conjunction with a distributed caching system.
I have implemented the MongoDB Caching System, as a cache collection only, with a SQL Server database as the Source of Truth for the database queries, and (non-SQL) MongoDB as the Source of Cache.
Caching Systems Setup (On-Premise)
Redis
The following YouTube video is a good guide to install Redis on Windows. You can download the (msi) installer from this GitHub site:

Once installed, navigate to the installation folder, and double click the file redis-server.exe to start Redis.
To monitor and configure Redis with a GUI tool, download and install Redis Insights. Then perform an app search for Redis Insight:
From here you can scale up you’re caching by adding more Nodes to the (Distributed Cache) Cluster.
Now you can view\filter data within the Redis Cache itself:
NCache
To use the distributed features of NCache, you will need to download the Enterprise version. Fill in the appropriate details and then download.
When you are installing NCache, do not select the Developer/QA option - this is free, but you will not be able to use the distributed caching features – select the Cache Server option.
You will get emailed an installation key, use this key during the installation process:
Once installed, you can bring up the NCache Web Portal by performing an app search for NCache:
If you find that the NCache Web Portal page isn’t loading, ensure that the NCache service (NCacheSvc) is running:
Below, you can see a clustered (Distributed) cache:
NB: If you want to be able to view your cache data as text not binary, change this option within the View Details link, change from Binary to JSON format and save changes.
NB: I found that the config.ncconf file that the NuGet package (NCache.Microsoft.Extensions.Caching) installed, caused conflicts with the config settings I had in the code – so I removed the config.ncconf file from the project.
NB: Configure your NCache project to target an OS architecture of x86, I feel this maybe more to do with the architecture of NCache!
Code Explanation
IDistributedCache Interface
The IDistributedCache interface is a key component in .NET's caching infrastructure, designed to provide a simple and consistent API for working with distributed caches. This interface is part of the Microsoft.Extensions.Caching.Distributed namespace and is typically used for scenarios where you need to cache data across multiple servers, ensuring that the cached data is available to all instances of your application. The IDistributedCache interface provides the following methods to manipulate items in the distributed cache implementation:
- Get, GetAsync: Accepts a string key and retrieves a cached item as a
byte[] array if found in the cache. - Set, SetAsync: Adds an item (as
byte[] array) to the cache using a string key. - Refresh, RefreshAsync: Refreshes an item in the cache based on its key, resetting its sliding expiration timeout (if any).
- Remove, RemoveAsync: Removes a cache item based on its string key.
Common Code
The solution will use an Abstract class that has one custom method called RetrieveEmployeeByNameAsync. A service has been created for each of the database contexts (to keep things simple).
Example of the RetrieveEmployeeByNameAsync method implemented. Each of the services inherits this method from the Abstract class (DistributedServiceBase). You will see that IDistributedCache is injected into the Abstract class, but it will be associated with a different DBContext.
The code checks the cache first (cache hit) to see if the data is there, if not (cache miss), it will query the database and then cache the new data for any preceding calls (with a sliding timespan).
Injecting IDistributedCache through the constructor, I do not have to implement any functionality for the IDistributedCache methods. These are automatically implemented; all I need to do is tell it what database to connect to when it needs to query the cache (this is setup in the API projects).
For e.g., in the SqlServerDistributedService class, the appropriate properties are passed to the base class (in this case the IDistributedCache). I also overdrive base class properties (Logger and Database Context) – this approach is taken for each of the services.
EF Core DBContext
For this tutorial, I am using two different databases as the data source (SQL Server & MySQL), thus I created two DBContext classes. The models are a reflection of the database schema.
The one thing to note within the DBContext classes, is that when you are referring to the appsetting values, you are actually using the appsetting of the parent (which is the API in this case).
MySQL Database
For this demo, I will only be using the Employee’s table.
SQL Server Database
Coding Configuration
Redis
Add the following package Microsoft.Extensions.Caching.StackExchangeRedis, into your project to use the Redis Cache middleware.
In the snippet of code below, you can see that I am injecting our custom service class SqlServerDistributedService that inherits from the interface IDistributedService (we are using SQL Server as our data source and Redis as our distributed caching system).
Within the custom service SqlServerDistributedService, the IDistributedCache is injected through the constructor, thus we can generically use the DistributedCache middleware for that Caching System (based on the configuration setting AddStackExchangeRedisCache within program.cs)
NCache
Add the following package NCache.Microsoft.Extensions.Caching, into your project to use the NCache middleware.
In the snippet of code below, you can see that I am injecting our custom service class SqlServerDistributedService that inherits from the interface IDistributedService (again we are using SQL Server as our data source and NCache as our distributed caching system).
Within the custom service SqlServerDistributedService, the IDistributedCache is injected through the constructor, thus we can generically use the DistributedCache middleware for that Caching System (based on the configuration setting AddNCacheDistributedCache within program.cs)
Monitor Activity in Web Portal
Navigate to http://localhost:8251/ClusteredCaches
And click on the Monitor button.
When you run the demo against NCache you will see spikes in caching.
SqlCache
Add the following package Microsoft.Extensions.Caching.SqlServer, into your project to use SQLCache middleware.
In the snippet of code below, you can see that I am injecting our custom service class SqlServerDistributedService that inherits from the interface IDistributedService (again we are using SQL Server as our data source and SQLCache as our distributed caching system).
Within the custom service SqlServerDistributedService, the IDistributedCache is injected through the constructor, thus we can generically use the DistributedCache middleware for that Caching System (based on the configuration setting AddDistributedSqlServerCache within program.cs)
Create SQL Server Caching Table
Once the NuGet package has been installed, the next step is to install the tooling support for SQL-Cache in .net CLI, so that we can generate the required tables within SQL Server to hold the cached data.
From Visual Studio, open the package manager console and enter the following command.
dotnet tool install -g dotnet-sql-cache
Now you can use the tool to create the database table where you will be storing the cached entries (note the space between dbo DistributedCacheTable in the command below).
dotnet sql-cache create "Data Source=(localdb)\MSSQLLocalDB;Initial Catalog=EmployeeDatabase;Trusted_Connection=True;MultipleActiveResultSets=true;" dbo DistributedCacheTable
The SQL-Cache create command, is expecting a connection string, the schema name and a table name that will get created within the target database.
The following is the schema of the table that is created by the dotnet tool.
In the image below, you can see an example of the cached data within DistributedCacheTable table.
NB The Absolute Expiration (2024-07-05 14:36:59.9846372 +00:00) - if I re-query using the IDistributedCache API, the cached data will not be there. But if I re-query within SQL Server editor - I can still see the cached data!
And after re-running the API request, the data is cached again the same key but a new Absolute Expiration date.
MySqlCache
Add the following package Pomelo.Extensions.Caching.MySql, into your project to use the Redis Cache middleware.
In the snippet of code below, you can see that I am injecting our custom service class MySqlServerDistributedService that inherits from the interface IDistributedService (this time we are using MySQL as our data source and our distributed caching system).
Within the custom service MySqlServerDistributedService, the IDistributedCache is injected through the constructor, thus we can generically use the DistributedCache middleware for that Caching System (based on the configuration setting AddDistributedMySqlCache within program.cs)
Create MySQL Server Caching Table
Once the NuGet package has been installed, the next step is to install the tooling support for the MySQL Cache in .net CLI, so that we can generate the required tables within MySQL to hold the cached data.
From Visual Studio, open the package manager console and enter the following command.
dotnet tool install --global Pomelo.Extensions.Caching.MySqlConfig.Tools
Now you can use the tool to create the database table where you will be storing the cached entries.
dotnet mysql-cache create "server=localhost;user id=bertoneill;password=P@ssw0rd;port=3306;database=employeedatabase;Allow User Variables=True" "mysqlcache" --databaseName "employeedatabase"
The mysql-cache create command, is expecting a connection string, the new cache table name and the database name.
The following table is created by the dotnet tool.
In the image below, you can see an example of the cached data within mysqlcache table.
MongoDBCache
Using a SQL UI tool like MongoDB Compass, you can create your database and collection (to hold your cached data) – below, I have created the database MongoCache and the collection AppCache
Then add the following package MongoDbCache, into your project to use the MongoDB Cache middleware.
In the snippet of code below, you can see that I am injecting our custom service class MongoDBDistributedService that inherits from the interface IDistributedService (again we are using SQL Server as our data source and MongoDbCache as our distributed caching system).
Within the custom service MongoDBDistributedService, the IDistributedCache is injected through the constructor, thus we can generically use the DistributedCache middleware for that Caching System (based on the configuration setting AddMongoDbCache within program.cs)
An example of the Non-SQL data cached within the MongoDB database.
Response Output
You would use Response Output caching in conjunction with an existing caching system, when the API is called for the first time, it will check the cache (for e.g. Redis) for the data. When it is not found (cache-miss), the database will be queried and the (Redis) cache updated. That data is then returned to the client, but also cached by the API too.
At this stage the data is cached in two places, but you should make your Caching System (Redis) hold onto the data longer than your API. So, now you will not hit the database as often because of the Caching System (Redis) and your Caching System should not be hit as often because of the response Output caching.
NB: The duration of the cache for your API (Output) should be shorter than the caching time in your Cache System (for e.g. Redis).
To be more granular with each API’s (as some API’s may need their data cached longer than others), create polices that fit the cache duration of each API – if no policy used, the default is 20 seconds.
To enable response caching for your minimal API, you just need to add the annotation [OutputCache] to the API signature (and use a policy or not).
You can use SQL Profiler to verify that your API Response Output cache, is not making its way back to the database on a retry. Plus, put a breakpoint within the caching service to also verify that the cache is not being hit (until the Response Output duration has lapsed).
Demo
Start Redis Caching System
Ensure that the Redis Caching System, has started (double click redis-server).
Start Redis Insights
By using this UI tool, we can verify that the data got added to the cache.
Running Both Redis API’s
Set both Redis APIs to start when you run the solution (right click on the solution and select Properties):
This will start two Swagger browsers – one for each project.
In the SqlServerDistributedService class, add a breakpoint within the function RetrieveEmployeeByNameAsync, just after the IDistributedCache call to query the caching mechanism for data.
First time in, there will be no data found from the cache (cache-miss), thus the database will be queried, and the data cached for any other calls within 60 seconds.
Run the first API GetEmployeeByName by entering Jane Doe and clicking Execute.
The code path will make its way to the breakpoint, here you will see that the cache property is NULL.
Next, the cache will be populated with the data from the database.
Response from first API call:
Run the second API GetEmployeeByName by entering Jane Doe and clicking Execute.
Now when the second API code path hits the breakpoint, the cache property is populated.
SQL Server Cache Table
Redis Insights Cached Data
Hit the refresh link, if you don’t see any entries.
Performance Tip
Static JsonSerializerOptions option
When you scale to a production environment, with a large volume of calls, it will be more beneficial to use a static JsonSerializerOptions and DistributedCacheEntryOptions – which can be stored in memory and not need to be created for each request return:
private static JsonSerializerOptions _serializerOptions = new JsonSerializerOptions
{
    PropertyNamingPolicy = null,
    WriteIndented = true,
    AllowTrailingCommas = true,
    DefaultIgnoreCondition = JsonIgnoreCondition.WhenWritingNull
};
Static Caching option
private static DistributedCacheEntryOptions _cacheOptions = new DistributedCacheEntryOptions
{
AbsoluteExpiration = DateTimeOffset.UtcNow.AddMinutes(2),
AbsoluteExpirationRelativeToNow = TimeSpan.FromMinutes(5),
SlidingExpiration = TimeSpan.FromMinutes(2)
};
Cache Expiration Options Explained
AbsoluteExpiration
This property specifies the exact date and time at which the cache entry should expire and be removed from the cache.
AbsoluteExpiration = DateTimeOffset.UtcNow.AddMinutes(2)
In this example, the cache entry will expire exactly 2 minutes from the current UTC time, regardless of when it was last accessed.
Use AbsoluteExpiration when you have a precise expiration requirement, such as a cache entry that should expire at midnight of a specific day.
AbsoluteExpirationRelativeToNow
This property sets a time span after which the cache entry will expire, starting from the time it was added to the cache.
AbsoluteExpirationRelativeToNow = TimeSpan.FromMinutes(5)
Here, the cache entry will expire 5 minutes after it is added to the cache, irrespective of subsequent access.
Use AbsoluteExpirationRelativeToNow for general caching scenarios where entries should expire after a certain period, such as caching data for 10 minutes after it is fetched from the database.
SlidingExpiration
This property defines a time span that resets every time the cache entry is accessed. If the entry is not accessed within this period, it expires.
SlidingExpiration = TimeSpan.FromMinutes(2)
In this example, the cache entry will expire if it is not accessed for a continuous 2-minute period. Each access resets the expiration timer.
Using SlidingExpiration is ideal for scenarios like session management, where you want to keep data in the cache as long as it is actively used. It ensures that frequently accessed data remains in the cache, while data that is not accessed within a specified time period is automatically purged. This helps in managing cache memory efficiently and providing a better user experience by keeping relevant data readily available.
Miscellaneous
Acronym
| Abbreviation | Meaning |
| EF | Entity Framework |
| EFC | Entity Framework Core |
| SQL | Structured Query Language |
| TSQL | Transact Structured Query Language |
| LFU | Least Frequently Used |
| LRU | Least Recently Used |
| TTL | Time-To-Live |

