With the growing adoption and reliance on smartphones and tablets in the competitive handheld industry, mobile applications need to be built across all major mobile operating platforms to reach the demanding customer base. These expectations leave mobile developers with the daunting task of building expertise in Android, iOS, and Windows Mobile. I will be the first to admit from first-hand experience, that moving from developing for Android to iOS or vice-versa can be difficult as every SDK has its own quirks.
As a working developer in the middle of my graduate studies, time is a big constraint. I often have class assignments that require me to develop in multiple mobile operating platforms. Therefore, I was delighted to learn about PhoneGap.
About
PhoneGap is an open source framework that allows the building of applications across major mobile platforms using languages you are already familiar and comfortable with, like HTML5, JavaScript, and CSS. It can be compiled using platform-native tools. The JavaScript API is defined to facilitate access to device features for supported platforms.
To familiarize myself with PhoneGap functionality, I decided to start small by building a simple application for an iPhone. Before diving into development of the application, please make sure that the following software tools are installed on your development machine.
Required Software Tools and Devices
- Mac OS X Lion or greater (10.7.4+)
- iOS 6 SDK and Xcode 4.5.2 (latest version of Xcode)
- Xcode command line tools
- PhoneGap
- iOS device (for testing) optional
Example Application
I developed a basic application to create a new contact with first name, last name, and a note using HTML, jQuery, and JavaScript. I used an HTML form to get the user input and integrated it with PhoneGap’s contact object.
To create a new project and run the Create script; go through the following steps:
- Locate the PhoneGap directory
- Inside the directory, go to lib/ios/bin
- Launch the Terminal and change the directory to point to the bin folder identified above (Tip: Drag the bin folder to the Terminal to accomplish this step)
- Run the create script with “./create ~/Documents/Cordova/ContactTest org.apache.cordova.ContactTest ContactTest”.
I have broken down the script to provide more definition:
- ~/Documents/Cordova/ContactTest is the project directory location
org.apache.cordova.ContactTest is the package name. It must be the reverse domain App ID created in the Apple provisioning portal.ContactTest is the project name
Finally, the project for iPhone is created and you are now ready to open the project in Xcode. You can find the default Index.html file under the www folder.
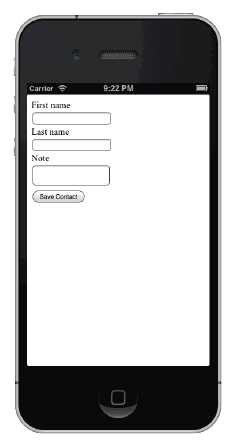
To create a contact, we will prompt the user to input the values with an HTML form in the body of index.html with the following code:
<form id="cform"><label for="firstname">First name </label>
 <input id="firstname" type="text"
 name="first" />
 <label for="flastname">Last name </label>
 <input id="lastname" type="text" />
 <label for="note">Note </label>
 <textarea id="note"></textarea>
 <input id="btnSave" onclick="saveContact()"
 type="button" value="Save Contact" />
</form>
We are using jQuery, so be sure to include the following script in header:
<script charset="utf-8" type="text/javascript"
src="js/jquery-1.8.2.min.js"></script>
<script charset="utf-8" type="text/javascript"
src="js/jquery.mobile-1.2.0.min.js"></script>
Run the project in a simulator to ensure that your UI looks similar to this screenshot:

When a user clicks on “Save Contact,” the ‘SaveContact()’ function is called and defined in the header. We will get the values that the user entered in the form inside the “saveContact” function with the following JavaScript:
var fname = document.getElementById('firstname').value;
var lname = document.getElementById('lastname').value;
var fullname = fname + " " + lname;
var note = document.getElementById('note').value;
To save the information on the phone, we need to create a contact and assign the gathered information. “Contact.Create()” creates and returns the new contact – but it is not saved on mobile phone yet. Assign the values to the contact and then save the contact using “Contact.save()” which saves the contact in the mobile phone. Here is the code:
var contact = navigator.contacts.create();
contact.displayName = fullname;
contact.note = note;
var name = new ContactName();
name.givenName = fname;
name.familyName = lname;
contact.name = name;
contact.save(onSaveSuccess,onSaveError);
You can access the full code of the application on Keyhole Software’s GitHub repository.
Final Notes
If you are already familiar with HTML, CSS and JavaScript, PhoneGap is an easy way into any mobile native application development. However, if your application is complex and needs to deal with massive amounts of data, it is advised to create a web service or server that can be accessed over XML. If you want to implement such a complex function in a native application environment, I would suggest using another medium. But for simple applications that can be implemented with HTML, PhoneGap is a good option as it provides the capacity to use the same code for a variety of mobile platforms. Overall, if you want to learn mobile platform development, PhoneGap is a good starting point.
Also, PhoneGap has recently released PhoneGap Build. PhoneGap Build compiles code, once submitted, on the cloud and provides a deployable application for multiple mobile platforms. More details about PhoneGap and PhoneGap Build can be found here. Good luck!
– Jinal Patel, asktheteam@keyholesoftware.com
