It has never been easier for C# desktop developers to write code that takes advantage of the amazing computing performance of modern graphics cards. In this post I will share some techniques for solving a simple (but still interesting) image analysis problem.
https://www.assembla.com/code/cudafypapyrus/subversion/nodes
Building The Application
To reproduce the work below requires that you have an graphics card that supports CUDA or OpenCL. I’ve run this code just fine on a GTX Titan ($1000) and on a GT 230 ($100) in both CUDA and OpenCL modes.
- Obtain Software:
- For CUDA for your NVidia GPU, obtain CUDA from NVidia: https://developer.nvidia.com/cuda-downloads
- For OpenCL for your GPU, your video driver should be all that you need.
- For OpenCL for your Intel CPU, obtain this SDK: http://software.intel.com/en-us/vcsource/tools/opencl-sdk
- For CUDAfy, for your C# development, obtain this DLL: http://cudafy.codeplex.com/.
As of this writing, you need to obtain version 1.23 (alpha) if you want OpenCL support in CUDAfy.
- For development, obtain Visual Studio. If you are doing CUDA work, you need the 2010 C++ compiler lurking on your HDD. You can use VS2010 or VS2012 for all the work in this article.
- For CUDA work, ensure that your environment variable PATH contains a link to the VS2010 C++ compiler. Mine includes this string: C:\Program Files (x86)\Microsoft Visual Studio 10.0\VC\bin
- Add a reference to Cudafy.net to the application.
The Problem
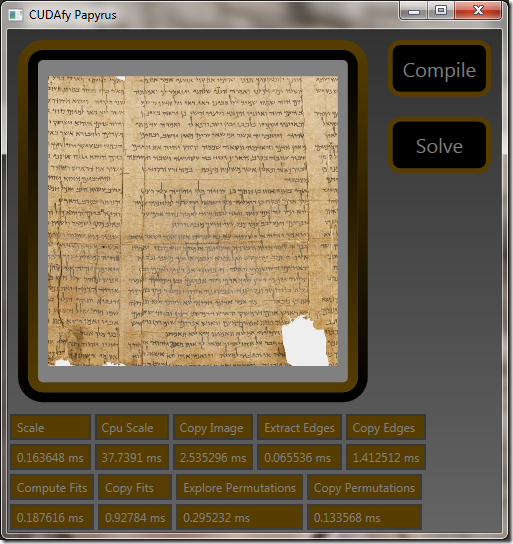
Restore an image that has been divided into 9 tiles, where the tiles have been randomly rearranged. Here is a fragment of a scroll (containing Isaiah 6:10) that has been scrambled.

Scaling the Image
The first step is to scale the image to a manageable size. In this case, I decided on a scaled image size of 192x192 pixels. I also decided to remove the color component and work directly with the gray scale image.

The C# code that runs on the CPU, reads as follows:
var cpuImage = new MyImageReader(sourceFileName);
var gpuImage = Gpu.Allocate<uint>(cpuImage.Pixels.Length);
Gpu.CopyToDevice(cpuImage.Pixels, gpuImage);
var gpuScaledImage = Gpu.Allocate<byte>(64 * 3, 64 * 3);
Gpu.Launch(new dim3(12, 12), new dim3(16, 16),
ScaleImageKernel, gpuImage, cpuImage.Width, cpuImage.Height, gpuScaledImage);
The last line of code launches a function on the GPU called ScaleImageKernel. The first two parameters to Gpu.Launch specify the number of blocks (12x12) and the number of threads in each block (16x16). This then gives us one thread per pixel in the scaled image.
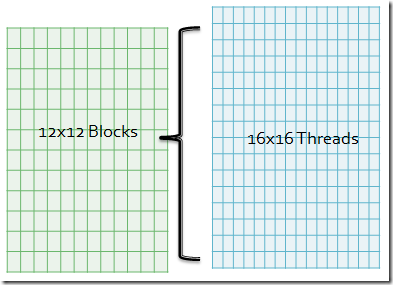
You might wonder why we don’t just launch a single block (whatever that is) with 192x192 threads. The answer is pretty simple. CUDA only allows 1024 threads per block. So, now you might wonder why we don’t just launch 192x192 blocks with one thread each. The answer is pretty simple. Each block carries with it an overhead that you want to minimize. You might wonder what the optimal number of blocks and threads/block are for this problem. NVidia supplies a neat spreadsheet called the CUDA_Occupancy_Calculator.xls that can help. Another option is to try different sizes and see what works best.
The remaining parameters are passed to the ScaleImageKernel function on the GPU. Just to be clear, the ScaleImageKernel is invoked once for each of the 192x192 threads. The C# code that (when translated by CUDAfy) runs on the GPU, reads as follows:
[Cudafy]
public static void ScaleImageKernel(GThread gThread, uint[] sourceImage, int sourceWidth, int sourceHeight, byte[,] scaledImage)
{
    var scaledX = gThread.blockIdx.x * gThread.blockDim.x + gThread.threadIdx.x;
    var scaledY = gThread.blockIdx.y * gThread.blockDim.y + gThread.threadIdx.y;

    var sourceX = scaledX * sourceWidth / scaledImage.GetLength(0);
    var sourceY = scaledY * sourceHeight / scaledImage.GetLength(1);

    var sourcePixel = sourceImage[sourceX + sourceY * sourceWidth];
    var blue = sourcePixel & 0xFF;
    var green = (sourcePixel >> 8) & 0xFF;
    var red = (sourcePixel >> 16) & 0xFF;

    scaledImage[scaledX, scaledY] = (byte)(red * 0.3f + green * 0.6f + blue * 0.1f);
}
For each invocation, the scaled destination pixel is directly obtainable given the current block and thread index. These values are passed into the function via a special parameter of type GThread. You should be able to follow the code easily enough, including the conversion to gray scale.
What some of you might notice is that this reduction kernel does not average the various source pixels, but rather simply copies one of the source pixels and ignores the rest. Well, it is always best to start simple, but now we can introduce an enhanced version of the kernel called EnhancedScaleImageKernel:
[Cudafy]
public static void EnhancedScaleImageKernel(GThread gThread, uint[] sourceImage, int sourceWidth, int sourceHeight, byte[,] scaledImage)
{
var scaledX = gThread.blockIdx.x * gThread.blockDim.x + gThread.threadIdx.x;
var scaledY = gThread.blockIdx.y * gThread.blockDim.y + gThread.threadIdx.y;
EnhancedScaleImagePixel(sourceImage, sourceWidth, sourceHeight, scaledImage, scaledX, scaledY);
}
[Cudafy]
private static float EnhancedScaleImagePixel(uint[] sourceImage, int sourceWidth, int sourceHeight, byte[,] scaledImage, int scaledX, int scaledY)
{
var startX = scaledX * sourceWidth / scaledImage.GetLength(0);
var startY = scaledY * sourceHeight / scaledImage.GetLength(1);
var endX = (scaledX + 1) * sourceWidth / scaledImage.GetLength(0);
var endY = (scaledY + 1) * sourceHeight / scaledImage.GetLength(1);
var sum = 0f;
var count = 0;
for (var sourceX = startX; sourceX < endX; sourceX++)
{
for (var sourceY = startY; sourceY < endY; sourceY++)
{
var sourcePixel = sourceImage[sourceX + sourceY * sourceWidth];
var blue = sourcePixel & 0xFF;
var green = (sourcePixel >> 8) & 0xFF;
var red = (sourcePixel >> 16) & 0xFF;
sum += red * 0.3f + green * 0.6f + blue * 0.1f;
count++;
}
}
scaledImage[scaledX, scaledY] = (byte)(sum / count);
return 0;
}
For reasons to be explained later, I decided to place the implementation of the kernel in a separate function called
EnhancedScaleImagePixel. In any case, there you go… a kernel that scales an image to 192x192 by averaging source pixels and removing the color component.
Vs. CPU
Now is later. I wanted to compare the speed of the GPU with the CPU. Because of the way is written, I can now call it from the CPU in a parallel loop to time the difference:
Parallel.For(0, 192 * 192, p => {
    var x = p % 192;
    var y = p / 192;
    EnhancedScaleImagePixel(sourceImage, sourceWidth, sourceHeight, scaledImage, x, y);});
Amazingly enough, the GPU performs this task over 100 times faster than the CPU for my configuration… which is a Dell Precision T3600, 16GB RAM, Intel Xeon E5-2665 0 @ 2.40GHz, NVidia GTX Titan.
Extracting the Edges
In my wisdom, I’ve decided the best way to solve this problem is to compare the edge pixels of each of the 9 tiles with each other to determine the best arrangement of tiles. That means I can dispense with most of the scaled image. That is kind of sad since it was so fun to create.
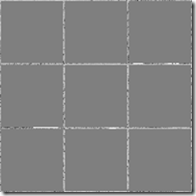
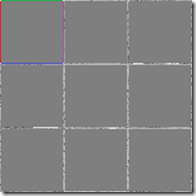
We have 9 tiles, each with 4 edges, and each edge has 64 pixels. The C# code that runs on the CPU, reads as follows:
var gpuEdges = Gpu.Allocate<byte>(9, 4, 64);
Gpu.Launch(new dim3(9, 4), 64, ExtractEdgeKernel, gpuScaledImage, gpuEdges);
As you can see, we create 9x4x64 threads on the GPU to perform the task of copying these pixels. What you might miss is that the scaled image from the previous step is still in GPU memory. That means we do not need to transfer the scaled image.

The C# code that runs on the GPU, reads as follows:
[Cudafy]
public static void ExtractEdgeKernel(GThread gThread, byte[,] image, byte[, ,] edges)
{
var tileIndex = gThread.blockIdx.x;
var tileX = tileIndex % 3;
var tileY = tileIndex / 3;
var edgeIndex = gThread.blockIdx.y;
var pixelIndex = gThread.threadIdx.x;
var sourceX = tileX * 64;
var sourceY = tileY * 64;
switch (edgeIndex)
{
case 0: sourceY += pixelIndex; break; case 1: sourceX += pixelIndex; break; case 2: sourceY += pixelIndex; sourceX += 63; break; case 3: sourceX += pixelIndex; sourceY += 63; break; }
edges[tileIndex, edgeIndex, pixelIndex] = image[sourceX, sourceY];
}
The hardest part about this kernel is figuring out which source coordinates map to which edge coordinates.
Constant Memory
Once the kernel completes, we know that there will be many subsequent operations on the edges data: It turns out that in CUDA there are many types of memory. So far we have been working with what is called “device memory”. This is like CPU RAM. It is fast, but nowhere near as fast as other types of memory on the GPU.
There is another type of memory called “constant memory”. The GPU can read this memory much faster than device memory because it can be cached. The GPU cannot write to it. Also, constant memory is in short supply – only 64KB.
This is a perfect time to use constant memory. We will move the edges data computed above into constant memory to make subsequent kernel calls that much faster. To declare constant memory in CUDAfy, you enter something like this:
[Cudafy]
public static byte[, ,] Edges = new byte[9, 4, 64];
What is weird here is that this actually allocates memory in CPU-accessible RAM and the GPU device memory. Up until now we would prefix our memory variables with “gpu” or “cpu” to keep that clear. If you reference Edges from the CPU it refers to CPU RAM and if you reference Edges from the GPU it refers to constant memory on the GPU. That should be clear enough.

Now there are two steps to moving data from device memory to constant memory. First, we need to copy the data from the GPU’s device memory into CPU RAM, and then from CPU RAM back to constant memory on the GPU. Here goes:
Gpu.CopyFromDevice(gpuEdges, Edges);
Gpu.CopyToConstantMemory(Edges, Edges);
Computing Fits
The goal here is to pre-compute the fitness between the edges of each tile. That means we want to know how well the left edge of tile 1 fits the right edge of tile 2, etc.
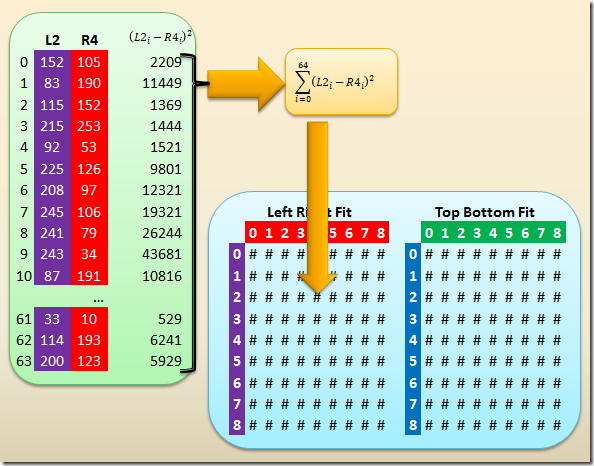
To hold this information, we create more constant memory as follows:
[Cudafy]
public static float[,] LeftRightFit = new float[9, 9];
We then compute all the left-right fit possibilities and store the results into constant memory using the following CPU code:
var gpuFit = Gpu.Allocate<float>(9, 9);
Gpu.Launch(new dim3(9, 9), 64, ComputeFitsKernel, 2, 0, gpuFit);
Gpu.CopyFromDevice(gpuFit, LeftRightFit);
Gpu.CopyToConstantMemory(LeftRightFit, LeftRightFit);
There is nothing new here except to realize that we are launching one block per edge pair. Yes, we will end up comparing the left edge of a tile with its own right edge. Those kinds of optimizations could be taken by launching 8x8 grids and some tricky maths in the kernel. Another option would be to launch the 9x9 but then having the threads in the block return a poor fit immediately if the two tiles are the same. Either way works well. Neither optimization is shown in this post.
At this time I would like you to anticipate a new problem in the kernel to be shown next. The
ComputeFitsKernel is launched with 64 threads per block, but we only want one number returned from each block. In previous kernels each thread set a specific output value. Now we have 64 threads that need to work together to arrive at a single number. As expected, there are some neat features of a block that make this work possible.
The GPU kernel that does the actual fit calculations is below:
[Cudafy]
public static void ComputeFitsKernel(GThread gThread, int edgeIndexA, int edgeIndexB, float[,] fit)
{
    var sum = gThread.AllocateShared<float>("sum", 64);

    var tileIndexA = gThread.blockIdx.x;
    var tileIndexB = gThread.blockIdx.y;
    var pixelIndex = gThread.threadIdx.x;

    var diff = Edges[tileIndexA, edgeIndexA, pixelIndex] - Edges[tileIndexB, edgeIndexB, pixelIndex];
    sum[pixelIndex] = diff * diff;

    gThread.SyncThreads();

    for (var i = 64 / 2; i > 0; i /= 2)
    {
        if (pixelIndex < i)
        {
            sum[pixelIndex] += sum[pixelIndex + i];
        }

        gThread.SyncThreads();
    }

    if (pixelIndex == 0)
    {
        fit[tileIndexA, tileIndexB] = sum[0];
    }
}
The first line should throw you for a loop. Why would we have each of the 64 threads allocate 64 floats of “shared” memory (whatever that is). I believe the function is named wrong. The function should be named “
TheFirstThreadPerBlockThatGetHereShouldAllocateThisMemoryAndAllSusequentThreadsInTheBlockShouldObtainAReferenceToThisAllocatedMemory”.
Maybe
ObtainShared would do too.
The shared memory (64 floats per block) is very, very, very fast. It is at the level of a CPU register and is about 100-200 times faster than device memory.
Each thread computes the difference of one pixel from one edge of one tile with another pixel from another edge of another tile. This difference (squared) is placed in the appropriate slot of the shared memory. So far, so good.
The
SyncThreads function causes all 64 threads in the block to wait for each other here. This means that the following for loop will not begin until all threads have placed their data in the shared array.
This is a good time to let you know that despite what others may say, there is never a good way to synchronize threads in different blocks.
The reduction loop is pretty simple. Read the code and understand its elegance. Also understand the deadlock that can occur if someone decides to place a
SyncThreads inside of an “
if” statement. That is never a good idea and can cause your device driver to lock up.
All of the above is repeated for the top-bottom edges.
Compare Permutations
The next step is to analyze all (9!) permutations and select the one with the best fit (smallest metric).
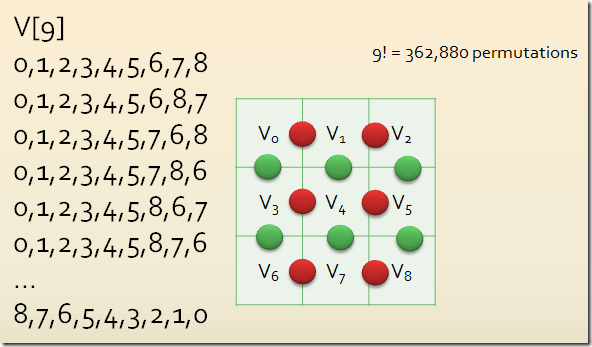
In this case we realize that there are a lot of permutations. We will pick (arbitrarily) that each block contains 256 threads. We will then create enough blocks (1418) so that each permutation has its own thread. We will then write the kernel so as each block returns the best permutation of the 256 that each of its threads evaluates. We will then transfer the 1418 best candidates from the GPU to the CPU. The CPU will then find the best permutation in each of the 1418 evaluations. Here is the CPU code:
const int threads = 256;
const int blocks = Permutations / threads + 1;
var cpuEvaluations = new Evaluation[blocks];
var gpuEvaluations = Gpu.Allocate(cpuEvaluations);
Gpu.Launch(blocks, threads, ExplorePermutationsKernel, gpuEvaluations);
Gpu.CopyFromDevice(gpuEvaluations, cpuEvaluations);
var bestEvaluation = cpuEvaluations[0];
foreach (var evaluation in cpuEvaluations)
{
if (evaluation.Metric < bestEvaluation.Metric)
{
bestEvaluation = evaluation;
}
}
There is nothing technically new in this final kernel, but it is clearly the most complicated of the kernels in this project.
[Cudafy]
public static void ExplorePermutationsKernel(GThread gThread, Evaluation[] evaluations)
{
var blockEvaluations = gThread.AllocateShared<Evaluation>("be", 256);
var v = gThread.AllocateShared<byte>("v", 256, 9);
var t = gThread.threadIdx.x;
var permutation = gThread.blockIdx.x * gThread.blockDim.x + gThread.threadIdx.x;
TileOrderFromPermutation(Permutations, permutation, 9, v, t);
var metric = 0f;
metric += LeftRightFit[v[t, 0], v[t, 1]] + LeftRightFit[v[t, 1], v[t, 2]];
metric += LeftRightFit[v[t, 3], v[t, 4]] + LeftRightFit[v[t, 4], v[t, 5]];
metric += LeftRightFit[v[t, 6], v[t, 7]] + LeftRightFit[v[t, 7], v[t, 8]];
metric += TopBottomFit[v[t, 0], v[t, 3]] + TopBottomFit[v[t, 3], v[t, 6]];
metric += TopBottomFit[v[t, 1], v[t, 4]] + TopBottomFit[v[t, 4], v[t, 7]];
metric += TopBottomFit[v[t, 2], v[t, 5]] + TopBottomFit[v[t, 5], v[t, 8]];
blockEvaluations[t].Permutation = permutation;
blockEvaluations[t].Metric = metric;
gThread.SyncThreads();
for (var i = 256 / 2; i > 0; i /= 2)
{
if (t < i)
{
if (blockEvaluations[t].Metric > blockEvaluations[t + i].Metric)
{
blockEvaluations[t] = blockEvaluations[t + i];
}
}
gThread.SyncThreads();
}
if (gThread.threadIdx.x == 0)
{
evaluations[gThread.blockIdx.x] = blockEvaluations[0];
}
}
OK, so the
TileOrderFromPermutation function needs a bit of explaining. This is a classic case of how writing code for the GPU differs from CPU code. On the CPU, we would look for an algorithm that can sequentially iterate though permutations. On the GPU we prefer an algorithm that can provide us with a permutation order, given the permutation index. Even though this approach is more costly, it ends up being worlds faster on the GPU than the CPU, simply because of the massive parallelism that the GPU offers.
