In this post, we are going to learn how to call an ASP.NET WebAPI using HttpClient libraries. The HttpClient library is quite useful and can be used while calling your WebAPI from Windows applications, Console Applications or even Windows 8 applications.
We will use the same WebAPI which we created in my previous post “Using ASP.NET WebAPI with WebForms” but this time we will consume it from a WPF application.
Create A WPF Application Project
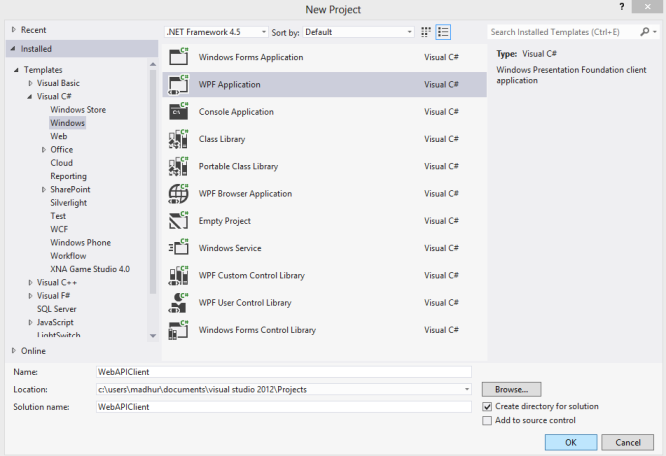
Open Visual Studio 2012, Go To New -> Project. Select Visual C# -> Windows from the left hand navigation and select project type as WPF Application. Enter the project name as WebAPIClient.

Installing WebAPI Client Libraries
We will then add the HttpClient libraries in our project using the NuGet Package Manager which makes it very easy to install the libraries in our project.
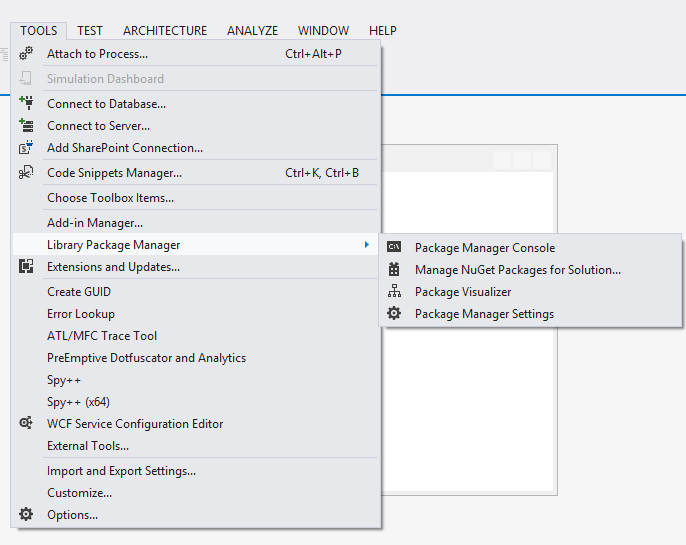
In the Tools menu, select Library Package Manager -> Manage NuGet Packages For Solution

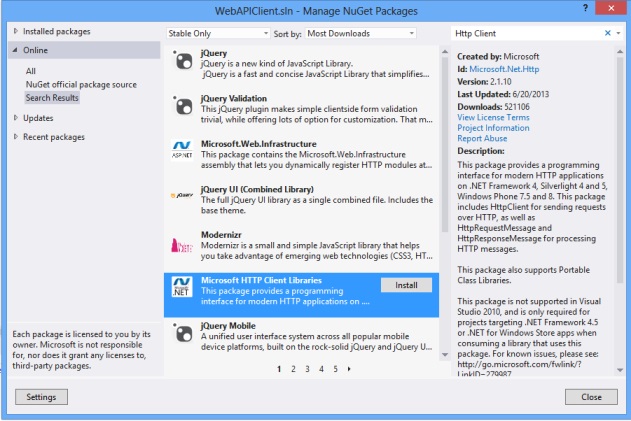
In the Manage NuGet Packages dialog box which opens, select online and search for “Http Client” and select the Microsoft HTTP Client Libraries which appear as shown below:

Select Install and it will ask you to select the project in which you want to install it. Click on Ok and close the dialog once the installation is done.
Similarly also install the package “JSON.Net” from Nuget Package Manager.
Creating the User Interface
We will add a DataGrid to display the user information and we will also create a simple form of textbox and button to get data from the user and add it through the API.
Here is how the code for MainWindows.xaml will look like:
<Window x:Class="WebAPIClient.MainWindow"
        xmlns="http://schemas.microsoft.com/winfx/2006/xaml/presentation"
        xmlns:x="http://schemas.microsoft.com/winfx/2006/xaml"
        Title="MainWindow" Height="500" Width="525">
    <Grid Margin="0,0,-8,-122">
        <DataGrid Name="usergrid"
        HorizontalAlignment="Left" Margin="28,23,0,0"
                 AutoGenerateColumns="True"
                 VerticalAlignment="Top" Height="185" Width="451"/>
        <Label Content="First Name" HorizontalAlignment="
        Left" Margin="28,259,0,0" VerticalAlignment="Top"
        RenderTransformOrigin="-0.085,-0.243"/>
        <TextBox x:Name="txtFirst" HorizontalAlignment="Left"
        Height="23" Margin="138,259,0,0" TextWrapping="Wrap"
        VerticalAlignment="Top" Width="120"/>
        <Label Content="Last Name" HorizontalAlignment="Left"
        Margin="290,259,0,0" VerticalAlignment="Top"/>
        <TextBox x:Name="txtLas" HorizontalAlignment="Left"
        Height="23" Margin="372,259,0,0" TextWrapping="Wrap"
        VerticalAlignment="Top" Width="120"/>
        <Label Content="Company" HorizontalAlignment="Left"
        Margin="28,311,0,0" VerticalAlignment="Top" RenderTransformOrigin="-0.085,-0.243"/>
        <Label Content="Email" HorizontalAlignment="Left"
        Margin="290,311,0,0" VerticalAlignment="Top"/>
        <TextBox x:Name="txtEmail" HorizontalAlignment="Left"
        Height="23" Margin="372,311,0,0" TextWrapping="Wrap"
        VerticalAlignment="Top" Width="120"/>
        <TextBox x:Name="txtCompany" HorizontalAlignment="Left"
        Height="23" Margin="138,311,0,0" TextWrapping="Wrap"
        VerticalAlignment="Top" Width="120"/>
        <Label Content="Phone" HorizontalAlignment="Left"
        Margin="28,360,0,0" VerticalAlignment="Top"
        RenderTransformOrigin="-0.085,-0.243"/>
        <TextBox x:Name="txtPhone" HorizontalAlignment="Left"
        Height="23" Margin="138,360,0,0" TextWrapping="Wrap"
        VerticalAlignment="Top" Width="120"/>
        <Button Content="Add User" HorizontalAlignment="Left"
        Margin="290,366,0,0" VerticalAlignment="Top"
        Width="75" Click="Button_Click_1"/>
        <TextBox HorizontalAlignment="Left" Height="23"
        Margin="53,404,0,0" TextWrapping="Wrap" x:Name="txtSearch"
        Text="" VerticalAlignment="Top" Width="120"/>
        <Button Content="Search" HorizontalAlignment="Left"
        Margin="204,407,0,0" VerticalAlignment="Top"
        Width="75" x:Name="btnSearch"/>
        <Button Content="Show All" HorizontalAlignment="Left"
        Margin="290,407,0,0" VerticalAlignment="Top"
        Width="75" x:Name="btnShowAll"/>
        <TextBox HorizontalAlignment="Left" Height="23"
        Margin="53,445,0,0" TextWrapping="Wrap" Text=""
        VerticalAlignment="Top" Width="120" x:Name="txtDelete"/>
        <Button Content="Delete" HorizontalAlignment="Left"
        Margin="204,448,0,0" VerticalAlignment="Top"
        Width="75" x:Name="btnDelete"/>
    </Grid>
</Window>
Here is how our UI will look like:

Create Model Class
We will create a Model class called “Users.cs” which will be used by HttpClient libraries to read and write the data to the WebAPI.
public class Users
    {
        public int Id { get; set; }
        public string FirstName { get; set; }
        public string LastName { get; set; }
        public string Company { get; set; }
        public string Email { get; set; }
        public string PhoneNo { get; set; }
    }
Creating HTTP Client
We have created a GetData() function which will call the WebAPI using the Client library and get a list of users and bind it to the Data Grid (Include a reference to System.Net.Http.Formatting assembly in the project).
private void GetData()
{
HttpClient client = new HttpClient();
client.BaseAddress = new Uri("http://localhost:56851/");
client.DefaultRequestHeaders.Accept.Add(
new MediaTypeWithQualityHeaderValue("application/json"));
HttpResponseMessage response = client.GetAsync("api/User").Result;
if (response.IsSuccessStatusCode)
{
var users = response.Content.ReadAsAsync&
lt;IEnumerable<Users>>().Result;
usergrid.ItemsSource = users;
}
else
{
MessageBox.Show("Error Code" +
response.StatusCode + " : Message - " + response.ReasonPhrase);
}
}
In this function, we are creating a new instance of the HttpClient and setting its base address to “http://localhost:56851?. This should be the address where our API is running. You can change the port number to match the port at which your API which you created in the previous tutorial runs.
We are then setting the Accept header property to “application/json” which instructs the server to send the response in Json format.
We then call the “GetAsync” method which sends a HTTP Get request to “api/User”. It is an asynchronous method which will return immediately without waiting for a response from the server. It returns a Task object and we can use the “Result” property of the Task class to get the response. (As we are using the Result property, we are turning it into a blocking call as it will wait for a response. It is not a good practice to follow in case of working with Windows applications, but to keep the example simple we will continue with it. For real projects, it is better to use Non Blocking calls to ensure that your UI is always active.)
We then check whether response to see if it indicated success. In case of success, the response will contain our data in JSON format.
We then call the “ReadAsAsync()” method which deserializes the response body to our Users type. This method is also asynchronous but using the Result property makes it a blocking call. We then bind the result to our DataGrid and it is displayed on the screen.
Please make sure you are running the Web API from my previous post for it to work.
On running the application, you will get the following screen:

Adding a User (POST)
On the Add User button click, we call the following code to Add a User:
HttpClient client = new HttpClient();
            client.BaseAddress = new Uri("http://localhost:56851/");

             client.DefaultRequestHeaders.Accept.Add(
                new MediaTypeWithQualityHeaderValue("application/json"));

            var user = new Users();

            user.FirstName = txtFirst.Text;
            user.Company = txtCompany.Text;
            user.LastName = txtLas.Text;
            user.Email = txtEmail.Text;
            user.PhoneNo = txtPhone.Text;
            user.Email = txtEmail.Text;

            var response = client.PostAsJsonAsync("api/User", user).Result;

            if (response.IsSuccessStatusCode)
            {
                MessageBox.Show("User Added");
                txtFirst.Text = "";
                txtLas.Text = "";
                txtPhone.Text = "";
                txtEmail.Text = "";
                txtCompany.Text = "";
                GetData();
            }
            else
            {
                MessageBox.Show("Error Code" +
                response.StatusCode + " : Message - " + response.ReasonPhrase);
            }
We again create a client object passing the base address and setting the headers. We then create a Users object collecting information from the textbox.
We call the “PostAsJsonAsync” method of the library and pass the user object which we have created. If a success response is returned, the user is successfully added and we refresh the DataGrid.
Searching for a User
Here is the code which gets called on the search button click
HttpClient client = new HttpClient();
            client.BaseAddress = new Uri("http://localhost:56851/");

            client.DefaultRequestHeaders.Accept.Add(
                new MediaTypeWithQualityHeaderValue("application/json"));

            var id = txtSearch.Text.Trim();

            var url = "api/User/" + id;

            HttpResponseMessage response = client.GetAsync(url).Result;

            if (response.IsSuccessStatusCode)
            {
                var users = response.Content.ReadAsAsync<Users>().Result;

                MessageBox.Show("User Found : " +
                users.FirstName + " "  + users.LastName);

            }
            else
            {
                MessageBox.Show("Error Code" +
                response.StatusCode + " : Message - " + response.ReasonPhrase);
            }
The code is similar to the Get Request which we used earlier. This time while constructing the URL, we are also passing the “id” of the user to the API.
While reading the response, we are using a single User object as a single user will be returned. If no user is found based on the id, an HTTP Response Exception is thrown by our WebAPI.

Deleting a User
Here is code which we are calling on Delete Button Click:
HttpClient client = new HttpClient();
            client.BaseAddress = new Uri("http://localhost:56851/");

            var id = txtDelete.Text.Trim();

            var url = "api/User/" + id;

            HttpResponseMessage response = client.DeleteAsync(url).Result;

            if (response.IsSuccessStatusCode)
            {
                MessageBox.Show("User Deleted");
                GetData();

            }
            else
            {
                MessageBox.Show("Error Code" +
                response.StatusCode + " : Message - " + response.ReasonPhrase);
            }
This is similar to the Search User code. We create the URL by passing the Id of the user which we want to delete.
We then call the “DeleteAsync” method of the library which will delete the User with the specified id. If no user is found, an exception will be thrown.
Hope you enjoyed reading the article. Let me know in the comments if you face any error.
Please make sure to run the WebAPI demo project before running the WPF application.
