Introduction
The Bitmap class has GetPixel and SetPixel methods that let you acquire and change color of chosen pixels. Those methods are very easy to use but are also extremely slow. My previous post gives detailed explanation on the topic, click here if you are interested.
Fortunately, you don’t have to use external libraries (or resign from .NET altogether) to do fast image manipulation. The Framework contains a class called ColorMatrix that lets you apply many changes to images in an efficient manner. Properties such as contrast or saturation can be modified this way. But what about manipulation of individual pixels? It can be done too, with the help from the Bitmap.LockBits method and the BitmapData class…
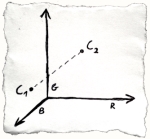
A good way to test individual pixel manipulation speed is color difference detection. The task is to find portions of an image that have color similar to some chosen color. How to check if colors are similar? Think about color as a point in three dimensional space, where axis are: red, green and blue. Two colors are two points. The difference between colors is described by the distance between two points in RGB space.
 diff = sqrt((C1R-C2R)2+(C1G-C2G)2+(C1B-C2B)2)
This technique is very easy to implement and gives decent results. Color comparison is actually a pretty complex matter though. Different color spaces are better suited for the task than RGB and human color perception should be taken into account (e.g. our eyes are more keen to detect difference in shades of green that in shades of blue). But let’s keep things simple here…
Our test image will be this Ultra HD 8K (7680x4320, 33.1Mpx) picture (on this blog, it’s of course scaled down to save bandwidth):

This is a method that may be used to look for R=255 G=161 B=71 pixels (car number "36"). It sets matching pixels as white (the rest will be black):
static void DetectColorWithGetSetPixel(Bitmap image,
  byte searchedR, byte searchedG, int searchedB, int tolerance)
{
    int toleranceSquared = tolerance * tolerance;

    for (int x = 0; x < image.Width; x++)
    {
        for (int y = 0; y < image.Height; y++)
        {
            Color pixel = image.GetPixel(x, y);

            int diffR = pixel.R - searchedR;
            int diffG = pixel.G - searchedG;
            int diffB = pixel.B - searchedB;

            int distance = diffR * diffR + diffG * diffG + diffB * diffB;

            image.SetPixel(x, y, distance > toleranceSquared ? Color.Black : Color.White);
        }
    }
}
The above code is our terribly slow Get/SetPixel baseline. If we call it this way (named parameters for clarity):
DetectColorWithGetSetPixel(image, searchedR: 255, searchedG: 161, searchedB: 71, tolerance: 60);
we will receive the following outcome:

Result may be ok but having to wait over 84300ms* is a complete disaster!
Now check out this method:
static unsafe void DetectColorWithUnsafe(Bitmap image,
byte searchedR, byte searchedG, int searchedB, int tolerance)
{
BitmapData imageData = image.LockBits(new Rectangle(0, 0, image.Width,
image.Height), ImageLockMode.ReadWrite, PixelFormat.Format24bppRgb);
int bytesPerPixel = 3;
byte* scan0 = (byte*)imageData.Scan0.ToPointer();
int stride = imageData.Stride;
byte unmatchingValue = 0;
byte matchingValue = 255;
int toleranceSquared = tolerance * tolerance;
for (int y = 0; y < imageData.Height; y++)
{
byte* row = scan0 + (y * stride);
for (int x = 0; x < imageData.Width; x++)
{
int bIndex = x * bytesPerPixel;
int gIndex = bIndex + 1;
int rIndex = bIndex + 2;
byte pixelR = row[rIndex];
byte pixelG = row[gIndex];
byte pixelB = row[bIndex];
int diffR = pixelR - searchedR;
int diffG = pixelG - searchedG;
int diffB = pixelB - searchedB;
int distance = diffR * diffR + diffG * diffG + diffB * diffB;
row[rIndex] = row[bIndex] = row[gIndex] = distance >
toleranceSquared ? unmatchingValue : matchingValue;
}
}
image.UnlockBits(imageData);
}
It does exactly the same thing but runs for only 230ms - over 360 times faster!
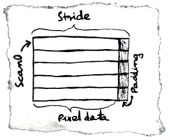
The above code makes use of Bitmap.LockBits method that is a wrapper for native GdipBitmapLockBits (GDI+, gdiplus.dll) function. LockBits creates a temporary buffer that contains pixel information in desired format (in our case RGB, 8 bits per color component). Any changes to this buffer are copied back to the bitmap upon UnlockBits call (therefore, you should always use LockBits and UnlockBits as a pair). Bitmap.LockBits returns BitmapData object (System.Drawing.Imaging namespace) that has two interesting properties: Scan0 and Stride. Scan0 returns an address of the first pixel data. Stride is the width of single row of pixels (scan line) in bytes (with optional padding to make it dividable by 4).

Please notice that I don’t use calls to Math.Pow and Math.Sqrt to calculate distance between colors. Writing code like this:
double distance = Math.Sqrt(Math.Pow(pixelR - searchedR, 2) +
Math.Pow(pixelG - searchedG, 2) + Math.Pow(pixelB - searchedB, 2));
to process millions of pixels is a terrible idea. Such line can make our optimized method about 25 times slower! Using Math.Pow with integer parameters is extremely wasteful and we don’t have to calculate square root to determine if distance is longer than specified tolerance.
Previously presented method uses code marked with unsafe keyword. It allows C# program to take advantage of pointer arithmetic. Unfortunately, unsafe mode has some important restrictions. Code must be compiled with \unsafe option and executed for fully trusted assembly.
Luckily, there is a Marshal.Copy method (from System.Runtime.InteropServices namespace) that can move data between managed and unmanaged memory. We can use it to copy image data into a byte array and manipulate pixels very efficiently. Look at this method:
static void DetectColorWithMarshal(Bitmap image,
  byte searchedR, byte searchedG, int searchedB, int tolerance)
{
    BitmapData imageData = image.LockBits(new Rectangle(0, 0, image.Width,
      image.Height), ImageLockMode.ReadWrite, PixelFormat.Format24bppRgb);

    byte[] imageBytes = new byte[Math.Abs(imageData.Stride) * image.Height];
    IntPtr scan0 = imageData.Scan0;

    Marshal.Copy(scan0, imageBytes, 0, imageBytes.Length);

    byte unmatchingValue = 0;
    byte matchingValue = 255;
    int toleranceSquared = tolerance * tolerance;

    for (int i = 0; i < imageBytes.Length; i += 3)
    {
        byte pixelB = imageBytes[i];
        byte pixelR = imageBytes[i + 2];
        byte pixelG = imageBytes[i + 1];

        int diffR = pixelR - searchedR;
        int diffG = pixelG - searchedG;
        int diffB = pixelB - searchedB;

        int distance = diffR * diffR + diffG * diffG + diffB * diffB;

        imageBytes[i] = imageBytes[i + 1] = imageBytes[i + 2] = distance >
          toleranceSquared ? unmatchingValue : matchingValue;
    }

    Marshal.Copy(imageBytes, 0, scan0, imageBytes.Length);

    image.UnlockBits(imageData);
}
It runs for 280ms, so it is only slightly slower than unsafe version. It is CPU efficient but uses more memory than the previous method – almost 100 megabytes for our test Ultra HD 8K image in RGB 24 format.
If you want to make pixel manipulation even faster, you may process different parts of the image in parallel. You need to make some benchmarking first because for small images, the cost of threading may be bigger than gains from concurrent execution. Here’s a quick sample of code that uses 4 threads to process 4 parts of the image simultaneously. It yields 30% time improvement on my machine. Treat is as a quick and dirty hint, this post is already too long…
static unsafe void DetectColorWithUnsafeParallel(Bitmap image,
    byte searchedR, byte searchedG, int searchedB, int tolerance)
{
    BitmapData imageData = image.LockBits(new Rectangle(0, 0, image.Width,
      image.Height), ImageLockMode.ReadWrite, PixelFormat.Format24bppRgb);
    int bytesPerPixel = 3;

    byte* scan0 = (byte*)imageData.Scan0.ToPointer();
    int stride = imageData.Stride;

    byte unmatchingValue = 0;
    byte matchingValue = 255;
    int toleranceSquared = tolerance * tolerance;

    Task[] tasks = new Task[4];
    for (int i = 0; i < tasks.Length; i++)
    {
        int ii = i;
        tasks[i] = Task.Factory.StartNew(() =>
            {
                int minY = ii < 2 ? 0 : imageData.Height / 2;
                int maxY = ii < 2 ? imageData.Height / 2 : imageData.Height;

                int minX = ii % 2 == 0 ? 0 : imageData.Width / 2;
                int maxX = ii % 2 == 0 ? imageData.Width / 2 : imageData.Width;

                for (int y = minY; y < maxY; y++)
                {
                    byte* row = scan0 + (y * stride);

                    for (int x = minX; x < maxX; x++)
                    {
                        int bIndex = x * bytesPerPixel;
                        int gIndex = bIndex + 1;
                        int rIndex = bIndex + 2;

                        byte pixelR = row[rIndex];
                        byte pixelG = row[gIndex];
                        byte pixelB = row[bIndex];

                        int diffR = pixelR - searchedR;
                        int diffG = pixelG - searchedG;
                        int diffB = pixelB - searchedB;

                        int distance = diffR * diffR + diffG * diffG + diffB * diffB;

                        row[rIndex] = row[bIndex] = row[gIndex] = distance >
                            toleranceSquared ? unmatchingValue : matchingValue;
                    }
                }
            });
    }

    Task.WaitAll(tasks);

    image.UnlockBits(imageData);
}
* .NET 4 console app, executed on MSI GE620 DX laptop: Intel Core i5-2430M 2.40GHz (2 cores, 4 threads), 4GB DDR3 RAM, NVIDIA GT 555M 2GB DDR3, HDD 500GB 7200RPM, Windows 7 Home Premium x64.
Update (2013-07-11): I forgot to precalculate tolerance * tolerance (thanks to Axel Rietschin for noticing this). With toleranceSquared, DetectColorWithUnsafe execution time dropped from 260ms to 230ms.
Update (2018-01-08): If you really want to do some complex and efficient image processing then you should use specialized library like OpenCV. Few months ago I've written "Detecting a Drone - OpenCV in .NET for Beginners (Emgu CV 3.2, Visual Studio 2017)" blog post series that will help you do it...
