↵

Introduction
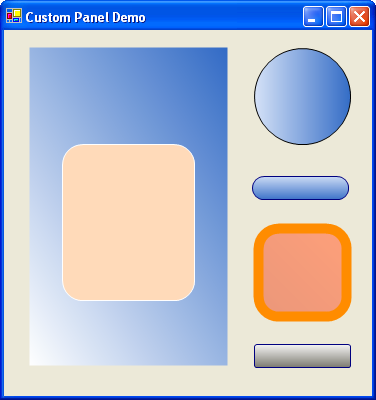
Whenever I use a Windows Panel, the first thing that annoys me with the default .NET Panel is the inability to set the border color. This is closely followed by the lack of gradients and rounded corners. As you can see from the screen shot above, a gradient fill with rounded corners makes for a very simple imitation of an XP style command button.
Update
Since various people have asked me for Fixed3D borderStyle support, and I have found a number of small, but annoying problems with the positioning of this panel control, I have updated the code. However, it was not easy. Setting the borderStyle to Fixed3D has the nasty effect off adding a 3D border to all the children of the control! Consequently, this version includes a method to draw my own 3D border. When using this style, the panel will always be rectangular.
Background
The easiest way to enhance a control is by visual inheritance, although there are one or two things to watch out for.
There is a big difference between Overriding a property and Shadowing a property. If you override a property, then any code in the base class which uses that property will call the code in the inherited class, whereas shadowing a property leaves the base class calling its own code and the shadowed property will only be available in the inherited class.
In C#, the override modifier is used instead of the VB Overrides modifier, and the new modifier is used instead of the VB Shadows modifier.
Some controls do not allow transparent backgrounds. Fortunately, the Windows Panel control does.
One very useful property of all controls is DesignMode. This can be used to discover if the control is in a run-time, or design-time environment.
The Solution
Some of the important parts of the solution are as follows.
We must ensure that transparent backgrounds are supported, and that we have full control of painting the control by adding the following code to the constructor:
Me.SetStyle(System.Windows.Forms.ControlStyles.DoubleBuffer, True)
Me.SetStyle(System.Windows.Forms.ControlStyles.AllPaintingInWmPaint, False)
Me.SetStyle(System.Windows.Forms.ControlStyles.ResizeRedraw, True)
Me.SetStyle(System.Windows.Forms.ControlStyles.UserPaint, True)
Me.SetStyle(System.Windows.Forms.ControlStyles.SupportsTransparentBackColor, True)
MyBase.BackColor = System.Drawing.Color.Transparent
ResizeRedraw makes sure that the control will repaint itself if you stretch it, and DoubleBuffer makes the drawing happen off-screen so as to reduce flickering.
Always remember to dispose off drawing objects as they wrap the unmanaged GDI+ API and will chew up resources if left hanging.
Using the Code
As you will see, in the demo solution, it is very easy to make the panels 'Hot' by swapping the colors over on mouse enter and leave.
To use the control, make sure you have the control and the enum in your solution, build it, add the custom panel to your Toolbox, and away you go. The new or enhanced properties are:
BackColor - Shadows the basic BackColor propertyBackColor2 - The second color of the gradient backgroundGradientMode - The direction of the gradient (defaults to none)BorderStyle - Only the FixedSingle works in this sub-classBorderWidth - Controls the width of the borderBorderColor - The color of the borderCurvature - The radius of the curve used to draw the corners of the panelCurveMode - The style of the curves to be drawn on the control
History
- 6th July, 2004: Initial version
