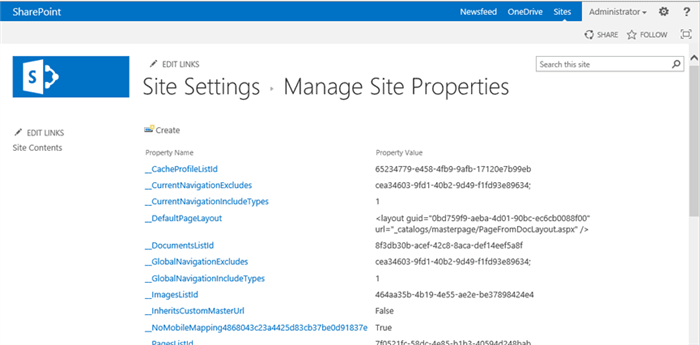
Figure 1 - Manage Site Properties page

Figure 2 - Edit Site Property dialog

Figure 3 - Add Site Property dialog
Introduction
For use in Microsoft SharePoint 2013, this set of application pages provides an administrative UI to manage custom properties, or more commonly known as property bags, in a SharePoint site. SharePoint stores meta data of a web site in hash table SPWeb.AllProperties. They are accessed through APIs SPWeb.GetProperty, SPWeb.AddProperty, SPWeb.SetProperty and SPWeb.RemoveProperty. These properties are particularly useful when building custom components when you need a place to store configuration data.
Background
There are a number of places to store configuration data in SharePoint. For delegate controls, you could use the element manifest. For web parts, you could use the .webpart file. For global configuration, you could use web.config, custom SharePoint list, or property bag in SPFarm, SPWebApplication, SPSite, SPWeb and SPList.
A number of free tools are available covering some of the scenarios described above. My tool is restricted to managing custom properties in SPWeb. It should however cover the majority of use cases. Storing properties in SPFarm or SPWebApplication is riskier and would require higher access rights that you may not necessarily have in a production environment or access to the SharePoint 2013 Central Administration where the application pages would logically be resided.
Description
The challenge in developing this tool is making the interface seamless to the other SharePoint application pages. By that, I mean not only the look and feel but how the entire UI works to the user and behind the scene.
- There are 3 application pages. They are MngSiteProperties.aspx (Management page), AddSiteProperty.aspx (Add page) and EditSiteProperty.aspx (Edit page). All 3 pages inherit from
WebAdminPageBase with RequireSiteAdministrator overridden to return true. - UI elements are rendered using built-in SharePoint elements if possible. Elements used include user controls ToolBar.ascx, ToolBarButton.ascx, InputFormSection.ascx, InputFormControl.ascx, ButtonSection.ascx and custom controls SPGridView and InputFormTextBox.
- All UI strings are stored in resource files. UI strings used in the application pages are stored in application global resource file QuestechSystems.SharePoint.SiteProperties.Global.resx. The file's Deployment Type is set to AppGlobalResource in Visual Studio 2013.
- In MngSiteProperties.aspx, the list of site properties are rendered out in a
SPGridView, wrapped in an UpdatePanel which I'll explain more in the next point. ItemTemplate is used to render the hyperlink to the edit page, passing in the property name as the query string. Care must be taken to URL encode the property name so HyperLinkField cannot be used. - The new SharePoint modal dialog mechanisms are used to launch the add and edit action, specifically function SP.UI.ModalDialog.showModalDialog. A callback function is written to manually refresh the
UpdatePanel upon successful completion of the add or edit action. Alternative you could use SP.UI.ModalDialog.RefreshPage but this refreshes the entire page and it uses a form submit! - To call back to the launcher page when the logic finishes, I added the following to the action events in the code behinds of AddSiteProperty.aspx and EditSiteProperty.aspx:
page.Response.Clear();
page.Response.Write(String.Format(@
	"<script language=""javascript"" type=""text/javascript"">
	window.frameElement.commonModalDialogClose(1, ""{0}"");
	</script>", returnValue));
page.Response.End();
This renders out SP.UI.ModalDialog.commonModalDialogClose to the browser, making it close the current dialog and pass the returnValue to the launcher callback function.
- Since site properties are stored by SharePoint in a hash table, the property value can potentially be an object rather than just a string. The management page will use
ToString to list out the property value but the OK button will be disabled in the edit page to disallow editing if it detects the property value is not a string. - Extreme caution must be exercised to not edit any of the built-in site properties, unless you know what you are doing.
- The application pages are exposed in Site Settings using CustomAction through site feature SiteProperties.
The supplied Visual Studio 2013 solution includes all the support files you need to build and deploy this tool, minus the strong name key file. It makes full use of the built-in SharePoint integration. No more third party tools or custom pre and post build scripts are needed to build the SharePoint solution file
Installation
Open SharePoint 2013 Management Shell, add solution file QuestechSystems.SharePoint.SiteProperties.wsp using Add-SPSolution like:
Add-SPSolution "C:\_deployment\QuestechSystems.SharePoint.SiteProperties.wsp"
Go to SharePoint 2013 Central Administration > System Settings > Manage farm solutions. Deploy the installed solution to the selected web applications. In the site collection where the solution is deployed, go to the top site or any sub-site to activate Site Feature Questech Systems Site Properties. A new section Custom Settings (by Questech Systems) should now be available in Site Settings.
History
- V1.0 - 2014.07.12 - Initial version.
