In my previous article, I just gave you the overview of knockout.js framework with a simple example.
As I was telling that knockout framework helps us to create interactive UI with whole business logic validation in place and clean syntax. Today we will see how it does so. Let’s dive in the pool of knockout and swim and try finding new fishes(features) in pond(knockout) :)

Note: Knockout.js library comes with its intellisense which is a best part for developers. In case you want to know more about knockout try looking in to intellisense.
Before reading this article please go through the previous article of Day 1
Agenda
1)Observables types
- Observable Array
- Demo example of Observable array
- Dependent Observable
- Demo example of Dependent Observable
2) Build-in Bindings & Custom Bindings
- Binding related to Text and Appearance
- Binding related to Forms elements and events
- Control-Flow binding
- Templates
Let's start our lab. As you go on reading this article, keep trying side by side. I am attaching the demo example solution as well.
Observables
Observable Array
As in out first day, we saw how you create observable property which helps us to track the changes happening to the property which we call as Dependency Tracking. Similarly, for dependency tracking in collection we have observableArray.It can be declared as

When I say collection definitely few inbuilt functions automatically come into picture. I would be explaining only the important function ob observableArray.
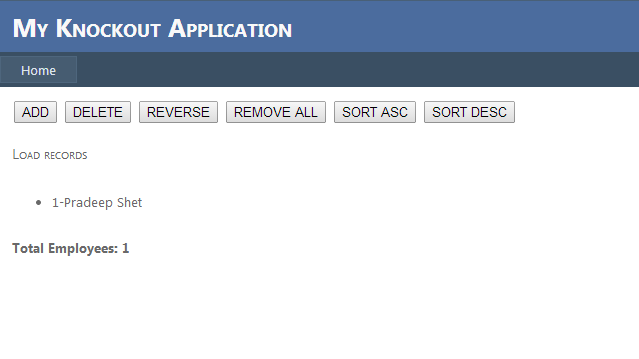
I have designed a webpage containing some buttons and a div to display the list of records

Adding item in the list
push() - This method of observable array is used to add item in the collection.
addclick: function () {
                    var self = this;
                    self.list.push({EmpNo: self.list().length + 1, FirstName: "Pradeep", LastName: "Shet"
 })
}
As you can see just for identifying the item I have added EmpNo property which is an incremental number.
Delete item from the list
pop() – This method is used to remove last inserted item from the list
deleteclick: function () {
                    this.list.pop();
                }
Reverse the list
reverse() - This method reverses the list items
reverseclick: function () {
                    this.list.reverse();
                }
Remove all items from the list
removeAll() – This method helps us to remove all items from the list
removeallclick: function () {
                    this.list.removeAll();
                }
Sorting
sort() - Now sorting has become very much simple using knockout observables array. Knockout has provided us the sorting on an observable array using sort method. This method takes two parameters which is compared with each other i.e. - considering a and b as parameter, sort will return 0 if a==b, <0 if a<b and >0 if a>b
sortclick: function (sortdirection) {
this.list.sort(
                    function (left, right) {
                        if (sortdirection == 'asc')
                            return left.EmpNo < right.EmpNo ? -1 : (left.EmpNo > right.EmpNo);
                        else
                            return left.EmpNo > right.EmpNo ? -1 : (left.EmpNo < right.EmpNo);
});
Here I am sorting based on Employee No. which is an incremented value. Check ObersvableArray.aspx page for reference.
As of now, just ignore how it is displaying the list in <li> tag. We will cover this topic in below section.
Dependent Observable
Note: Renamed as computed after knockout 2.0 Dependent Observable is a type of observable which encapsulate one or more observable.
viewModel.TotalEmployees = ko.computed(function () {
                var self = this;
                return (self.list().length > 0) ? "Total Employees: " + self.list().length : "";
            }, viewModel);
In above snippet, we will create one computed column which displays total employee count. ko.computed(fn,vm) takes 2 parameters
1) Function which returns value depending on other observable
2) viewmodel name which represent this keyword
Binding
There are mainly four types of build in binding. Some of them we have already used in our demo application which we have created.

- Bindings with respect to text and appearance
Refer Default.aspx page
- text - This we are using since I showed you the first demo. This we have already used for showing Employee Name in label
<span data-bind="text: FirstName"></span>
- html - It Appends raw html of DOM element
<span data-bind="html: htmlContent"></span>
- style - Apply style of DOM element based on condition
<span data-bind="style: color:(FirstName().length > 2 : 'red' : 'blue')"></span>
As you can see based on condition, I have set the color for span
- css - To apply css class, we can use this binding
-
<span data-bind="html: htmlContent, css: {clsHighlight : FirstName().length > 1}"></span>
- Note: 1) To apply multiple css, you can write within curly braces with comma seperated. Here I have applied the cssclass clsHighlight only if my first name length > 1
2) if you want to apply any css which is not a legal javascript name then write the name within single quotes
<span data-bind="css: ‘cls-Highlight’ : isDisplay}"></span>
Here cls-Highlight is not a proper name for css but we can give this kind of name. In that case as shown write within single quote
- visible - This is useful in case if we want to make DOM element visible or invisible.
<span data-bind="visible: fullAddressVisible"></span>
- Bindings with respect to Form
Refer Default.aspx page
- click - Adding event handler
<input type="button" value="PUSH" data-bind="click:pushclick" />
- event - This binding helps us to add multiple events like shown below
<input type="button" value="PUSH" data-bind="event: { focus: enableDetails, blur: disableDetails }" />
- enable/disable - This binding is used to enable/disable the DOM element
- selectedOptions - This binding can be used when item from dropdown or listbox is selected
options - To bind the list for dropdown or listbox
Both takes an array as input
<select data-bind="options: ['India','Canada','Singapore'], selectedOptions: ['Canada']"></select>
- value - This binding can be used to set the value of DOM element
<input type="text" name="txtFname" data-bind="value: FirstName" />
- textInput - This is similar to value and works with both textbox and textarea. But only difference from value is its instantly update the model on typing in textbox/ textarea.
- Control flow Binding
Refer Default.aspx page
- if - Conditional based binding
<div data-bind="if: (FirstName().length > 0)>
Here I am trying to check if First Name is available then only display this >div< else keep it invisible.
- ifnot - Same conditional based binding but check for negation
- foreach - Iterate through the collection.
<ul data-bind="foreach: list">
Here list is a observable array which is iterated.
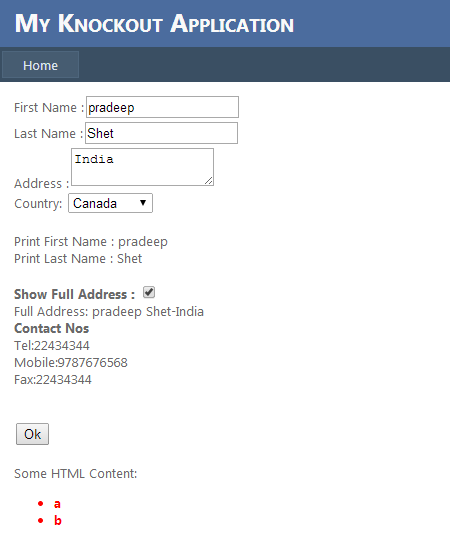
- with - The with binding creates a new binding context, so that descendant elements are bound in the context of a specified object. Suppose I have a list of Employees having properties FirstName, LastName, LeavesDate where Leaves is again a collection of LeavesDate. In this case it I wish to iterate through the collection of Employee’s Leaves and access it LeavesDate then we will use with which creates a child binding context and refers to the nested view model data. In view model, I am adding one more property called as Contacts. Within which I have 3 properties tel, mob, fax with some value Now I can bind those values in a span like this.
 <div>
       <b> Contact Nos</b>
        <br />
        Tel:<span data-bind="text: Contacts.tel"></span>
        <br />
        Mobile:<span data-bind="text: Contacts.mob"></span>
        <br />
        Fax:<span data-bind="text: Contacts.fax"></span>
 </div>
Other way I can move my binding cursor or context to descendant elements by using with as shown below
 <div data-bind="with: Contacts">
       <b> Contact Nos</b>
        <br />
        Tel:<span data-bind="text: tel"></span>
        <br />
        Mobile:<span data-bind="text: mob"></span>
        <br />
        Fax:<span data-bind="text: fax"></span>
    </div>
This keeps my code clean and easy to understand :)
- Template Binding
Refer TemplateBinding.aspx page

- template - Binding within <script> tag.
Suppose we want to bind some piece of information from the collection. So while iterating the piece of information in container i.e.- <ul>, I can keep the common binding info within script tag whose type is text/html. Below code shows you how I mapped the template id and script tag id and how the knockout iterate through same binding context. This is one way of looping the collection.
-
 <ul data-bind="template{name: 'listtemplate', foreach: list}">
 </ul>
 <script id="listtemplate" type="text/html">
        <li data-bind="text: FirstName + ' ' + LastName + ' ' + SelectedCountry"></li>
 </script>
- Containerless control flow - Binding using comments
This is a wiered but good technique of iterating the collection provided by knockout. Here just move the code from script tag and paste within container <ul>
As you can see, using ko foreach: list I am able to iterate through the collection. Also close the /ko. This ko interprets the binding context of list object.
Point to remember: This comment based coding is applicable to ant of the binding. For example: if, ifnot, etc
-
<ul>
<!---->
<li data-bind="text: FirstName + ' ' + LastName + ' ' + SelectedCountry"></li>
<!---->
</ul>
Till now we covered, types of observables and types of inbuilt bindings available in knockout. Don't you think it is making our work much simpler than we use to write before in web application
Now let's understand how can we create our own binding.
Custom Binding
If we can’t find the binding as per requirement, we can create our own binding.This can be done by extending on to the bindingHandler of knockout.
Steps to create custom binding
- Ko.bindingHandlers.MyBindingName = { }
- Within this binding set two object property
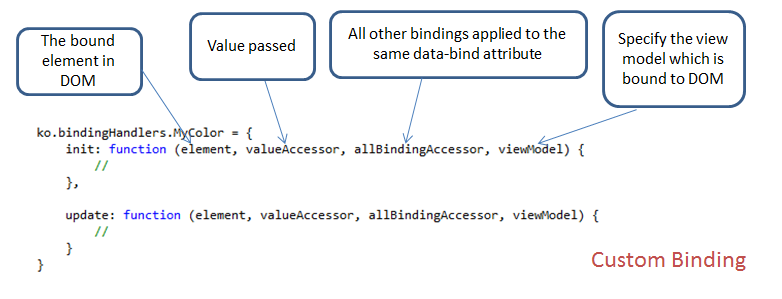
init – The init function runs for the first time when binding is evaluated . I mean when it is used to bind the DOM.
update – Update function is subsequently called whenever your observable value changes or the bound value changes

Create a custombinding.js file
ko.bindingHandlers.MyCustomColor = {
init: function (element, valueAccessor, allBindingAccessor, viewModel) {
var color = valueAccessor();
$(element).css('background-color', 'blue');
},
update: function (element, valueAccessor, allBindingAccessor, viewModel) {
var color = valueAccessor();
var binding = allBindingAccessor().KeepTextBold;
$(element).css({ 'background-color': color(), 'border': '1px', 'border-style': 'solid' });
if (binding())
$(element).css({ 'font-weight': 'bold' });
else
$(element).css({ 'font-weight': 'normal' });
}
};
In CustomBinding.aspx,
 Enter Color:  <input type="textbox" data-bind="value: setcolor" />
    <br />
    Bold Text:  <input type="checkbox" data-bind="checked: bold" />
    <div style="width:300px;height:200px" data-bind="MyCustomColor: setcolor, KeepTextBold: bold">
       This is a Custom Binding Example
    </div>
    <script type="text/javascript">
         $(function () {
             var viewModel = {
                 bold: ko.observable(true)
                 , setcolor: ko.observable('yellow')
             }
             ko.applyBindings(viewModel);
         });
    </script>
Let's try to understand the above code.
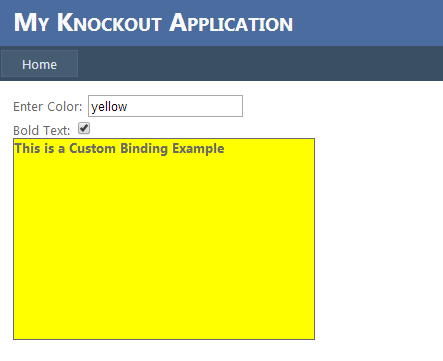
I have created a custom binding with nam MyCustomColor. In init() set the default background-color of div to blue. In update() access the value from textbox which is bound to one observable and the same is bound to the div with my custom binder. So on writing the color in textbox same get reflected on my div. Similarly another binding KeepTextBold which is also accessed in same custom binder and set the text bold property based on observable which is attached to checkbox.
Output:

This is how you can create your own custom binding.
Here I end up with my Day 2 article. Today we have learnt a lots of new things about knockout and how it makes our work easy. I hope by now you can create your own webpage with basic CRUD operation.
In upcoming article, we will cover
- Find data associated with DOM element
- Types of binding context
- JSON data binding with ViewModel
- CRUD operation with WebAPI
Conclusion
This is how knockout provide us with new bindings which can keep our code small and clean. We use to say jquery helped us to shorten our code size compared to javascript. But now you can say knockout has made the code even shorter with its strong binding concept than jquery. Please share your comments whether its good or bad.
For technical trainings on various topics like WCF (Windows Communication Foundation), MVC (Model View Controller), Business Intelligence, Design Patterns, WPF, TFS and Basic fundamentals visit www.JustCompile.com
