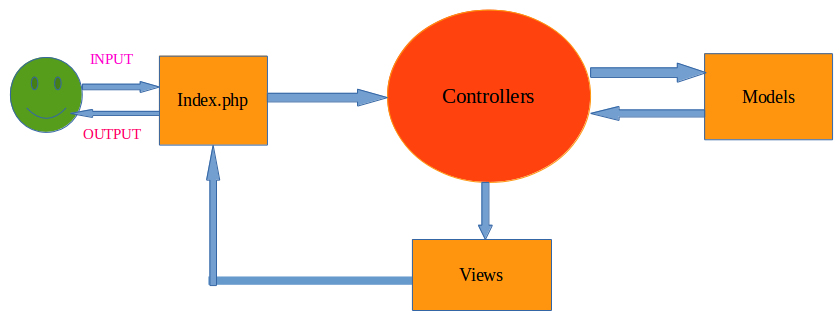
In this blog, we will discuss how to cache your whole project. When we run our project, PHP interpreter enters into the public/index.php file and after interpreting the project source code, again it comes out through index.php file.

As in the above image, we can see index.php is the entry point and exit point so if we will start Caching and end Caching in index.php file, then our whole project will be cached. We will see how it can be possible through demo.
DEMO
1st Step
You should have created project using zend framework. Here, we are using zend framework 1.12 for easy understanding. If you want to install framework and create project, so check these 2 links:
- https://www.digitalocean.com/community/tutorials/how-to-install-zend-framework-on-an-ubuntu-12-04-vps
- http://framework.zend.com/manual/1.12/en/learning.quickstart.create-project.html
2nd Step
Create a clone of the project from https://github.com/tbiswal/quickstart which we will use for demo.
3rd Step
As we are caching whole project, we will follow #Zend_Cache_Frontend_Output method.
4th Step
Create directory called cache inside public directory and give full read write permission to cache directory.
5th Step
Add the below code in mentioned files:
- quickstart/public/index.php
Add this code before $application->bootstrap()->run();
require_once 'Zend/Loader/Autoloader.php';
$autoloader = Zend_Loader_Autoloader::getInstance();
$autoloader->setFallbackAutoloader(true);
$config = new Zend_Config_Ini(APPLICATION_PATH . '/configs/application.ini', 'production');
$registry = Zend_Registry::getInstance();
$registry->set('config', $config);
$frontendOptions = array(
'lifetime' => 7200,
'automatic_serialization' => true
);
$backendOptions = array(
'cache_dir' => 'cache/'
);
$cache = Zend_Cache::factory('Output',
'File',
$frontendOptions,
$backendOptions
);
$registry->set('appCacheObj', $cache);
$appCache = Zend_Registry::get('appCacheObj');
$cacheId = 'myCacheId'.str_replace("/", "_", $_SERVER['REQUEST_URI']);
if(strpos($cacheId, ".php") !== -1) {
$cacheId = explode(".php", $cacheId)[0];
}
if($_SERVER['REQUEST_URI'] == "/guestbook/sign") {
$appCache->remove($cacheId);
}
if($appCache->start($cacheId)) {
exit;
}
After $application->bootstrap()->run(); add the below line:
if(!is_null($appCache)){
$appCache->end();
}
2. Add the below code inside end of the public function save() of models/GuestbookMapper.php file:
$appCache = Zend_Registry::get('appCacheObj');
$appCache->clean(Zend_Cache::CLEANING_MODE_ALL);
When you will browse http://quickstart.local/guestbook/sign, you will get the page like below:

You can check the cache directory which contains the cached files. After clicking on Sign Guestbook, it will clear the cache first and then it will create new cached files.
FYI: So for your project, you have to clear cache on any save action so that user will get new fetched records, otherwise you can show data from cached records.
After completing all the above steps, when you will browse your project, you will find that each page of your application is cached. Only the cached record will be cleaned if you click on any save action. So enjoy! :)
/*Hope you will love it */
