Introduction
Welcome to Step 4 of our DCOM tutorial. In this series, I will strip the mystique, the headache, and confusion from DCOM by giving you a comprehensive tutorial with a straightforward example. OK, no promises - but I will give it a good try.
If you want to follow along with this tutorial and add code and use the Visual C++ wizards as we go along, that's great. In fact, I highly recommend that, because otherwise this tutorial is a big waste of electronic ink (?). However, I follow along exactly with the tutorial myself, as I write it, and develop the code and use the Visual C++ wizards just as I say you should. The screenshots, in fact, are from my development of the files for each step! To download this already-developed code to compare with your own, simply click the 'Download the step n files - n Kb" links at the top of each step. There's also an archive (coming soon) of the files for all the steps at the Questions and Answers page (coming soon) for this tutorial. I still recommend that you follow along with us as we go; this way, you can learn while you code. If you ever have problems along the way with this tutorial, feel free to:
- Post a message to the message board at the bottom of this page.
- Check out this tutorial's Questions and Answers page - coming soon.
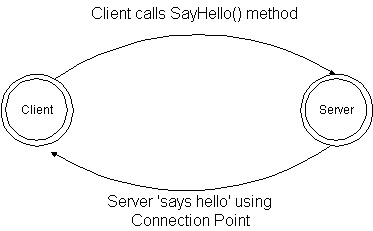
A diagram of how our software will eventually work is shown in Figure 1. The client calls a method on the server, which then fires an event back to the client using a connection point. This connection point's event sink is implemented in the client (using MFC and Class Wizard!!!), and the client shows its user a message telling the user that the server said "Hello!":

Figure 1. The diagram of our DCOM client/server set-up.
Remember, our steps in developing the software in this tutorial are as follows:
- Step 1: Create the server,
HelloWorldServ.NET, using the ATL Project wizard.
- Step 2: Modify the starter files provided by the ATL Project wizard.
- Step 3: Add a simple ATL Object,
HelloWorld, to the server, to expose our functionality.
- Step 4: Add a method,
SayHello(), to the server, that fires the event which the client handles.
- Step 5: We look at the connection points and set up the server's end of one.
- More steps coming soon!
We're currently on step 4 of this tutorial, where we finally add the working code to our DCOM server. We'll add a method to the IHelloWorld interface, and we'll call this method SayHello(). This method will get the network name of the host that it's executing on, and then will fire the event back to the client. Anyway, enough of my jabber; let's plunge in.
Step 4: Modify the IHelloWorld Interface to Add the SayHello() Method
This step of the tutorial is really short. All we will do is add one method to our IHelloWorld interface, and implement it using the CHelloWorld ATL class. Then we'll be ready to move on to step 5! Since the user of our client would like to have some indication as to what computer on their network this code ran on, we'll add some code to get the network name of that computer. The following listing, Listing 1, shows a piece of code which you can cut-and-paste into any application you wish. This code calls the Windows GetComputerName() function:
TCHAR szComputerName[MAX_COMPUTERNAME_LENGTH + 1];
DWORD dwSize = MAX_COMPUTERNAME_LENGTH + 1;
if (!GetComputerName(szComputerName, &dwSize))
{
AfxMessageBox(
_com_error(GetLastError()).ErrorMessage(), MB_ICONSTOP);
return ;
}
Listing 1. Calling the GetComputerName() function.
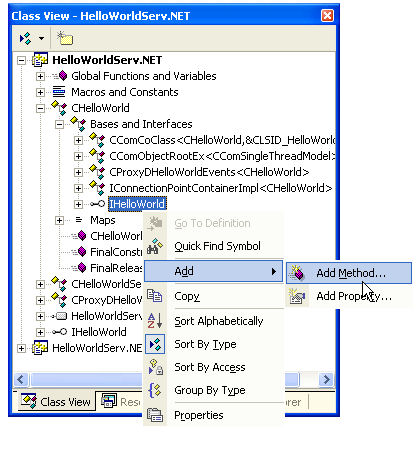
Let's now add the IHelloWorld::SayHello() method, and then add its code. First, in order to generate the files needed by the Add Method Wizard, build the project. Next, go to the Class View. Then click the '+' sign to expand the CHelloWorld class, and then click the '+' sign to expand the 'Bases and Interfaces' icon, and do the same to the IHelloWorld interface icon. Then, double-click the IHelloWorld interface icon. This causes Visual C++ .NET 2003 to generate a file needed to add methods. Next, right-click the IHelloWorld interface icon, point to Add, and then click Add Method, as illustrated in Figure 2, below:

Figure 2. Using the Class View to add a new method to the class.
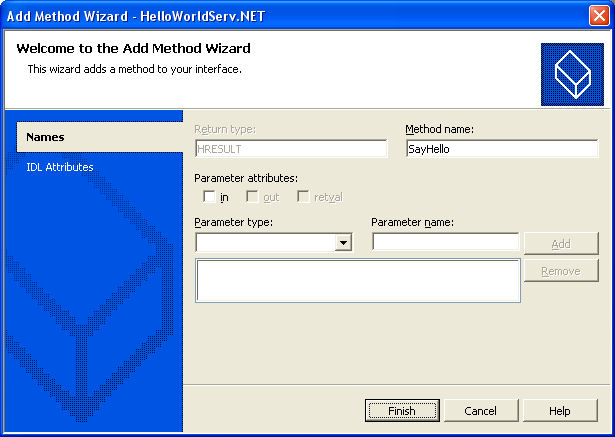
The Add Method Wizard appears, as shown below, in Figure 3. Type SayHello in the Method Name box, and leave the Return Type set to HRESULT (OK, well this is not much of a stretch seeing as how - now - the development environment leaves you no choice!).

Figure 3. Using the Add Method Wizard to add the SayHello() method to IHelloWorld.
Tip: When doing DCOM programming and adding methods to interfaces, *always* set the Return Type of the method to HRESULT. This allows DCOM to report network errors and other status to the client.
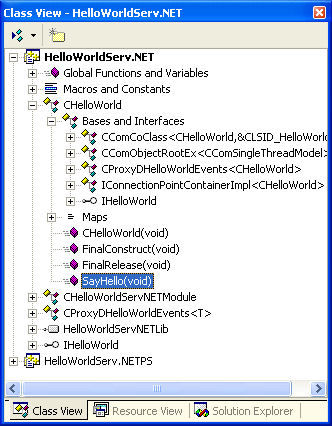
Click Finish. When you do that, the Add Method Wizard will add the code in all the right places to make sure that when a call to the IHelloWorld::SayHello() method comes in over the wire, the CHelloWorld::SayHello() member function will get called and executed. After the method has been added, Class View should resemble the one shown in Figure 4 below:

Figure 4. Class View after the SayHello() method has been added.
Look at Figure 4. See the highlighted item? Double-click that item in your Class View to open up the CHelloWorld::SayHello() member function. This function implements the IHelloWorld::SayHello() method. Let's add some code, shown in Listing 2 in bold, to implement the method:
STDMETHODIMP CHelloWorld::SayHello()
{
TCHAR szComputerName[MAX_COMPUTERNAME_LENGTH + 1];
DWORD dwSize = MAX_COMPUTERNAME_LENGTH + 1;
if (!GetComputerName(szComputerName, &dwSize))
return E_FAIL;
return S_OK;
}
Listing 2. Adding code to implement the SayHello() method.
Notes from the Rear
Notice the line which says
<< Back | Next >>Questions and Answers - coming soon!
Tip: If you're having trouble or can't understand something, it's often the case that you just went ahead as far as you could in this tutorial without following thoroughly, and downloaded the code for the latest step that was done. Perhaps if you go back to previous steps, and work through the tutorial in the places where it wasn't clear, this may help. Also, it could be because there are still more steps yet to be written! Stay tuned!
Tip: Also, if you have a question, go ahead and post it to the message board, below, which is at the bottom of this article page. I will get an email when you do so, and then everyone can see your question and my answer. Don't forget to rate this article either! If you gave it anything less than 5, then post to the message board as to the reason why, so that I can make these articles better for everyone.
