
Introduction
If you have taken high school Physics, you would know something about Moments. From Physics, it found its way into probability theory, and since computer vision leverages probability theory, it is only natural to use Moments in computer vision. So moving on from Part I, I will discuss image moments and how to use them. Since the theme of this series of articles is Application, I will always emphasis on putting theory to practice. So let's start!
Image Moments
Image moments can simply be described as some function of the image pixel intensity. A pixel intensity is nothing but the pixel colour value. Moments are described with respect to their power as in raised-to-the-power in Mathematics. So, we have Zeroth Moment, First Moment, Second Moment etc. Here is the formula for finding Moments:
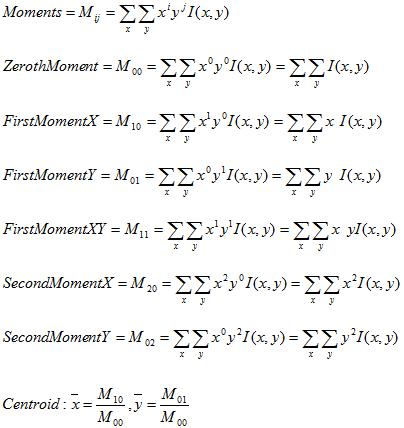
Note that from basic algebra, we know anything raised to the power 0 is 1, so that is why some of the terms above have disappeared. Also, Zeroth Moment is also called the Area of an image. So basically, what we need is the pixel intensity or value and the x and y coordinates to find moments. Using moments, we can find the centroid or centre of gravity of an image. There are some more things that can be found out by using moments.
Histogram Backprojection
Histogram backprojection is a technique used for creating a probability image (backprojection image) of the object of interest. For example, suppose we create a histogram of a target in an image. If we backproject this histogram onto the image, it will create an image that shows the probability of a pixel belonging to the target.
Let's dive into it - once we have the target histogram histT, we create the histogram of the image histImage on which we want to backproject the target histogram. Then, for each pixel value in the image, we get the bin index idx from the image histogram. We set the value of the pixel in the backprojection image by using the ratio of the value of the target histogram and the value of the image histogram at the bin index, i.e., histT[idx] / histImage/[idx] as shown below.
Bitmap bpImage = new Bitmap(bmp.Width, bmp.Height, bmp.PixelFormat);
Histogram frameHistogram = Create1DHistogram(bmp, sourceHistogram.BinCount1,
sourceHistogram.BinCount2, sourceHistogram.BinCount3);
:
:
for (int y = 0; y < size.Y; y++)
{
pPixel = fastBitmap[0, y];
pPixelBP = fastBitmapBP[0, y];
for (int x = 0; x < size.X; x++)
{
idx = GetSingleBinIndex(sourceHistogram.BinCount1,
sourceHistogram.BinCount2, sourceHistogram.BinCount3, pPixel);
if (frameHistogram.Data[idx] > 0)
val = (byte)(255 * (int)(sourceHistogram.Data[idx] /
frameHistogram.Data[idx]));
else
val = 0;
pPixelBP->red = val;
pPixelBP->green = val;
pPixelBP->blue = val;
pPixel++;
pPixelBP++;
}
}
In the above code, we created a blank backprojection image, created the histogram for the current frame, and iterated through the frame pixels. For each pixel, we find the bin index, and using this bin index, we get the value of the target histogram and the frame histogram. We find the ratio of these values and scale it such that the ratio value ranges from 0 to 255. This value is finally used to set the pixel value in the backprojection image. So, here is an example of a backprojection image:
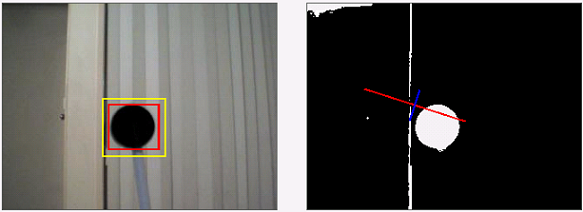
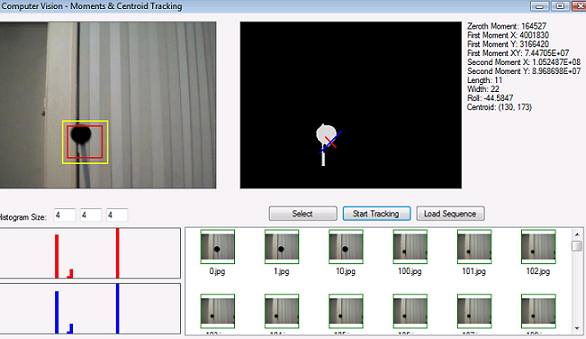
In the above figure, I have selected the target with the mouse. It is shown as the red rectangle (ignore the yellow rectangle for now). Then, the histogram of the selected target is backprojected (right image) onto the same image frame. We can see that if the bin values of the target and the frame corresponding to a pixel index are the same, the resulting pixel value in the backprojection image will be 255. So, the brighter the pixel value, higher the probability that it belongs to the target. In the backprojection image (ignore the red and blue line for now), we can clearly see the target as well as some noise, i.e., a vertical line and some area in the top left.
The reason to discuss Histogram Backprojection is because:
- It is a useful technique to have in the bag
- You can find some more information about the target, like orientation, and
- I am going to implement a simple object tracker using backprojection.
Using backprojection image and moments, we can find the orientation of the target, and the length and the width of the probability distribution. Here are the formulas to use:
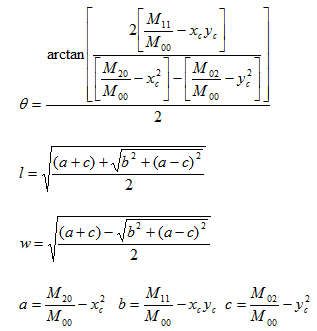
The angle is the orientation of the object about the major axis l (the red line above) whereas w is the minor axis (the blue line above).
Centroid Tracker
Now, it is time to do something more exciting - let's track an object in an image sequence. How would we do it? Let's do the following:
- Select the object in the image and create a histogram of the area inside the target window.
- Segment the object using backprojection. But, instead of projecting onto the whole frame, we project it onto the search area (yellow box) only to reduce the risk of tracker failure.
- Find the centroid of this object.
- Get the next frame, and segment the section under the search window using histogram backprojection.
- Find the centroid, and centre the target and search windows at the centroid.
- Repeat 4 till the end of the image sequence.
We should realise that using a search window around the original object is very important. It limits the scope of segmentation to a smaller area. This means the probability of the tracker getting lost because of a similar coloured object in the background is reduced. Furthermore, limited area increases the processing speed, making the tracker very fast.
Using the Code - Moments & Centroid
Step 1: Select a histogram size - the default is 4x4x4.
Step 2: Select an image from the list and click the "Select" button.
Step 3: Select an area in the image using the mouse - right click the mouse and drag. This will create the selected area histogram, backprojected onto the whole image, calculate the moments, and mark the centroid of the selected area.
Using the Code - Centroid Tracking
Step 1: Select a histogram size - the default is 4x4x4
Step 2: Click "Load Sequence" button to see its histogram of the first image.
Step 3: Select an area in the image using mouse - Right click the mouse & drag. This will backproject only onto the search area, calculate moments and mark the centroid of the selected area. The target histogram is shown in red and will not change during the tracking.
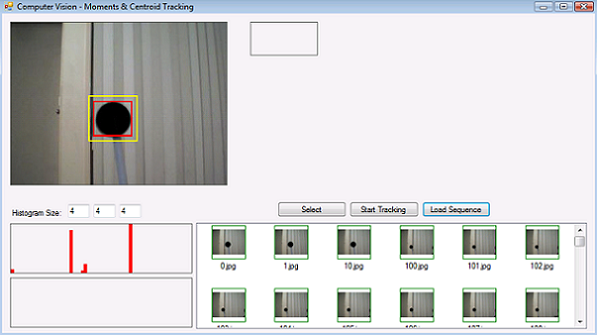
Step 4: Click "Track" button to see the tracking in action. The candidate histogram is shown in blue, and will change during tracking as it is the histogram of the area that the tracker "thinks" is the target.
You can drop bitmaps from your own sequence (named 0 to N) in the sequence folder and try the tracker on it.
In this article, we learned about image moments, and then we used our creativity to apply what we learned about moments to create a simple object tracker. Obviously, the tracker is a simple one, but can be very effective given correct circumstances. But in the real world, we do not always have the luxury of correct circumstances. We cannot control the environment where our tracker will be deployed. There will be multiple objects in the scene doing different things, with different colours etc. So, we need a more robust object tracker. This will be the topic of my next article, where I will discuss a very popular tracking algorithm called ....... "Meanshift Algorithm" - Stay tuned.
Acknowledgements
For any third party code or material used, please refer to "Points of Interest" in Part I.
History
