Introduction
This article discusses nuances of and differences between the visual tree and logical tree in WPF. It also presents a small application with which you can investigate this topic further. If you are completely unfamiliar with the concepts of the visual tree and/or logical tree, I suggest you read this page in the SDK documentation first.
Background
The existing documentation about the visual tree and logical tree in the Windows SDK leaves much to be desired. Ever since I started with WPF, I have felt unsure about what exactly differentiates the two. I knew that the logical tree and visual tree both only contain visual elements and controls, right? Wrong. I knew that a Window/Page/Control/etc. contains one and only one logical tree, right? Wrong. I knew what I was doing, right? Wrong.
It turns out that the element trees in WPF are rather complicated and require detailed knowledge of low-level WPF classes to work with them correctly. Walking an element tree in a generic fashion; where you assume no knowledge of its constituents; is not as simple as it might seem. Unfortunately WPF does not publicly expose a class which simplifies walking the element trees to the point where it is "really easy".
At this point you might be wondering what makes walking the element trees so complicated. Good question. The answer has several parts, which are discussed in the following sections.
The Visual Tree
The visual tree represents all of the elements in your UI which render to an output device (typically, the screen). The visual tree is used for many things like rendering, event routing, locating resources (if an element has no logical parent), and more. Walking up and down the visual tree can be a simple matter of just using VisualTreeHelper and some simple recursive methods.
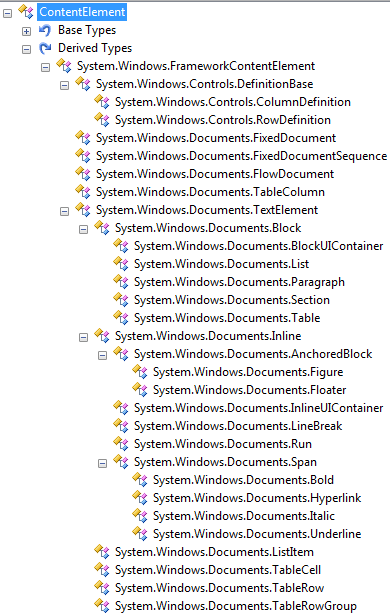
However, there is one wrinkle which makes this a little more complicated. Anything which descends from ContentElement can appear in a user interface, but is not actually in the visual tree. WPF will "pretend" that those elements are in the visual tree, to facilitate consistent event routing, but it's just an illusion. VisualTreeHelper does not work with ContentElement objects because ContentElement does not derive from Visual or Visual3D. Here are all of the classes in the Framework which descend from ContentElement, as seen in Reflector:

Here is how the docs explain what it means that ContentElements are not really in the visual tree:
Content elements (derived classes of ContentElement) are not part of the visual tree; they do not inherit from Visual and have no visual representation. In order to appear in a UI at all, a ContentElement must be hosted within a content host that is a Visual, usually a FrameworkElement. You can conceptualize that the content host is somewhat like a "browser" for the content and chooses how to display that content within the screen region the host controls. Once the content is hosted, the content can be made a participant in certain tree processes that are normally associated with the visual tree. Generally the FrameworkElement host class includes implementation code that adds any hosted ContentElement to the event route through subnodes of the content logical tree, even though the hosted content is not part of the true visual tree. This is necessary so that a ContentElement can source a routed event that routes to any element other than itself.
So what does all this mean? Well, it means that you can't always just use VisualTreeHelper to traverse the visual tree. If you pass a ContentElement to VisualTreeHelper's GetParent or GetChild methods, an exception will be thrown because ContentElement does not derive from Visual or Visual3D. In order to walk up the visual tree, you need to check each element along the way to see if it descends from Visual or Visual3D, and if it does not, then you must temporarily walk up the logical tree until you encounter another visual object. For example, here's some code which walks up to the root element in a visual tree:
DependencyObject FindVisualTreeRoot(DependencyObject initial)
{
DependencyObject current = initial;
DependencyObject result = initial;
while (current != null)
{
result = current;
if (current is Visual || current is Visual3D)
{
current = VisualTreeHelper.GetParent(current);
}
else
{
current = LogicalTreeHelper.GetParent(current);
}
}
return result;
}
This code walks up the logical tree when necessary, as seen in the else clause. This is useful if, say, the user clicks on a Run element within a TextBlock and in your code you need to walk up the visual tree starting at that Run. Since the Run class descends from ContentElement, the Run is not "really" in the visual tree so we need to walk up out of "Logical Land" until we encounter the TextBlock which contains the Run. At that point we will be back in "Visual Land" since TextBlock is not a ContentElement subclass (i.e. it is a real part of a visual tree).
The Logical Tree
The logical tree represents the essential structure of your UI. It closely matches the elements you declare in XAML, and excludes most visual elements created internally to help render the elements you declared. WPF uses the logical tree to determine several things including dependency property value inheritance, resource resolution, and more.
Working with the logical tree is not nearly as clear-cut as the visual tree. For starters, the logical tree can contain objects of any type. This differs from the visual tree, which only contains instances of DependencyObject subclasses. When working with the logical tree, you must keep in mind a leaf node in the tree (a terminus) can be of any type. Since LogicalTreeHelper only works with DependencyObject subclasses, you need to be careful about type checking the objects while walking down the tree. For example:
void WalkDownLogicalTree(object current)
{
DoSomethingWithObjectInLogicalTree(current);
DependencyObject depObj = current as DependencyObject;
if (depObj != null)
foreach(object logicalChild in LogicalTreeHelper.GetChildren(depObj))
WalkDownLogicalTree(logicalChild);
}
A given Window/Page/Control will have one visual tree, but can contain any number of logical trees. Those logical trees are not connected to each other, so you cannot just use LogicalTreeHelper to navigate between them. In this article, I refer to the top level control's logical tree as the "main logical tree" and all of the other logical trees within it as "logical islands". Logical islands are really just regular logical trees, but I think that the term "island" helps to convey the fact that they are not connected to the main logical tree.
This weirdness can all be boiled down to one word: templates.
Controls and data objects have no intrinsic visual appearance; instead they rely on templates to explain how they should render. A template is like a cookie-cutter which can be "expanded" to create real live visual elements used to render something. The elements that are part of an expanded template, hereafter referred to as "template elements", form their own logical tree which is disconnected from the logical tree of the object for which they were created. Those little logical trees are what I refer to as "logical islands" in this article.
You have to write extra code if you need to jump between logical islands/trees. Bridging those logical islands together, while walking up logical trees, involves making use of the TemplatedParent property of FrameworkElement or FrameworkContentElement. TemplatedParent returns the element which has the template applied to it, and, thus, contains a logical island. Here is a method which finds the TemplatedParent of any element:
DependencyObject GetTemplatedParent(DependencyObject depObj)
{
    FrameworkElement fe = depObj as FrameworkElement;
    FrameworkContentElement fce = depObj as FrameworkContentElement;

    DependencyObject result;
    if (fe != null)
        result = fe.TemplatedParent;
    else if (fce != null)
        result = fce.TemplatedParent;
    else
        result = null;

    return result;
}
Walking down the logical tree and jumping from one tree to the next is more difficult because there is no TemplatedChild property. You need to check the visual children of an element at the end of one logical tree, and see if those children (or perhaps their descendants) are members of a different logical tree. That code is left as an exercise for the reader to create.
The Research Tool
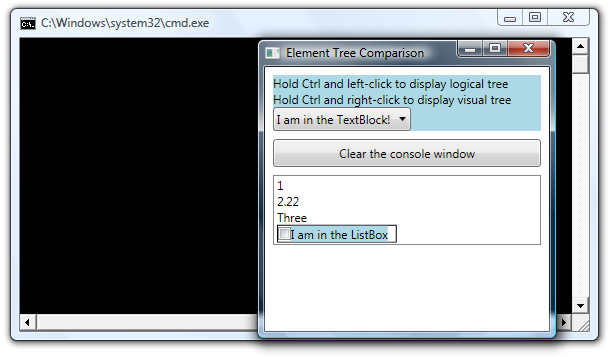
This article is accompanied by a small console application which allows you to experiment with and investigate the element trees. It opens a WPF Window and will write out to a console window either the visual tree or logical tree for any element on which you click. The instructions for how to use it appear in the Window, so let's just see what it looks like and what information it provides us.
When you start the app, it looks like this:

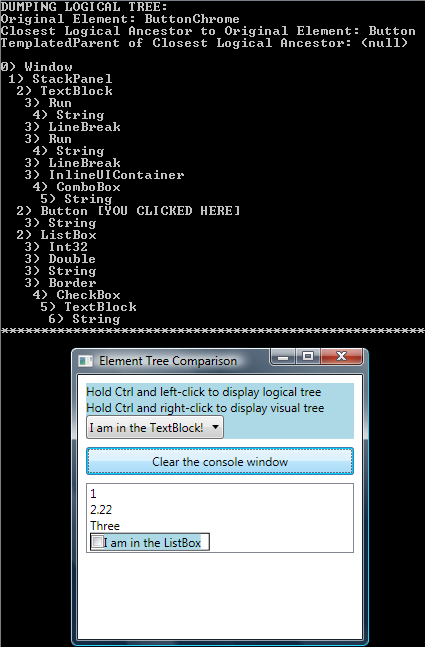
After maximizing the console window and moving the WPF Window over it, I held down Ctrl and left-clicked on the Button in the middle of the Window (but not over the display text). At that point, the app dumped the logical tree of the ButtonChrome element on which I clicked, and it looked like this:

Notice that the [YOU CLICKED HERE] text appears on the line in the console window which represents a Button, not the on the line for the ButtonChrome element on which I actually clicked. That's because this logical tree does not care about or contain ButtonChrome elements, which is simply a rendering artifact created by Button's default control template.
Since Button is a ContentControl, it also has a ContentPresenter within its visual tree. The ContentPresenter is what hosts and displays the content seen in the Button, which is the string "Clear the console window". That string is rendered by expanding a simple data template which displays the text in a TextBlock element.
If I were to hold Ctrl and left-click on the text itself, meaning on the TextBlock element, the console window displays this:

Notice how the logical tree is very different now. It is much smaller than before; the root is a ButtonChrome instead of a Button; and the terminus is a ContentPresenter instead of a string. The reason for this change is that we are now looking at a logical island. This logical island is the logical tree of the template elements created to display the content of the Button.
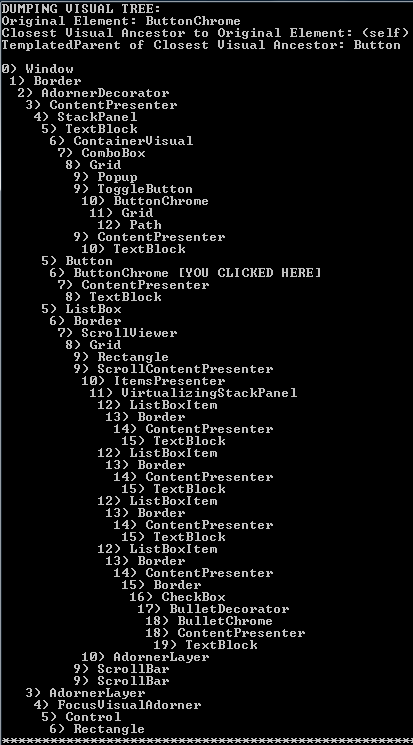
If we were to hold Ctrl and right-click on the ButtonChrome (or anywhere else for that matter), the console window would display the entire visual tree and indicate on which element we clicked. It would look like this:

Obviously the visual tree seen here is much larger than the original logical tree seen previously. It is interesting to note that the visual tree contains all of the visual elements involved with the Button being examined earlier. It does not care about whether elements come from templates or not, which makes it much easier to understand.
Conclusion
At first glance, the element trees in WPF might seem to be fairly self-explanatory. Upon closer examination, though, it becomes apparent that they are not that simple. For most WPF programming tasks it is not important to be familiar with these details, but for some more advanced scenarios it becomes crucial information. Hopefully this article has helped shed some light on these arcane details.
Revision History
- November 30, 2007 - Created the article
- December 5, 2007 - Fixed the article's links after the CodeProject site upgrade munged them
