Introduction
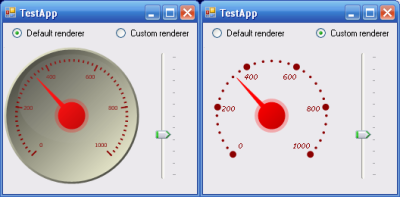
On the internet I found many projects on analog meters, but few could change their appearance using a custom renderer. Because of this, I decided to create my first control in C#, and use this control in my next projects.
Background
To compile this demo you need .NET 2.0 which is available here. The project is developed with SharpDevelop, a free IDE per .NET.
Using the Code
In the zip files there is a complete solution, but it is simple enough to use the code of the control for inserting this in another project. In the next section, there is a description for how to use the class.
Control Class
The class is derived from System.Windows.Forms.UserControl. Normally, this class has a default renderer class that is used for drawing all parties, but it is possible to set a custom renderer to draw a single part, or the entire control. The main class of the control is:
namespace LBSoft.IndustrialCtrls.Meters
{
public partial class LBAnalogMeter : UserControl
{
...
}
}
You can set the following properties at design time:
Appearance Properties
MeterStyle - Style of the control. At the moment the only stile is AnalogMeterStyle.Circular. BodyColor - Color of the body of the control. NeedleColor - Color of the needle of the control ScaleColor - Color of the thicks of the control scale ScaleDivisions - Number of main division of the scale ScaleSubDivisions - Number of the sub-division between a main division to an other of the scale ViewGlass - Flag for the visualization of the glass effect
Behavior Properties
Value - Current value of the control MinValue - Minimum value of the control MaxValue - Maximum value of the control
In the next section will describe the renderer class and how it is possible to customize the control draw.
Renderer Class
The renderer class is a class with a few virtual methods which are called for the design of the individual parts of control.
namespace LBSoft.IndustrialCtrls.Meters
{
public class LBAnalogMeterRenderer
{
private LBAnalogMeter meter = null;
public LBAnalogMeter AnalogMeter
{
set { this.meter = value; }
get { return this.meter; }
}
public virtual bool DrawBackground( Graphics gr, RectangleF rc )
{
return false;
}
public virtual bool DrawBody( Graphics Gr, RectangleF rc )
{
return false;
}
public virtual bool DrawDivisions( Graphics Gr, RectangleF rc )
{
return false;
}
public virtual bool DrawThresholds( Graphics gr, RectangleF rc )
{
return false;
}
public virtual bool DrawUM( Graphics gr, RectangleF rc )
{
return false;
}
public virtual bool DrawValue( Graphics gr, RectangleF rc )
{
return false;
}
public virtual bool DrawNeedle( Graphics Gr, RectangleF rc )
{
return false;
}
public virtual bool DrawNeedleCover( Graphics Gr, RectangleF rc )
{
return false;
}
public virtual bool DrawGlass( Graphics Gr, RectangleF rc )
{
return false;
}
}
}
All the methods of the base class return False. The control class, if it has a custom renderer, call the custom renderer, and if the method called returns False, call the same method of the default renderer.
For example, if you want to eliminate the drawing of the body of the control, use the following this steps :
- Create a class derived from
LBAnalogMeterRenderer
- Override the method
DrawBody
- In this method return
True
- Create an instance of the custom renderer in the main form
- Set the renderer to the control with the property
Renderer
Code :
namespace TestApp
{
public class LBNoBodyAnalogMeterRenderer : LBAnalogMeterRenderer
{
public override bool DrawBody( Graphics Gr, RectangleF rc )
{
return true;
}
}
public partial class MainForm : Form
{
LBNoBodyAnalogMeterRenderer customRenderer = null;
...
public MainForm()
{
InitializeComponent();
this.customRenderer = new LBNoBodyAnalogMeterRenderer;
this.lbAnalogMeter.Renderer = this.customRenderer;
...
}
...
}
}
Conclusion
This is the preliminary version of the control, and many features have yet to be implemented, but I hope to do so soon
For this article, I used the code and ideas from this article:
Points of Interest
Any suggestions/comments/feedback are highly appreciated
History
