Introduction
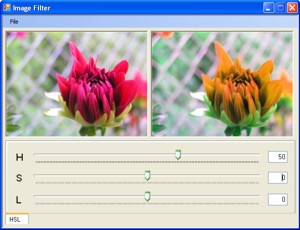
This Visual Basic .NET class implements an image filter which can change the hue, saturation, and/or lightness of the image. A small demo project is provided.
Background
I was playing with image filters described in the article "A C# image enhancement filters library" and transferring code from C to VB.NET. Then, I extended my library with filters described in "Image Processing for Dummies with C# and GDI+ Part 1 - Per Pixel Filters". Since none of above articles describes a hue/saturation/lightness (HSL) filter, I decided to write my own class.
Filter class basics
All the filters share the same interface IFilter, defining a single function accepting an image as input and returning a filtered image on exit.
Public Interface IFilter

Function ExecuteFilter( _
         ByVal inputImage As System.Drawing.Image) As System.Drawing.Image

End Interface
The class BasicFilter implements the IFilter interface and is used as the base class for all filters.
Public MustInherit Class BasicFilter _
Implements IFilter
Private _bgColor As Color = Color.FromArgb(0, 0, 0, 0)
Private _interpolation As InterpolationMode = _
InterpolationMode.HighQualityBicubic
Public Property BackgroundColor() As Color
Get
Return _bgColor
End Get
Set(ByVal value As Color)
_bgColor = value
End Set
End Property
Public Property Interpolation() As InterpolationMode
Get
Return _interpolation
End Get
Set(ByVal value As InterpolationMode)
_interpolation = value
End Set
End Property
Public MustOverride Function ExecuteFilter( _
ByVal img As System.Drawing.Image) _
As System.Drawing.Image Implements IFilter.ExecuteFilter
End Class
Most of the filters have the same ExecuteFilter function, which at the moment only handles certain image formats.
Public Overrides Function ExecuteFilter( _
         ByVal img As System.Drawing.Image) _
         As System.Drawing.Image
   Select Case img.PixelFormat
      Case PixelFormat.Format16bppGrayScale
         Return img
      Case PixelFormat.Format24bppRgb, _
               PixelFormat.Format32bppArgb, PixelFormat.Format32bppRgb
         Return ExecuteRgb8(img)
      Case PixelFormat.Format48bppRgb
         Return img
      Case Else
         Return img
   End Select
End Function
Since I like to be in control and understand what's going on, I don't use a color matrix to transform an image, but rather read/modify/write pixels, which proved to be as fast as using a color matrix. I'm using a similar frame in my filters to access pixels.
Private Function ExecuteXXX(ByVal img As System.Drawing.Image) As System.Drawing.Image
Dim result As Bitmap = New Bitmap(img)
result.SetResolution(img.HorizontalResolution, img.VerticalResolution)
Dim bmpData As BitmapData = result.LockBits( _
New Rectangle(0, 0, result.Width, result.Height), _
ImageLockMode.ReadWrite, img.PixelFormat)
Dim pixelBytes As Integer = _
System.Drawing.Image.GetPixelFormatSize(img.PixelFormat) \ 8
Dim ptr As IntPtr = bmpData.Scan0
Dim size As Integer = bmpData.Stride * result.Height
Dim pixels(size - 1) As Byte
Dim index As Integer
System.Runtime.InteropServices.Marshal.Copy(ptr, pixels, 0, size)
For row As Integer = 0 To result.Height - 1
For col As Integer = 0 To result.Width - 1
index = (row * bmpData.Stride) + (col * pixelBytes)
R = pixels(index + 2)
G = pixels(index + 1)
B = pixels(index + 0)
Next
Next
System.Runtime.InteropServices.Marshal.Copy(pixels, 0, ptr, size)
result.UnlockBits(bmpData)
Return result
End Function
Implementing an HSL filter
The basic idea is to convert RGB values to HSL values, change the HSL values according to the user settings, and then convert the HSL values back to RGB values. The HSL color space is well described in Wikipedia where you can also find a link to the C code for conversion at EasyRGB. Converting C code to VB.NET was trivial, and the filter works just fine.
For testing the filters, I'm using a JPEG image 256 pixels square, and I'm running filters from a console application, also measuring the filtering time. Execution time was slightly longer than with other filters, but not so critical. Until filter was used on image size 2288x1712 pixels. Execution time was more than 16 seconds.
With paper, pencil, and some basic math, I found that a lot of calculations in the EasyRGB code are not necessary. Using the full range for HSL instead of the range [0..1] also saved some time. The biggest time saving was achieved by putting code that was in a separate function in the main loop. It is interesting that when I tried to do part of the calculations with integer arithmetic, the execution time increased. It seems type conversions took quite some time.
The final execution time is approximately 1.5 seconds, which is barely 10% of the original execution time.
Using the code
The code is fairly simple. The filter accepts parameters as follows:
Hue is a value between 0 and 360; actually, any value will be accepted and then transformed into the proper range.Saturation and Lightness have allowed values between -100 and +100 (in percent).BackgroundColor and Interpolation parameters have no meaning within this filter.
Dim myEncoderParameters As EncoderParameters = New EncoderParameters(1)
myEncoderParameters.Param(0) = _
New EncoderParameter(Encoder.Quality, CType(90L, Int32))
Dim imgOriginal As Image = _
Image.FromFile("C:\Documents and Settings\Test.jpg")
Dim imgFilter As HSLFilter = New HSLFilter()
imgFilter.Hue = 50
imgFilter.Saturation = 0
imgFilter.Lightness = 0
Dim imgFiltered As Image = imgFilter.ExecuteFilter(imgOriginal)
imgFiltered.Save("C:\Documents and Settings\Test_HSL.jpg", _
Library.Image.Functions.GetEncoderInfo(ImageFormat.Jpeg), _
myEncoderParameters)
Points of interest
Implementing this filter is a good example of optimizing the code for speed. I learned a lot about colors and accessing image data.
History
- 2007-06-08: Saturation and lightness scale changed. Demo project added.
- 2007-06-05: Version 1.00.
