Introduction
XColorHexagonCtrl mimics behavior of hexagon control on
standard page of Microsoft Office® color picker:
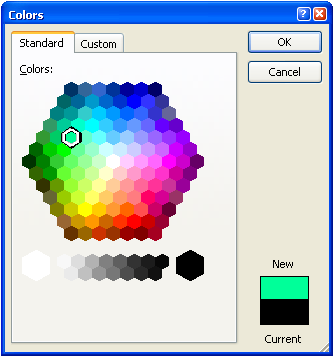
This is companion article to my
XColorSpectrumCtrl article,
but you need not read that article to make use of this control.
XColorHexagonCtrl Features and Behaviors
Visually the
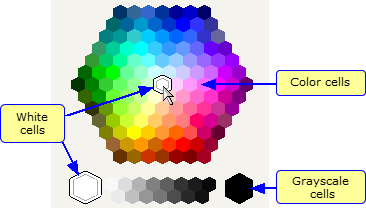
XColorHexagonCtrl control has two separate areas of user
interaction, a large hexagon comprised of many smaller hexagon cells, each
displaying a different color; and underneath that, grayscale hexagon cells
that include a large white and a large black cell. In actual use,
both areas function the same, with only one noticeable difference,
concerning the behavior of the two cells filled with the color
white (#FFFFFF). When the
small white cell is clicked, the large white cell is also selected;
but when the large white cell is clicked, the small white cell is not also
selected. No other cells behave this way, and no other colors are duplicated.
In every other respect, the cells in the large hexagon and the
cells in the grayscale area behave exactly the same.
These user interface behaviors are implemented in XColorHexagonCtrl:
 |
Clicking on a cell selects that cell, and selection indicator,
or selector, is displayed. The
WM_XCOLORPICKER_SELCHANGE message is sent to parent window, with
RGB (COLORREF) color as WPARAM and
control id as LPARAM.
|
 |
Double-clicking on a cell selects cell, and selector is displayed. The
WM_XCOLORPICKER_SELENDOK message is sent to parent window, with
RGB (COLORREF) color as WPARAM and control id as
LPARAM.
|
 |
The selector changes appearance according to whether the control has focus:
With Focus
 |
|
Without Focus
 |
|
 |
The arrow, Home and End keys
may be used when control has focus. Left and Right arrows
do what you would expect, and wrap to previous/next line. Down arrow
always goes down and to the right (since cells are staggered). When going
down is no longer possible, it simply goes to right. Up does similar
thing, going up and to the left. Home goes to first cell, End
goes to large black cell. All nav keys cause
WM_XCOLORPICKER_SELCHANGE message to be sent to parent window.
|
 |
The selector may be clicked and dragged to new position.
This will result in multiple
WM_XCOLORPICKER_SELCHANGE messages sent to parent window.
|
 |
Tooltips in four formats may be optionally displayed:
|
The programmatic interface to XColorHexagonCtrl attributes is very
simple: just eight functions to get/set RGB and HSL values, background color,
and tooltip format:
| Function |
Description |
|
COLORREF GetBackground()
|
Retrieves current background color
|
|
void GetHSL(BYTE* h, BYTE* s, BYTE* l)
|
Retrieves HSL values for current color
|
|
COLORREF GetRGB()
|
Retrieves RGB value for current color
|
|
void GetTooltipFormat()
|
Retrieves tooltip format
|
|
CXColorHexagonCtrl& SetBackground(COLORREF cr)
|
Sets background color
|
|
CXColorHexagonCtrl& SetHSL(BYTE h, BYTE s, BYTE l)
|
Sets color from HSL values
|
|
CXColorHexagonCtrl& SetRGB(COLORREF cr)
|
Sets color from RGB value
|
|
CXColorHexagonCtrl& SetTooltipFormat(TOOLTIP_FORMAT eFormat)
|
Sets tooltip format
|
XColorHexagonCtrl Color Models
XColorHexagonCtrl allows you to work with either RGB or
HSL color model, depending on requirements of your application.
For more details about these color models, please see my
XColorSpectrumCtrl article.
Implementation Notes
Taking advantage of the helper classes (
CXDC,
CXRect, and
CXToolTipCtrl)
I wrote for my
XColorSpectrumCtrl article,
I was able to quickly convert
XColorHexagonCtrl from MFC.
Internal Design
Just like in
XColorSpectrumCtrl,
I use old Win32 trick of
caching DC. The first time the hexagon needs to be drawn,
I create a persistent DC and bitmap. For subsequent drawing,
I
BitBlt the saved
DC to target DC, and then do any additional drawing on that.
This draws the hexagon instantly with no discernible flicker.
One big difference between this control and XColorSpectrumCtrl
is that with the color hexagon, you are dealing with discrete colors,
rather than spectrum. Moreover, these colors must match those
used in MS Office® color picker. In all, there are 143
unique colors displayed in the hexagon (including grayscale colors).
While some of them are standard
named colors,
most of them are not.
Handling this many non-standard colors took some effort - color-picking
the colors and setting up an array for the hexagon display - but it
provided me with an understanding of why the MS Office® color
picker behaves the way it does. In fact, the XColorHexagonCtrl
implementation was really driven by the structure of the color data.
Here is the struct used to define each cell:
struct COLOR_CELL
{
COLOR_CELL(int x, int y, COLORREF crFill)
{
index = 0;
startx = x;
starty = y;
cr = crFill;
}
int index;
int startx;
int starty;
COLORREF cr;
};
enum { NUMBER_COLOR_CELLS = 144 };
COLOR_CELL * m_paColorCells[NUMBER_COLOR_CELLS];
The first time hexagon is painted, the array
m_paColorCells
is filled from pre-defined list of colors. This array is in sequential order,
starting with the top-left cell, and ending with the large black cell.
This sequence is what allows the
Left arrow and
Right arrow
keys to work correctly.
Navigation Details
But what if the user clicks on a cell? How does navigation work
from a random cell in hexagon? This is where
index
member of the
COLOR_CELL comes in. You can find which cell
the cursor is over with Win32
GetPixel() function,
using saved DC (we don't want to use window DC because there might be
a selector displayed, and
GetPixel() could pick up
selector colors). Once we have color, it is simple to search through array
to find matching cell (remember that colors are unique, except for white).
This gives us pointer to
COLOR_CELL
But wait! What if user clicks on large white cell? Won't the search
find small cell first? Well, yes, it would, but simple test determines
whether cursor is in color hexagon or grayscale area.
Once we have pointer to COLOR_CELL struct, the index
member can be used to access next or previous cells. However, accessing
cells above or below current cell takes a bit more work.
Once again we use the saved DC. We know that cells are staggered,
so imagine that cells are squares instead of hexagons;
then going up means taking top left corner of current cell, and going down
means taking bottom right corner:
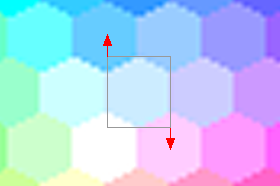
When we have X and Y coordinates that we know will be in desired cell (if
there is one), we can get color of that pixel, and from there we can
once again search array for color match, to retrieve pointer to
COLOR_CELL struct.
Drawing Details
There is one oddity about the hexagon cells in MS Office® color picker
that is not immediately apparent: they are not symmetrical, left to right:
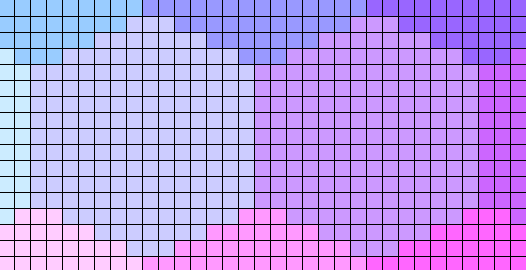
As you see, the right side of individual cells is short by one column
of pixels. This is true of every cell in hexagon and in
grayscale area. Possibly this is to give the whole color hexagon a
more symmetrical appearance.
This discovery led me to completely
change my thinking about how to draw color hexagon. Up to this
point, I had been thinking of some nice algorithms to compute the vertices,
side lengths, etc. Now I could see that the algorithms had taken a turn
for the baroque, which made them much less appealing.
I now faced challenge: how to reproduce the visual appearance
of the MS Office® color hexagon, given its non-symmetrical
structure? I began thinking of individual hexagon cells - they were all
identical in size, shape, and even the missing column of pixels was
identical. For some reason I started thinking about a factory stamping out
these cells like cookies, and that is when I realized I could draw cells
with same technique I used in drawing indicators for
XColorSpectrumCtrl.
Using this approach, cell is defined by internal bit array; each pixel
is represented by one BYTE, whose value
determines whether pixel should be drawn (if non-zero).
Here is bit array for small cell:
static BYTE pixels[SMALL_CELL_HEIGHT][SMALL_CELL_WIDTH] =
{
0,0,0,0,0,0,1,1,1,0,0,0,0,0,
0,0,0,0,1,1,1,1,1,1,1,0,0,0,
0,0,1,1,1,1,1,1,1,1,1,1,1,0,
1,1,1,1,1,1,1,1,1,1,1,1,1,1,
1,1,1,1,1,1,1,1,1,1,1,1,1,1,
1,1,1,1,1,1,1,1,1,1,1,1,1,1,
1,1,1,1,1,1,1,1,1,1,1,1,1,1,
1,1,1,1,1,1,1,1,1,1,1,1,1,1,
1,1,1,1,1,1,1,1,1,1,1,1,1,1,
1,1,1,1,1,1,1,1,1,1,1,1,1,1,
1,1,1,1,1,1,1,1,1,1,1,1,1,1,
1,1,1,1,1,1,1,1,1,1,1,1,1,1,
0,0,1,1,1,1,1,1,1,1,1,1,1,0,
0,0,0,0,1,1,1,1,1,1,1,0,0,0,
0,0,0,0,0,0,1,1,1,0,0,0,0,0,
};
I also used this technique to draw two large cells,
as well as selector. Again borrowing idea from
XColorSpectrumCtrl,
for selector I assigned different values to pixel positions,
depending on what color they should be painted:
static BYTE pixels[SMALL_SELECTOR_HEIGHT][SMALL_SELECTOR_WIDTH] =
{
0,0,0,0,0,0,0,1,1,1,1,1,0,0,0,0,0,0,0,
0,0,0,0,0,1,1,2,2,2,2,2,1,1,0,0,0,0,0,
0,0,0,1,1,2,2,2,2,2,2,2,2,2,1,1,0,0,0,
0,1,1,2,2,2,2,2,3,3,3,2,2,2,2,2,1,1,0,
1,2,2,2,2,2,3,3,0,0,0,3,3,2,2,2,2,2,1,
1,2,2,2,3,3,0,0,0,0,0,0,0,3,3,2,2,2,1,
1,2,2,3,0,0,0,0,0,0,0,0,0,0,0,3,2,2,1,
1,2,2,3,0,0,0,0,0,0,0,0,0,0,0,3,2,2,1,
1,2,2,3,0,0,0,0,0,0,0,0,0,0,0,3,2,2,1,
1,2,2,3,0,0,0,0,0,0,0,0,0,0,0,3,2,2,1,
1,2,2,3,0,0,0,0,0,0,0,0,0,0,0,3,2,2,1,
1,2,2,3,0,0,0,0,0,0,0,0,0,0,0,3,2,2,1,
1,2,2,3,0,0,0,0,0,0,0,0,0,0,0,3,2,2,1,
1,2,2,2,3,3,0,0,0,0,0,0,0,3,3,2,2,2,1,
1,2,2,2,2,2,3,3,0,0,0,3,3,2,2,2,2,2,1,
0,1,1,2,2,2,2,2,3,3,3,2,2,2,2,2,1,1,0,
0,0,0,1,1,2,2,2,2,2,2,2,2,2,1,1,0,0,0,
0,0,0,0,0,1,1,2,2,2,2,2,1,1,0,0,0,0,0,
0,0,0,0,0,0,0,1,1,1,1,1,0,0,0,0,0,0,0
};
There are three colors used in the selector, with one color
(the outer border) dependent on whether the control has focus.
A Design Hole Emerges
After I had finished with drawing code and navigation code,
I thought
XColorHexagonCtrl was nearly finished. Then I
realized there was a big hole in the design, caused by one of
the assumptions I made early on. I had assumed that
if a color was found in the
m_paColorCells array,
that it meant that the color was that of a valid cell,
and therefore the cell was valid part of the color hexagon.
It turns out this might not be true.
It is possible - though perhaps unlikely - that user has set
system colors to match one of the colors in the hexagon. This is
especially true of the grayscale colors. If this happened, and
the dialog background matched a hexagon color, then clicking anywhere
in hexagon or anywhere in its entire client area would be interpreted
as clicking on a valid cell. Except it might not be valid!
How to prevent this from happening? I ran down list of things
I could do: grab all the system colors, check for match;
do some fancy geometry calculations, check for out-of-bounds;
paint non-hexagon bits a "special" color that I could check
for. It was this last idea that led me to simple yet effective solution:
I would create a validating mirror image of the persistent color hexagon DC.
This validating DC would be painted
with only two colors: black and white. First I filled the validating DC
completely with black. Then, when I was setting up
the persistent color DC, I painted a white pixel in validating DC
wherever I painted a color pixel in persistent color DC. The final
validating DC looked like this:

Given an X,Y pixel position, it was now easy to validate it: a color
value of 0 in the validating DC meant that it was not valid. Hence
any clicks in the black area could be ignored.
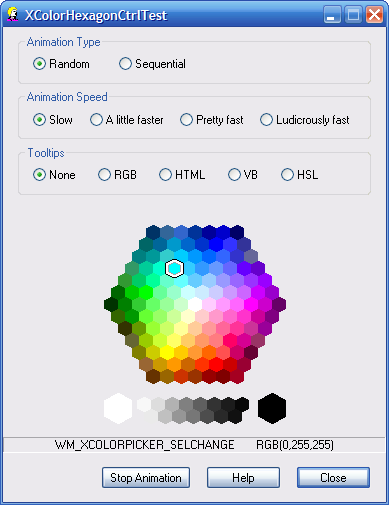
Demo App
Here is what demo app looks like:
How to use
The following steps assume you want to add
XColorHexagonCtrl to
a dialog. Steps would be similar for
CFormView or
CPropertyPage.
Step 1 - Add Files
To integrate CXColorHexagonCtrl into your app, you first need to
add following files to your project:
- CXCD.h
- CXRect.h
- CXToolTipCtrl.h
- XColorHexagonCtrlConstants.h
- XColorHexagonCtrl.cpp
- XColorHexagonCtrl.h
- rgbhsl.cpp
- rgbhsl.h
The .cpp files should be set to Not using precompiled header
in Visual Studio. Otherwise, you will get error
fatal error C1010: unexpected end of file while looking for precompiled header directive
Step 2 - Add Placeholder Rect to Dialog Resource
Next add a STATIC or other control to dialog resource, where you want the
XColorHexagonCtrl to be displayed. The dialog for demo app looks
like this:
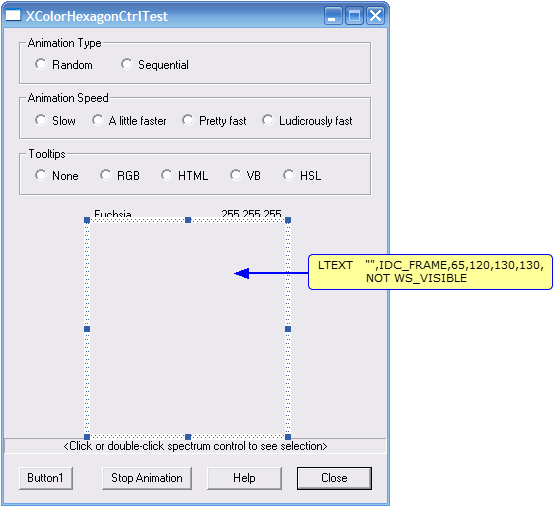
Note that this step is not required, if you have some other way to specify
where XColorHexagonCtrl should be displayed.
Step 3 - Create the Control
You need to do two things here: first,
add
#include statement to dialog class header file:
#include "XColorHexagonCtrl.h"
and insert variable that looks like:
CXColorHexagonCtrl m_ColorHexagon;
Second, add code to
OnInitDialog() function:
CRect rect;
GetDlgItem(IDC_FRAME)->GetWindowRect(&rect);
ScreenToClient(&rect);
GetDlgItem(IDC_FRAME)->ShowWindow(SW_HIDE);
VERIFY(m_ColorHexagon.Create(AfxGetInstanceHandle(),
WS_CHILD | WS_VISIBLE | WS_TABSTOP,
rect,
m_hWnd,
9001,
RGB(0,255,0)),
CXColorHexagonCtrl::XCOLOR_TOOLTIP_HTML));
::SetWindowPos(m_ColorHexagon.m_hWnd, ::GetDlgItem(m_hWnd, IDC_FRAME),
0,0,0,0, SWP_NOMOVE|SWP_NOSIZE);
Step 4 - Add Message Handlers
According to your app's requirements, you may need to add handlers for one
or both of the
XColorHexagonCtrl registered messages. Here are
handlers used in demo app:
LRESULT CXColorHexagonCtrlTestDlg::OnSelChange(WPARAM wParam, LPARAM lParam)
{
KillTimer(1);
CString s = _T("");
GetDlgItem(IDC_COLOR_NAME)->SetWindowText(s);
GetDlgItem(IDC_COLOR_RGB)->SetWindowText(s);
s.Format(_T("WM_XCOLORPICKER_SELCHANGE RGB(%d,%d,%d)"),
GetRValue(wParam), GetGValue(wParam), GetBValue(wParam));
if (lParam == 9001)
GetDlgItem(IDC_SELECTION)->SetWindowText(s);
return 0;
}
LRESULT CXColorHexagonCtrlTestDlg::OnSelendOk(WPARAM wParam, LPARAM lParam)
{
KillTimer(1);
CString s = _T("");
GetDlgItem(IDC_COLOR_NAME)->SetWindowText(s);
GetDlgItem(IDC_COLOR_RGB)->SetWindowText(s);
s.Format(_T("WM_XCOLORPICKER_SELENDOK RGB(%d,%d,%d)"),
GetRValue(wParam), GetGValue(wParam), GetBValue(wParam));
if (lParam == 9001)
GetDlgItem(IDC_SELECTION)->SetWindowText(s);
return 0;
}
Both messages send RGB color as wParam, and
control id as lParam.
If you use XColorHexagonCtrl and XColorSpectrumCtrl together in the same
project, you will notice that the extern variable names of the registered
messages are different for the two controls. However, the actual message
strings that are registered are the same, and so you can use the same handlers
to handle both controls. You can tell which is which by using the control
id returned in lParam.
Revision History
Version 1.1 - 2008 April 4
Version 1.0 - 2008 March 15
Usage
This software is released into the public domain. You are free to use it
in any way you like, except that you may not sell this source code. If you
modify it or extend it, please to consider posting new code here for everyone
to share. This software is provided "as is" with no expressed or implied
warranty. I accept no liability for any damage or loss of business that
this software may cause.
