Introduction
In Part 1 of this article, I discussed how to create a custom Webpart which connects to database and pull data.
In this article (Part 2), I will show how to deploy the DatabaseConn Webpart that we have created to Sharepoint site and use it in any of your sites.
Deployment Methods
We can deploy a custom webpart in 2 ways:
- Deploying the Assembly (i.e. DatabaseConnWebpart.dll) to GAC
This requires the assembly to be strong named, a change in manifest etc. - Other simplest way is to deploy assembly to Sharepoint Virtual Directory folder in IIS, i.e. C:\inetpub\wwwroot\wss\VirtualDirectories\80\bin
Note: Sometimes using way 2 may create trust problems, so if you encounter that issue, try copying your DLL to GAC too. It will solve the issue.
Copying Assembly to Sharepoint BIN Folder
Sharepoint Virtual directory can be found at: C:\inetpub\wwwroot\wss\VirtualDirectories\80\bin.
Copy the DLL of DatabaseConnWebPart that we created from your project folder and paste it in the bin folder of portal directory and also GAC, c:\windows\assembly (if you encounter any trust issues).
Adding the Safe Control Entry
Even though the assembly is present in the Portal’s Bin folder, there is another step required to make the Control (Web Part) assembly usable on the Portal Pages.
Since the control will need to render on multiple machines in different browsers with as many user accounts as the organizations have, there is a need to declare the control as “safe”.
To do so, open the web.config file of Sharepoint portal placed under the portal’s directory, and look for <SafeControls> node in web.config and add the following Safe control code:
// Check for this node

<SafeControls>
………..
………....

// Add this line of code which ensures webpart is safe

<SafeControl Assembly="DatabaseConnWebPart " Namespace="DatabaseConnWebPart "
    TypeName="*" Safe="True" />

</SafeControls>
Now that we declared the webpart as safe, our webpart will be deployed to Sharepoint Portal.
Configuring Portal to Use NewWebPart
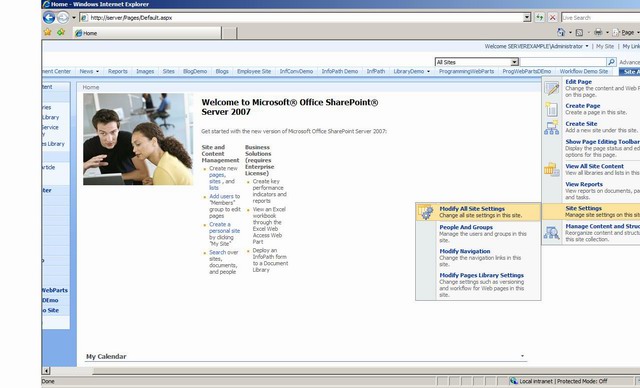
Open your Sharepoint portal and on your “Home”, click Site Actions -> Site Settings -> Modify all Site Settings as shown in this figure:

Sharepoint will open the Settings page.
Click “Webparts” under Galleries as shown below:

Adding Custom Webpart to Webparts Gallery
Click “New” in toolbar to add a new webpart as shown below:

Sharepoint will open the webparts gallery, choose your DatabaseConnWebPart from the gallery and check the checkbox to the left of webpart and click Populate Gallery on top as shown below.
Note: You can rename your webpart anyway you want. Use the TextBox provided to the right of your webpart to rename it accordingly.

Now we have successfully added our new custom web part to Sharepoint portal. We can go ahead and use that webpart in any site that we want.
Note : If you want to make sure whether your webpart is added to gallery or not, check the Webpart Gallery page. It should have your webpart.
Using DatabaseConnWebPart in Site
To use our new deployed webpart in a site, open the site and Click Site Actions -> Edit Page.
This will show the site in edit mode, now click "Add a WebPart" as shown below:

This will open the Add WebPart dialog box. Choose your webpart (in Miscellaneous section) and check it and click "Add" as shown below:

This will add the webpart to your home page and now your homepage as shown below:

Conclusion
This is how we can create custom webparts, deploy them to Sharepoint server and use them in our sites.
Happy programming!!!
History
- 5th March, 2009: Initial post
