Contents
Introduction
In Part I of the Guide, I gave an introduction to writing shell extensions, and demonstrated a simple context menu extension that operated on a single file at a time. In Part II, I'll show how to handle multiple files in a single right-click operation. This article's sample extension is a utility that can register and unregister COM servers. It also demonstrates how to use the ATL dialog class CDialogImpl. I will wrap up Part II by explaining some special registry keys that you can use to have your extension invoked on any file, not just preselected types.
Part II assumes that you've read Part I so you know the basics of context menu extensions. You should also understand the basics of COM, ATL, and the STL collection classes.
Remember that VC 7 (and probably VC 8) users will need to change some settings before compiling. See the README section in Part I for the details.
Using AppWizard to Get Started
Run the AppWizard and make a new ATL COM program. We'll call it "DllReg". Keep all the default settings in the AppWizard, and click Finish. In VC 7, be sure to uncheck the Attributed checkbox; we won't be using Attributed ATL in this sample. To add a COM object to the DLL, go to the ClassView tree, right-click the DllReg classes item, and pick New ATL Object. (In VC 7, right-click the item and pick Add|Add Class.)
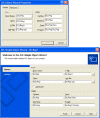
In the ATL Object Wizard, the first panel already has Simple Object selected, so just click Next. On the second panel, enter "DllRegShlExt" in the Short Name edit box (the other edit boxes on the panel will be filled in automatically):
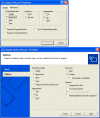
By default, the wizard creates a COM object that can be used from C and script-based clients through OLE Automation. Our extension will only be used by Explorer, so we can change some settings to remove the Automation features. Go to the Attributes page, and change the Interface type to Custom, and change the Aggregation setting to No:
When you click OK, the wizard creates a class called CDLLRegShlExt that contains the basic code for implementing a COM object. We will add our code to this class.
We'll be using the list view control and the STL string and list classes, so add these lines to stdafx.h after the existing #include lines that include ATL headers:
#include <atlwin.h>

#include <commctrl.h>

#include <string>

#include <list>

typedef std::list< std::basic_string<TCHAR> > string_list;
The Initialization Interface
Our IShellExtInit::Initialize() implementation will be quite different from the extension in Part I, for two reasons. First, we will enumerate all of the selected files. Second, we will test the selected files to see if they export registration and unregistration functions. We will consider only those files that export both DllRegisterServer() and DllUnregisterServer(). All other files will be ignored.
We start out just as in Part I, by removing some wizard-generated code and adding the IShellExtInit interface to the C++ class:
#include <shlobj.h>

#include <comdef.h>


class ATL_NO_VTABLE CDLLRegShlExt :
  public CComObjectRootEx<CComSingleThreadModel>,
  public CComCoClass<CDLLRegShlExt, &CLSID_DllRegShlExt>,
  public IDllRegShlExt,
  public IShellExtInit
{
  BEGIN_COM_MAP(CDLLRegShlExt)
    COM_INTERFACE_ENTRY(IDllRegShlExt)
    COM_INTERFACE_ENTRY(IShellExtInit)
  END_COM_MAP()
Our CDLLRegShlExt class will also need a few member variables:
protected:
  HBITMAP     m_hRegBmp;
  HBITMAP     m_hUnregBmp;
  string_list m_lsFiles;
The CDLLRegShlExt constructor loads two bitmaps for use in the context menu:
CDLLRegShlExt::CDLLRegShlExt()
{
  m_hRegBmp = LoadBitmap ( _Module.GetModuleInstance(),
                           MAKEINTRESOURCE(IDB_REGISTERBMP) );

  m_hUnregBmp = LoadBitmap ( _Module.GetModuleInstance(),
                             MAKEINTRESOURCE(IDB_UNREGISTERBMP) );
}
Now we're ready to write the Initialize() function. Initialize() will perform these steps:
- Change the current directory to the directory being viewed in the Explorer window.
- Enumerate all of the files that were selected.
- For each DLL and OCX file, try to load it with
LoadLibrary().
- If
LoadLibrary() succeeded, see if the file exports DllRegisterServer() and DllUnregisterServer().
- If both exports are found, add the filename to our list of files we can operate on,
m_lsFiles.
HRESULT CDLLRegShlExt::Initialize (
  LPCITEMIDLIST pidlFolder, LPDATAOBJECT pDataObj, HKEY hProgID )
{
UINT      uNumFiles;
HDROP     hdrop;
FORMATETC etc = { CF_HDROP, NULL, DVASPECT_CONTENT,
                  -1, TYMED_HGLOBAL };
STGMEDIUM stg = { TYMED_HGLOBAL };
HINSTANCE hinst;
HRESULT (STDAPICALLTYPE* pfn)();
Tons of boring local variables! The first step is to get an HDROP from the pDataObj passed in. This is done just like in the Part I extension.
if ( FAILED( pDO->GetData ( &etc, &stg ) ))
return E_INVALIDARG;
hdrop = (HDROP) GlobalLock ( stg.hGlobal );
if ( NULL == hdrop )
{
ReleaseStgMedium ( &stg );
return E_INVALIDARG;
}
uNumFiles = DragQueryFile ( hdrop, 0xFFFFFFFF, NULL, 0 );
Next comes a for loop that gets the next filename (using DragQueryFile()) and tries to load it with LoadLibrary(). The real shell extension in the sample project does some directory-changing beforehand, which I have omitted here since it's a bit long.
for ( UINT uFile = 0; uFile < uNumFiles; uFile++ )
{
if ( 0 == DragQueryFile ( hdrop, uFile, szFile, MAX_PATH ) )
continue;
hinst = LoadLibrary ( szFile );
if ( NULL == hinst )
continue;
Next, we'll see if the module exports the two required functions.
(FARPROC&) pfn = GetProcAddress ( hinst, "DllRegisterServer" );
if ( NULL == pfn )
{
FreeLibrary ( hinst );
continue;
}
(FARPROC&) pfn = GetProcAddress ( hinst, "DllUnregisterServer" );
if ( NULL != pfn )
m_lsFiles.push_back ( szFile );
FreeLibrary ( hinst );
}
If both exported functions are present in the module, the filename is added to m_lsFiles, which is an STL list collection that holds strings. That list will be used later, when we iterate over all the files and register or unregister them.
The last thing to do in Initialize() is free resources and return the right value back to Explorer.
GlobalUnlock ( stg.hGlobal );
ReleaseStgMedium ( &stg );
return (m_lsFiles.size() > 0) ? S_OK : E_INVALIDARG;
}
If you take a look at the sample project's code, you'll see that I have to figure out which directory is being viewed by looking at the names of the files. You might wonder why I don't just use the pidlFolder parameter, which is documented as "the item identifier list for the folder that contains the item whose context menu is being displayed." Well, during my testing, this parameter was always NULL, so it's useless.
Adding Our Menu Items
Next up are the IContextMenu methods. As before, we add IContextMenu to the list of interfaces that CDLLRegShlExt implements, by adding the lines in bold:
class ATL_NO_VTABLE CDLLRegShlExt :
  public CComObjectRootEx<CComSingleThreadModel>,
  public CComCoClass<CDLLRegShlExt, &CLSID_DllRegShlExt>,
  public IShellExtInit,
  public IContextMenu
{
  BEGIN_COM_MAP(CDLLRegShlExt)
    COM_INTERFACE_ENTRY(IShellExtInit)
    COM_INTERFACE_ENTRY(IContextMenu)
  END_COM_MAP()
We'll add two items to the menu, one to register the selected files, and another to unregister them. The items look like this:

Our QueryContextMenu() implementation starts out like in Part I. We check uFlags, and return immediately if the CMF_DEFAULTONLY flag is present.
HRESULT CDLLRegShlExt::QueryContextMenu (
HMENU hmenu, UINT uMenuIndex, UINT uidFirstCmd,
UINT uidLastCmd, UINT uFlags )
{
UINT uCmdID = uidFirstCmd;
if ( uFlags & CMF_DEFAULTONLY )
return MAKE_HRESULT(SEVERITY_SUCCESS, FACILITY_NULL, 0);
Next up, we add the "Register servers" menu item. There's something new here: we set a bitmap for the item. This is the same thing that WinZip does to have the little folder-in-a-vice icon appear next to its own menu items.
InsertMenu ( hmenu, uMenuIndex, MF_STRING | MF_BYPOSITION, uCmdID++,
_T("Register server(s)") );
if ( NULL != m_hRegBmp )
SetMenuItemBitmaps ( hmenu, uMenuIndex, MF_BYPOSITION, m_hRegBmp, NULL );
uMenuIndex++;
The SetMenuItemBitmaps() API is how we show our little gears icon next to the "Register servers" item. Note that uCmdID is incremented, so that the next time we call InsertMenu(), the command ID will be one more than the previous value. At the end of this step, uMenuIndex is incremented so our second item will appear after the first one.
And speaking of the second menu item, we add that next. It's almost identical to the code for the first item.
InsertMenu ( hmenu, uMenuIndex, MF_STRING | MF_BYPOSITION, uCmdID++,
_T("Unregister server(s)") );
if ( NULL != m_hUnregBmp )
SetMenuItemBitmaps ( hmenu, uMenuIndex, MF_BYPOSITION, m_hUnregBmp, NULL );
And at the end, we tell Explorer how many items we added.
  return MAKE_HRESULT(SEVERITY_SUCCESS, FACILITY_NULL, 2);
}
Providing Fly-By Help and a Verb
As before, the GetCommandString() method is called when Explorer needs to show fly-by help or get a verb for one of our commands. This extension is different than the last one in that we have 2 menu items, so we need to examine the uCmdID parameter to tell which item Explorer is calling us about.
#include <atlconv.h>


HRESULT CDLLRegShlExt::GetCommandString (
  UINT uCmdID, UINT uFlags, UINT* puReserved,
  LPSTR szName, UINT cchMax )
{
USES_CONVERSION;
LPCTSTR szPrompt;

  if ( uFlags & GCS_HELPTEXT )
    {
    switch ( uCmdID )
      {
      case 0:
        szPrompt = _T("Register all selected COM servers");
      break;

      case 1:
        szPrompt = _T("Unregister all selected COM servers");
      break;

      default:
        return E_INVALIDARG;
      break;
      }
If uCmdID is 0, then we are being called for our first item (register). If it's 1, then we're being called for the second item (unregister). After we determine the help string, we copy it into the supplied buffer, converting to Unicode first if necessary.
if ( uFlags & GCS_UNICODE )
lstrcpynW ( (LPWSTR) szName, T2CW(szPrompt), cchMax );
else
lstrcpynA ( szName, T2CA(szPrompt), cchMax );
}
return S_OK;
}
For this extension, I also wrote code that provides a verb. However, during my testing, Explorer never called GetCommandString() to get a verb. I even wrote a test app that called ShellExecute() on a DLL and tried to use a verb, but that didn't work either. I have omitted the verb-related code here, but you can check it out in the sample project if you're interested.
Carrying Out The User's Selection
When the user clicks one of our menu items, Explorer calls our InvokeCommand() method. InvokeCommand() first checks the high word of lpVerb. If it's non-zero, then it is the name of the verb that was invoked. Since we know verbs aren't working properly (at least on Win 98), we'll bail out. Otherwise, if the low word of lpVerb is 0 or 1, we know one of our two menu items was clicked.
HRESULT CDLLRegShlExt::InvokeCommand ( LPCMINVOKECOMMANDINFO pCmdInfo )
{
if ( 0 != HIWORD( pInfo->lpVerb ))
return E_INVALIDARG;
switch ( LOWORD( pInfo->lpVerb ))
{
case 0:
case 1:
{
CProgressDlg dlg ( &m_lsFiles, pInfo );
dlg.DoModal();
return S_OK;
}
break;
default:
return E_INVALIDARG;
break;
}
}
If lpVerb is 0 or 1, we create a progress dialog (which is derived from the ATL class CDialogImpl), and pass it the list of filenames.
All of the real work happens in the CProgressDlg class. Its OnInitDialog() function initializes the list control, and then calls CProgressDlg::DoWork(). DoWork() iterates over the string list that was built in CDLLRegShlExt::Initialize(), and calls the appropriate function in each file. The basic code is below; it is not complete, since for clarity I've left out the error-checking and the parts that fill the list control. It's just enough to demonstrate how to iterate over the list of filenames and act on each one.
void CProgressDlg::DoWork()
{
HRESULT (STDAPICALLTYPE* pfn)();
string_list::const_iterator it;
HINSTANCE hinst;
LPCSTR pszFnName;
HRESULT hr;
WORD wCmd;
wCmd = LOWORD ( m_pCmdInfo->lpVerb );
if ( wCmd > 1 )
return;
pszFnName = wCmd ? "DllUnregisterServer" : "DllRegisterServer";
for (it = m_pFileList->begin(); it != m_pFileList->end(); it++)
{
hinst = LoadLibrary ( it->c_str() );
if ( NULL == hinst )
continue;
(FARPROC&) pfn = GetProcAddress ( hinst, pszFnName );
if ( NULL == pfn )
continue;
hr = pfn();
}
The remainder of DoWork() is cleanup and error handling. You can find the complete code in ProgressDlg.cpp in the sample project.
Registering the Shell Extension
The DllReg extension operates on in-proc COM servers, so it should be invoked on DLL and OCX files. As in Part I, we can do this through the RGS script, DllRegShlExt.rgs. Here's the necessary script to register our DLL as a context menu handler for each of those extensions.
HKCR
{
  NoRemove dllfile
  {
    NoRemove shellex
    {
      NoRemove ContextMenuHandlers
      {
        ForceRemove DLLRegSvr = s '{8AB81E72-CB2F-11D3-8D3B-AC2F34F1FA3C}'
      }
    }
  }
  NoRemove ocxfile
  {
    NoRemove shellex
    {
      NoRemove ContextMenuHandlers
      {
        ForceRemove DLLRegSvr = s '{8AB81E72-CB2F-11D3-8D3B-AC2F34F1FA3C}'
      }
    }
  }
}
The syntax of the RGS file, and the keywords NoRemove and ForceRemove are explained in Part I, in case you need a refresher on their meaning.
As in our previous extension, on NT-based OSes, we need to add our extension to the list of "approved" extensions. The code to do this is in the DllRegisterServer() and DllUnregisterServer() functions. I won't show the code here, since it's just simple registry access, but you can find the code in the sample project.
The Extension In Action
When you click one of our menu items, the progress dialog is displayed and shows the results of the operations:
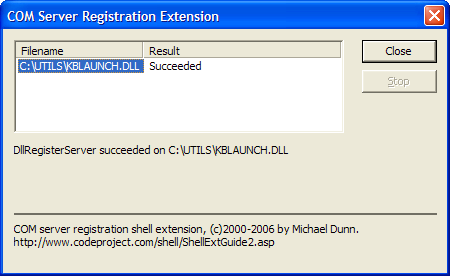
The list control shows the name of each file, and whether the function call succeeded or not. When you select a file, a message is shown beneath the list that gives more details, along with a description of the error if the function call failed.
Notice that in the above screen shot, the dialog isn't using the XP theme. As described in the MSDN article "Using Windows XP Visual Styles", there are two things we need to do to make our UI themed. The first is to tell the OS to use common controls version 6 for our DLL, by putting a manifest in the resources. You can copy the necessary manifest XML from the above MSDN article and save it to a file called dllreg.manifest in the project's res subdirectory. Next, add this line to the resource includes:
ISOLATIONAWARE_MANIFEST_RESOURCE_ID RT_MANIFEST "res\\dllreg.manifest"
Then in stdafx.h, add this line before all includes:
#define ISOLATION_AWARE_ENABLED 1
As of May, 2006, the MSDN article says the symbol is called SIDEBYSIDE_COMMONCONTROLS, but in my SDKs, only ISOLATION_AWARE_ENABLED is used. If you have a newer SDK and ISOLATION_AWARE_ENABLED doesn't work for you, try SIDEBYSIDE_COMMONCONTROLS.
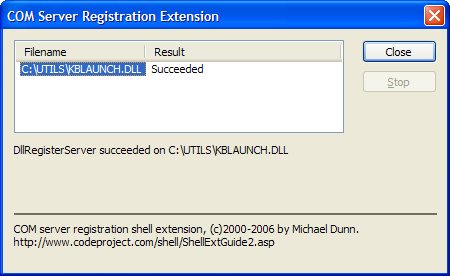
After making these changes and rebuilding, the dialog now follows the active theme:
Other Ways to Register The Extension
So far, our extensions have been invoked only for certain file types. It's possible to have the shell call our extension for any file by registering as a context menu handler under the HKCR\* key:
HKCR
{
  NoRemove *
  {
    NoRemove shellex
    {
      NoRemove ContextMenuHandlers
      {
        ForceRemove DLLRegSvr = s '{8AB81E72-CB2F-11D3-8D3B-AC2F34F1FA3C}'
      }
    }
  }
}
The HKCR\* key lists shell extensions that are called for all files. Note that the docs say that the extensions are also invoked for any shell object (meaning files, directories, virtual folders, Control Panel items, etc.), but that was not the behavior I saw during my testing. The extension was only invoked for files in the file system.
In shell version 4.71+, there is also a key called HKCR\AllFileSystemObjects. If we register under this key, our extension is invoked for all files and directories in the file system, except root directories. (Extensions that are invoked for root directories are registered under HKCR\Drive.) However, on some versions of Windows, you get some strange behavior when registering under this key. For example, on Windows 98, the DllReg menu items ended up being mixed in with the Send To item:
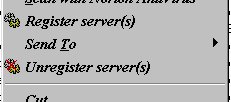
This wasn't a problem on XP.
You can also write a context menu extension that operates on directories. For an example of such an extension, check out my article A Utility to Clean Up Compiler Temp Files.
Finally, in shell version 4.71+, you can have a context menu extension invoked when the user right-clicks the background of an Explorer window that's viewing a directory (including the desktop). To have your extension invoked like this, register it under HKCR\Directory\Background\shellex\ContextMenuHandlers. Using this method, you can add your own menu items to the desktop context menu, or the menu for any other directory. The parameters passed to IShellExtInit::Initialize() are a bit different, though, so I may cover this topic in a future article.
To Be Continued
Coming up in Part III, we'll examine a new type of extension, the QueryInfo handler, which displays pop-up descriptions of shell objects. I will also show how to use MFC in a shell extension.
Copyright and License
This article is copyrighted material, �2003-2006 by Michael Dunn. I realize this isn't going to stop people from copying it all around the 'net, but I have to say it anyway. If you are interested in doing a translation of this article, please email me to let me know. I don't foresee denying anyone permission to do a translation, I would just like to be aware of the translation so I can post a link to it here.
The demo code that accompanies this article is released to the public domain. I release it this way so that the code can benefit everyone. (I don't make the article itself public domain because having the article available only on CodeProject helps both my own visibility and the CodeProject site.) If you use the demo code in your own application, an email letting me know would be appreciated (just to satisfy my curiosity about whether folks are benefitting from my code) but is not required. Attribution in your own source code is also appreciated but not required.
Revision History
- March 29, 2000: Article first published.
- June 6, 2000: Something updated. ;)
- May 14, 2006: Updated to cover changes in VC 7.1.
Series Navigation: � Part I | Part III �
