Introduction
This article is about creating a simple tabbed ActiveX control. The function of the control is very simple, it adds two numbers and displays their results in another tab.
We'll create an MFC ActiveX control with the following functions exposed.
void SetFirstNumber(LONG Num1)
void SetSecondNumber(LONG Num2)
void AddAndShow()
You will find the things very simple if you have worked in MFC. The user interface is simply a CPropertySheet containing two CPropertyPages. So, let us start following the steps below.
- First of all, create a new MFC ActiveX control project. Give it the name "SimpleAdditionAtx". Click the control settings tab and select "STATIC" in the combo under the text "Create control based on" and click finish. The wizard has created the following classes:
CSimpleAdditionAtxApp, CSimpleAdditionAtxCtrl and CSimpleAdditionAtxPropPage.
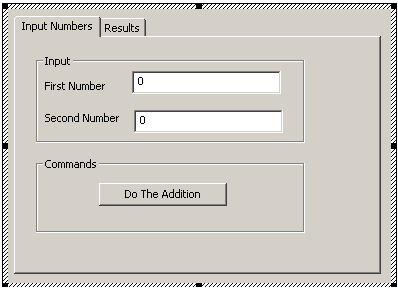
- Next, switch to the resource view and add two dialog resources, one will be used for input and the other will be used for displaying the output. Add required controls in them. For the current situation, we need two edit boxes and one button for the input page, as you can see in the screenshot of our control. You can add as many Pages as you want depending upon your requirements.
- Now, create the classes for the two dialogs by right clicking on the dialogs one by one and selecting "Add class". Set proper names for the classes. I chose
CInputPage and CResulsPage. And select CPropertyPage as the base class for both dialogs, then click Finish.
- Next, create the following members in
CSimpleAdditionAtxCtrl class.
CPropertySheet* m_pSheet;
CInputPage m_InputPage;
CResultsPage m_ResultsPage;
- Now, select the class
CSimpleAdditionAtxCtrl and select properties.. select the "Messages" button in the properties and add a method for WM_CREATE message. The wizard will add the OnCreate method in the class.
- Now, we add the following code in the
OnCreate method:
m_pSheet=new CPropertySheet("hello");
m_pSheet->AddPage(&m_InputPage);
m_pSheet->AddPage(&m_ResultsPage);
m_pSheet->Create(this,WS_CHILD,NULL);
m_pSheet->SetWindowPos(NULL,0,0,500,500,NULL);
m_pSheet->ShowWindow(TRUE);
The above code will first create an object of Property Sheet, add pages to it and then actually create the CPropertySheet structure in memory and after that adjusts the position of the CPropertySheet to the top left corner of our control. And finally, it shows it.
- Since we have created the
CPropertySheet on heap, we've to deallocate the memory also. So, we also have to handle the WM_DESTROY message by adding a method corresponding to it, just like we did it in Step 5. Add the following code in the OnDestroy method: if(m_pSheet!=NULL)
delete m_pSheet;
- Now, add event handler for the button we created on the input page dialog in step 2. And also add value member variables for the two edit boxes. And we add the following code in the handler of the button:
LONG result=m_FirstNumber+ m_SecondNumber;
CPropertySheet* pParentSheet=(CPropertySheet*)GetParent();
pParentSheet->SetActivePage(RESULTS_PAGE);
CResultsPage* pPage=(CResultsPage*)pParentSheet->GetPage(1);
pPage->DisplayResult(result);
m_FirstNumber and m_SecondNumber are the member variables for the two edit controls. DisplayResult is a method you need to add in the CResultPage to display results.....
- Now, we are ready to expose methods. For this, switch to class view and expand the node
SimpleAdditionAtxLib. Now, you will see two more nodes:
_DSimpleAdditionAtx and
_DSimpleAdditionAtxEvents
The first one is where we'll add our methods, the second is for adding the events. We'll simply add methods by right clicking on the first node and selecting "Add method". Now, we add the following methods one by one:
void SetFirstNumber(LONG Num1)
void SetSecondNumber(LONG Num2)
void AddAndShow()
- Now, we need to provide implementation for these methods. The wizard will have already created default implementation in the class
CSimpleAdditionAtxCtrl. Our implementation of these methods is simple. void CSimpleAdditionAtxCtrl::SetFirstNumber(LONG Num1) {
AFX_MANAGE_STATE(AfxGetStaticModuleState());
m_pSheet->SetActivePage(INPUT_PAGE);
CEdit* pEdit1=(CEdit*)m_InputPage.GetDlgItem(IDC_EDIT1);
char buff[10]; wsprintf(buff,"%d",Num1);
pEdit1->SetWindowText(buff);
}
void CSimpleAdditionAtxCtrl::AddAndShow(void) {
AFX_MANAGE_STATE(AfxGetStaticModuleState());
m_InputPage.OnBnClickedButton1();
}
- Now, our control is ready for build. Then test in the ActiveX control test container. For this, go to Tools-> ActiveX control test container.
