Abstract
This tutorial describes how to utilize message resources and the Message Compiler (mc.exe) in your own projects. It explains how to integrate mc.exe seamlessly into the Visual Studio build environment by a step-by-step example, and shows how easy it is to use message resources and NT event logging in your own apps.
Introduction
MC.exe: The unloved tool
Being shipped with Visual Studio and the Platform SDK for years, the Message Compiler (mc.exe) still seems to be one of the most unknown, unpopular and underestimated development tools. Most developers intentionally avoid to deal with it. And if they have to (which is the case if they want to integrate their app with the NT Event Logging model), they get frustrated and look for third-party libraries to save them of all this message resource stuff.
I never understood why nobody likes the message compiler. It is a very handy and powerful tool. Not only if dealing with the NT event log, but, in conjunction with FormatMessage() API, for all kinds of string resources - especially if it comes to internationalization. The syntax of message definition files (.mc files) is simple and effective, and makes it easy to deal with a huge bunch of unformatted and formatted strings. (Have you ever tried to enter a formatted multi-line text, like the "/?" help of a console app, into the Visual Studio string resource editor?) Message resources are also very useful for definition of custom error codes and their descriptions. And the improved printf-like parameter insertion model of FormatMessage() is just great! In my own projects, I use message resources all the time. They are so much easier to maintain. Consequently, most of my apps don't contain any string resources.
Bad rumors
So, why nobody seems to like the message compiler? I suppose because of two reasons: Its lack of documentation and there are some common misunderstandings around the topic. One of these misunderstandings is that you have to create and maintain an extra message resource DLL to use the NT event log. This is not true! Any PE module (.dll or .exe file) can contain message resources and be registered as EventMessageFile in the registry. If your app consists of a single EXE, there is no need to use an additional DLL. Another one is that it is difficult and cumbersome to work with mc.exe, because it is not integrated into Visual Studio. This is also not true. Yes, mc.exe is not integrated into the Visual Studio environment. But it is possible to integrate it. This is the main topic of this article :-).
The example project
The example project is a simple Win32 console application that includes message resources and shows how to use them with FormatMessage() and ReportEvent(). It also shows how to register an event source for the NT event log. And the best thing: it does all of this with less than 100 lines of code.
Side note: Some of you may wonder about the naming of the sample project: "SimpleDown". When I started to write this tutorial, I had plans to introduce the power of message resources by a real world project. "SimpleDown" was planned as a shutdown/hibernate/reboot/etc. console tool with some kind of text based user interactions, eventlog support, and so on. While I was working on this, I got the conviction that this would add too much "noise" around the main topic. So I dropped all functionality out of SimpleDown and reduced it to the most-simple demo application. However, I had already put a lot of effort into the screen-shots, so I did not rename it to something more suitable (a.k.a. "MCTest").
Structure of the article
The rest of this article is structured as follows:
The basics: How message compiling interacts with the build process
The main difficulty on dealing with message resources is not writing the .mc file or manually compiling it with mc.exe. It is the task to integrate all this stuff at the right places into your project. This tends to be a bit tricky because the integration has to take place at a couple of places in your project settings. However, once you understood how everything relates to each other, it becomes clear what to do.
The build process
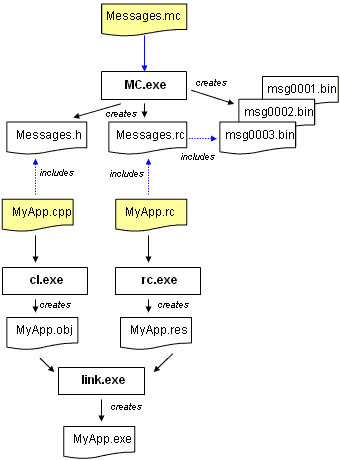
The figure on the right side shows the build process and dependencies of an app or DLL that uses message resources. The files depicted in yellow are our actual source files, all other files are intermediate files generated during the build process. The arrows depicted in blue are the points we have to take into account for the integration of mc.exe in our project build process.
The most simple project that uses message resources consists of three different source files:
- Messages.mc is the message definition file. It contains the strings for all messages in every language we support. It is compiled by the message compiler mc.exe into a header file (Messages.h) that contains the symbolic names, a resource script (Messages.rc) that defines the message resource, and some binary data files (*.bin) for the actual message data.
- MyApp.rc is the project's main resource script. Usually, we don't edit resource scripts directly, but modify it with the Visual Studio resource editors. It is compiled by the resource compiler rc.exe into a binary resource file (MyApp.res).
- MyApp.cpp is an ordinary C++ source file that contains the entry point of our .exe or .dll, and uses the messages defined in Messages.mc with API calls like FormatMessage() or ReportEvent(). It is compiled by the C/C++ compiler cl.exe into an object file (MyApp.obj).
Finally, the intermediate object and binary resource files (.obj and .res) are linked together with link.exe into the final .exe or .dll module.
The integration steps
The Visual Studio build system knows how to deal with .cpp and .rc files and implicitly invokes the necessary compiler tools for them. It also knows how to link the output of cl.exe and rc.exe into the resulting .exe or .dll module. But it does not know how to build Messages.mc and integrate the output of mc.exe into the final module. Therefore, we have to tell the build system explicitly how to do so. This is a bit cumbersome, because we have to change configuration settings in four different places. These places are depicted by blue arrows in the figure. The following list shows the necessary steps:
- Definition of a custom build rule that tells the build system how to invoke mc.exe on the Messages.mc file.
- Inclusion of the mc.exe output file Messages.rc into the application's main resource script MyApp.rc.
- Extending the include path for rc.exe so that it is able to find the message data files msg*.bin.
- Inclusion of the mc.exe output file Messages.h into every C/C++ source file that works with messages IDs (e.g., uses them with FormatMessage() or ReportEvent()).
|
The build process
(Click to enlarge) |
Integration of mc.exe with Visual Studio 6.0: Step by step
Having understood what is necessary to integrate message resource support into our app or DLL project, we will now go through a step-by-step example. The example shows how to create a simple Win32 Console Application project with message resource support from scratch. You can do the same for other project types (e.g., GUI, MFC, DLL) as well, there are no important differences. You may also perform the following steps on an already existing project. (Obviously, you have to skip steps 1 and 2 in this case.)
Note to Visual Studio .NET users: The screenshots are from Visual Studio 6.0. At the time of this writing, Visual Studio 6 is still used by much more people than the newer versions. However, the integration of message resource support into a Visual Studio .NET C++ project works similar to the way described here. And after all, you have always the possibility to open the example project and convert it to a Visual Studio .NET solution.
Step 1: Creating the core project
Run AppWizard to create a "Win32 Console Application", name it "SimpleDown". On the following page, choose "A simple application" to create an initial main() function and support for precompiled headers. Add #include directives for windows.h, tchar.h and stdio.h to your stafx.h header file.
Step 2: Adding a resource script (.rc file) to the project
If your project does not already contain a resource script, add one. In Visual Studio, choose "New" from the "File" menu, select "Resource Script", and make sure that the "Add to project" option is checked. Name the file "SimpleDown.rc".
Step 3: Adding a message definition file (.mc file) to the project
Again, choose "File - New", select "Text File", and make sure that the "Add to project" option is checked. Name the file "Messages.mc".
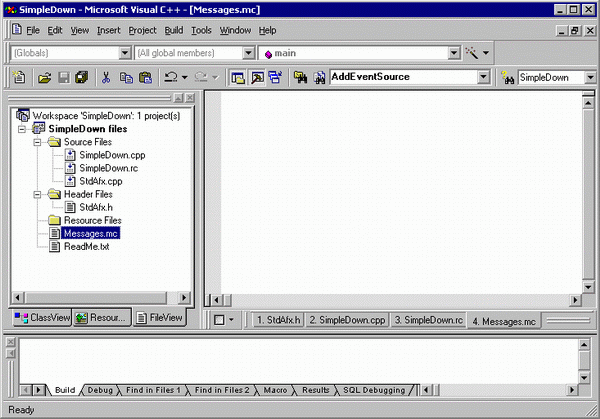
Your project workspace should now look similar to this one:
Step 4: Definition of a custom build rule for the message resource file
Visual Studio does not know how to build .mc files. We need to tell it how to do so by adding a custom build rule for the Messages.mc file. Right click on the Messages.mc file in the Workspace, and choose "Settings...". The "Project Settings" dialog comes up:
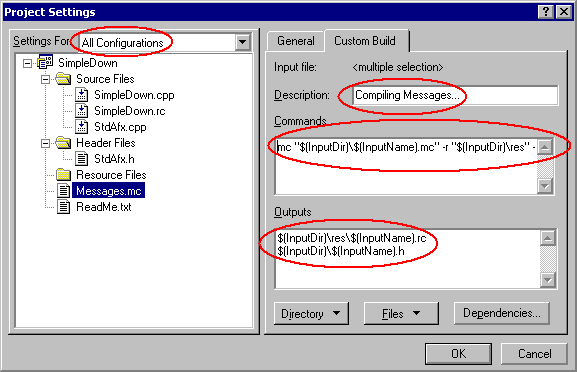
Go to the "Custom Build" page and change the "Settings For:" combo to "All Configurations". Then enter the following data:
- Enter a description message like "Compiling Messages..." into the "Description" field. This message is later printed into the "Build" window of the IDE if the Messages.mc file is compiled.
- Enter the following command line for the message compiler (mc.exe) into the "Commands" field:
mc.exe -A "$(InputDir)\$(InputName).mc" -r "$(InputDir)\res" -h "$(InputDir)"
I do not want to go into details about mc.exe command line options here. For more information about this topic, call "mc.exe /?" in a console window or take a look at the Message Compiler SDK documentation.
- Add the files that are created by mc.exe to the "Outputs" field. This information is necessary for the build system to determine which parts of the project have to be recompiled if the message file has been modified:
$(InputDir)\res\$(InputName).rc
    $(InputDir)\$(InputName).h
The output of the message compiler is a header file (Messages.h) with the symbolic message IDs and a resource script (Messages.rc) that contains code to include the binary message data. (Note: mc.exe actually creates also a .bin file for every supported language. However, we do not need to add them to the "Outputs" field, because they are only referenced by the created Messages.rc file.)
After closing the dialog with "OK", the icon shape of "Messages.mc" should become the same as for .cpp or .rc files. This means that the file is now associated with a compile tool and the build system knows how to build it. However, our .mc file is still empty, so there is nothing to compile. In the next step, we will insert some simple message definitions into it.
Step 5: Insert message definitions into the message file
The following shows a simple message definition file that supports two languages: English and German. It defines some event categories, some events, and some additional messages.
I am intentionally not going into details about the syntax of message files here, it is well documented in the Message Compiler SDK documentation. For this tutorial, just copy the following lines into your Messages.mc file:
;#ifndef __MESSAGES_H__
;#define __MESSAGES_H__
;
LanguageNames =
(
English = 0x0409:Messages_ENU
German = 0x0407:Messages_GER
)
;
;
;
;
;
MessageId = 1
SymbolicName = CATEGORY_ONE
Severity = Success
Language = English
First category event
.
Language = German
Ereignis erster Kategorie
.
MessageId = +1
SymbolicName = CATEGORY_TWO
Severity = Success
Language = English
Second category event
.
Language = German
Ereignis zweiter Kategorie
.
;
;
;
MessageId = +1
SymbolicName = EVENT_STARTED_BY
Language = English
The app %1 has been started successfully by user %2
.
Language = German
Der Benutzer %2 konnte das Programm %1 erfolgreich starten
.
MessageId = +1
SymbolicName = EVENT_BACKUP
Language = English
You should backup your data regulary!
.
Language = German
Sie sollten Ihre Daten regelm��ig sichern!
.
;
;
;
MessageId = 1000
SymbolicName = IDS_HELLO
Language = English
Hello World!
.
Language = German
Hallo, Welt!
.
MessageId = +1
SymbolicName = IDS_GREETING
Language = English
Hello %1. How do you do?
.
Language = German
Hallo %1. Wie geht es Ihnen?
.
;
;#endif
;
Step 6: Compile the message file
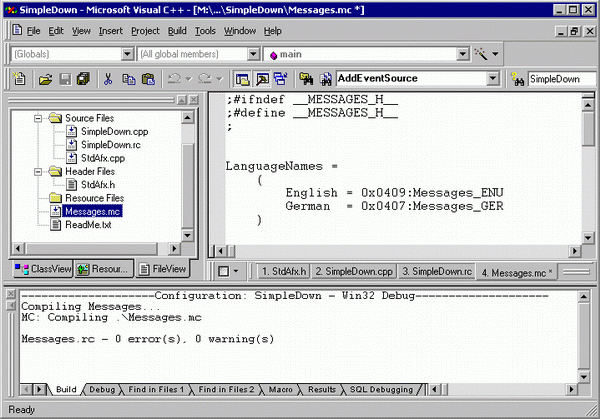
Now, we are able to compile the Messages.mc file by hitting Strg+F7 or choosing "Compile Messages.mc" from the "Build" menu. All output of mc.exe is redirected to the "Build" window, it should look like the following:
Start an Explorer window and redirect it to your projects directory. The message compiler should have generated four different output files out of the Messages.mc file:
- The header file Messages.h, containing
#define statements for every message ID.
- The resource script res/Messages.rc.
- The English language message definitions res/Messages_ENU.bin.
- The German language message definitions res/Messages_DEU.bin.
Step 7: Include the message resource into the main resource script
Even if the .mc file compiles fine, the message data is still not linked into the .exe or .dll module. We need to include it into the modules resources. To do so, go to the "Resource View", right click on "SimpleDown resources", and choose "Resource Includes...":
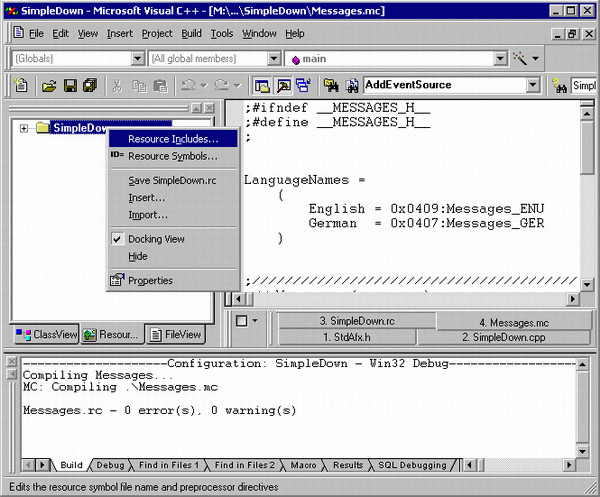
In the upcoming dialog box, enter the following line to the "Compile-time directives:" field:
#include "res/Messages.rc"
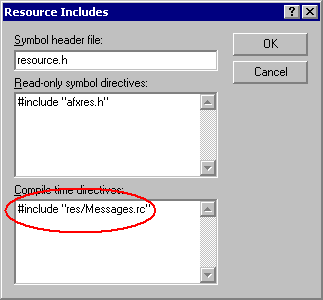
Click on "OK" and ignore the warning by Visual Studio that this may render your .rc script incompatible. We absolutely know what we are doing! :-) And don't panic if rc.exe now throws an error when compiling the resource script. It is not able to find the binary message files (.bin files). We fix this by adding their directory to the rc.exe include path.
Step 8: Extending the include path for rc.exe
Switch back to "File View", right click the file SimpleDown.rc, and choose "Settings...". Again, select "All Configurations" in the "Settings For:" combo, and then add the following directory to the "Additional resource include directories:" field:
./res
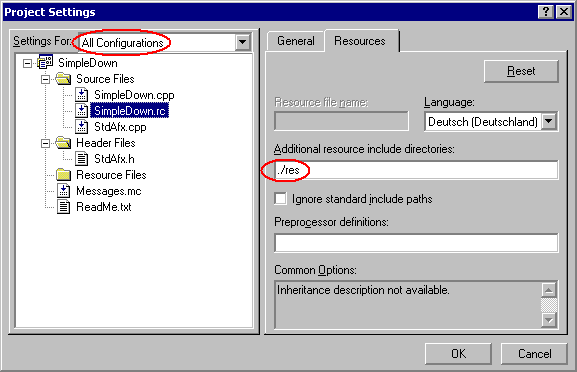
The resource script SimpleDown.rc should now compile fine and, if necessary, automatically invoke the compilation of the message definition file.
Step 9: Build the project and check
We are now ready to build the app for the first time. After linking succeeds, open the resulting .exe or .dll file in resource mode: Choose "Open" from the file menu and open SimpleDown.exe from the project's Debug folder. Make sure that "Open as:" is set to "Resources". You should find a new resource "1" of type "11" in it. This is the message resource data.
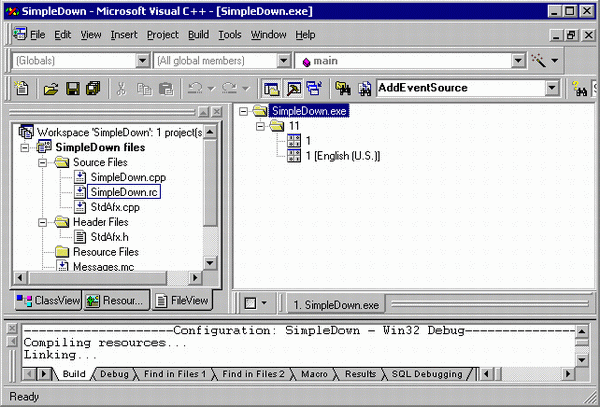
Step 10: Open a bottle of beer (or whatever)
Congratulations! You just mastered to add message resource support to your Project.
Using the message resources inside your app
Now, after successfully adding message resources to your app, you may want to see how to use them. The demo project SimpleDown shows this in less than 100 lines of code (including all helper functions): It shows how to:
- Load and format message strings.
- Load a message string in a specific language.
- Register an app as a
EventMessageFile and CategoryMessageFile source for the eventlog.
- Report some events to the eventlog.
In the following, we will take a short walk through all relevant parts of the code.
Load and format message strings
The message strings are loaded and formatted with the FormatMessage() API call. One point that is a bit cumbersome about FormatMessage() is that it gets a lot of parameters you only occasionally need. Another one is that it expects the insertion parameters as an array of 32 bit data types. Therefore, we first define a simple sprintf-like helper function to make our life a bit more comfortable:
namespace util {
UINT LoadMessage( DWORD dwMsgId, PTSTR pszBuffer, UINT cchBuffer, ... )
{
va_list args;
va_start( args, cchBuffer );
return FormatMessage(
FORMAT_MESSAGE_FROM_HMODULE,
NULL,
dwMsgId,
LANG_NEUTRAL,
pszBuffer,
cchBuffer,
&args
);
}
}
Using this helper function, retrieving and formatting of message strings is quite easy:
int _tmain( int argc, TCHAR* argv[] )
{
TCHAR szUserName[ 128 ];
DWORD cchUserName = 128;
GetUserName( szUserName, &cchUserName );
TCHAR szBuffer[ 512 ];
DWORD cchBuffer = 512;
util::LoadMessage( IDS_HELLO, szBuffer, cchBuffer);
_tprintf( szBuffer );
util::LoadMessage( IDS_GREETING, szBuffer, cchBuffer, szUserName );
_tprintf( szBuffer );
SetThreadLocale( MAKELCID( MAKELANGID( 0x0409,
SUBLANG_NEUTRAL ), SORT_DEFAULT ) );
util::LoadMessage( IDS_GREETING, szBuffer, cchBuffer, szUserName );
_tprintf( szBuffer );
SetThreadLocale( MAKELCID( MAKELANGID( 0x0407,
SUBLANG_NEUTRAL ), SORT_DEFAULT ) );
util::LoadMessage( IDS_GREETING, szBuffer, cchBuffer, szUserName );
_tprintf( szBuffer );
...
return 0;
}
Register an app as a source of events
To register our app for the NT application event log, we need to create a new registry key HKLM\SYSTEM\CurrentControlSet\Services\EventLog\Application\SimpleDown and set some values into it. This is done by the util::AddEventSource() helper function:
namespace util {
void AddEventSource( PCTSTR pszName, DWORD dwCategoryCount )
{
HKEY hRegKey = NULL;
DWORD dwError = 0;
TCHAR szPath[ MAX_PATH ];
_stprintf( szPath,
_T("SYSTEM\\CurrentControlSet\\Services\\EventLog\\Application\\%s"),
pszName );
dwError = RegCreateKey( HKEY_LOCAL_MACHINE, szPath, &hRegKey );
GetModuleFileName( NULL, szPath, MAX_PATH );
dwError = RegSetValueEx( hRegKey,
_T("EventMessageFile"), 0, REG_EXPAND_SZ,
(PBYTE) szPath, (_tcslen( szPath) + 1) * sizeof TCHAR );
DWORD dwTypes = EVENTLOG_ERROR_TYPE |
EVENTLOG_WARNING_TYPE | EVENTLOG_INFORMATION_TYPE;
dwError = RegSetValueEx( hRegKey, _T("TypesSupported"), 0, REG_DWORD,
(LPBYTE) &dwTypes, sizeof dwTypes );
if( dwCategoryCount > 0 ) {
dwError = RegSetValueEx( hRegKey, _T("CategoryMessageFile"),
0, REG_EXPAND_SZ, (PBYTE) szPath,
(_tcslen( szPath) + 1) * sizeof TCHAR );
dwError = RegSetValueEx( hRegKey, _T("CategoryCount"), 0, REG_DWORD,
(PBYTE) &dwCategoryCount, sizeof dwCategoryCount );
}
RegCloseKey( hRegKey );
}
}
Registration of the event source has to be done only once. Usually, your product's setup tool is the right place for this.
Report events
To report events, we first have to open the eventlog with RegisterEventSource(). The resulting HANDLE can then be used in ReportEvent() to add an entry to the event log:
int _tmain( int argc, TCHAR* argv[] )
{
...
HANDLE hEventLog = RegisterEventSource( NULL, _T("SimpleDown") );
BOOL bSuccess = ReportEvent(
hEventLog,
EVENTLOG_WARNING_TYPE,
CATEGORY_ONE,
EVENT_BACKUP,
NULL,
0,
0,
NULL,
NULL
);
PCTSTR aInsertions[] = { argv[0], szUserName};
bSuccess = ReportEvent(
hEventLog,
EVENTLOG_INFORMATION_TYPE,
CATEGORY_TWO,
EVENT_STARTED_BY,
NULL,
2,
0,
aInsertions,
NULL
);
DeregisterEventSource( hEventLog );
return 0;
}
Conclusion
Using the message compiler is known to be hard and tricky. However, if you integrate it by custom build rules into into your Visual Studio project, the message compiler becomes an easy-to-use and powerful tool for dealing with huge amounts of localized strings. Besides utilizing message resources to integrate your app with the NT event log system, they are also a good replacement for ordinary string resources.
History
- May 19th, 2003: Published initial version of article.
