Introduction
I have found a few descriptions on the internet on how to write a Custom Tool (Single File Generator) for Visual Studio but - mainly - the registration process had been an obstacle for me. Finally, I have come to a good point in my learning curve, and I am writing it up here all together for the community.
Please note: The tool itself is a skeleton, it does not do anything useful; it does not produce any text and returns an error message immediately. However, it is shown here how to develop, register and use a custom tool for Visual Studio 2015.
Prerequisites
I am using the Community edition of Visual Studio 2015. The VS installation must contain the "Visual Studio Extensibility Tools" (the VS SDK in former VS releases). If the Extensibility Tools are not installed yet, you can do so by modifying your current VS2015 installation.
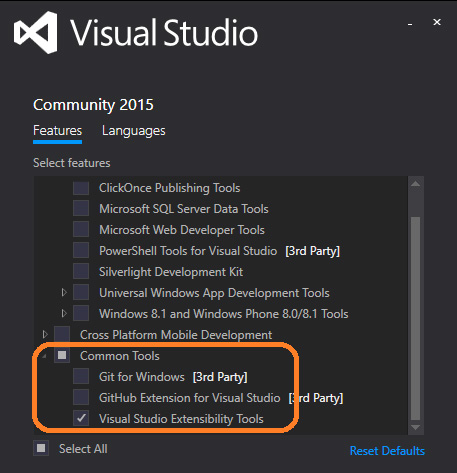
Part 1: Creation of the Single File Generator
Step 1: Create the Tool Project
Launch Visual Studio as Administrator. This is important or VS will not be able to copy the compiled and built tool into the "Program Files" folder.
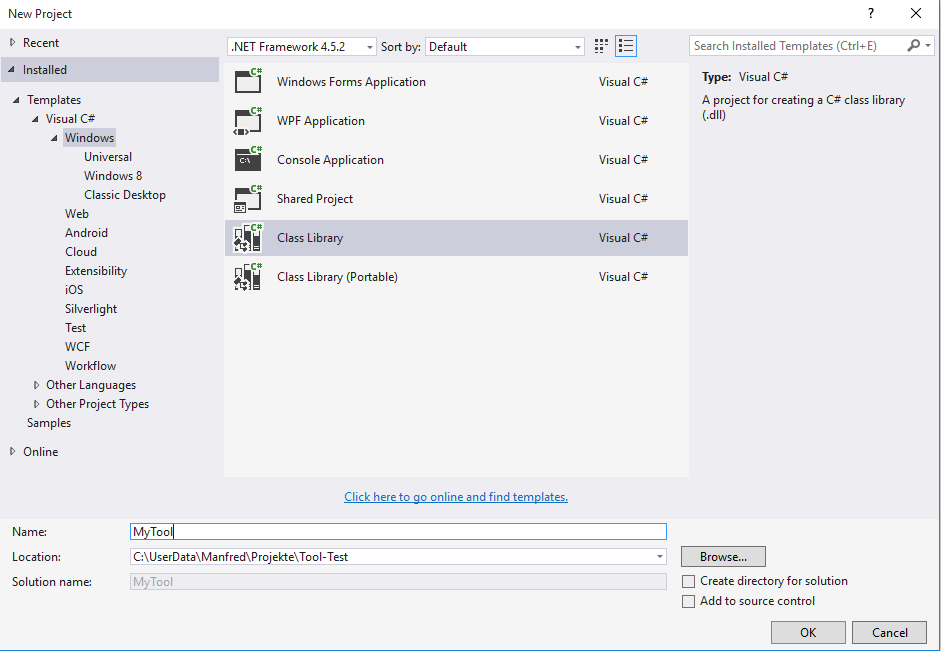
Create a new Class Library Project:
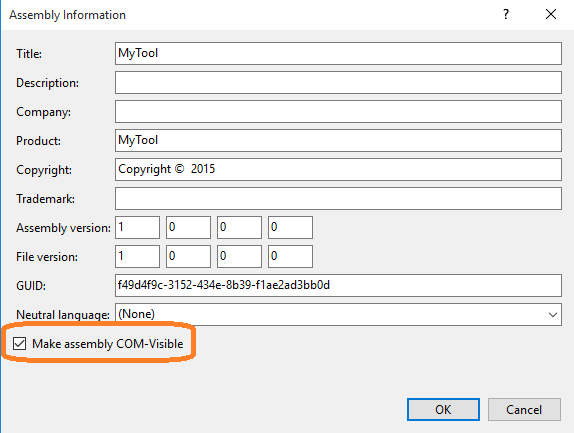
Go into the project Properties, select tab “Application” then go to the “Assembly Information”. Select the checkbox “Make assembly COM-Visible”, ignore the GUID shown there:
Step 2: Project Property Settings
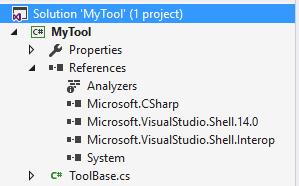
Go into the Solution Explorer and add the following references:
Microsoft.VisualStudio.Shell.14.0Microsoft.VisualStudio.Shell.Interop
These references are found in the References Manager under “Assemblies” | “Extensions” - but only if VS had been configured to contain the “Visual Studio Extensibility”. Other references can be added or removed as required:
Step 3: Create Tool GUID
VS has a built-in GUID generator which is launched from the menu “TOOLS | Create GUID”:
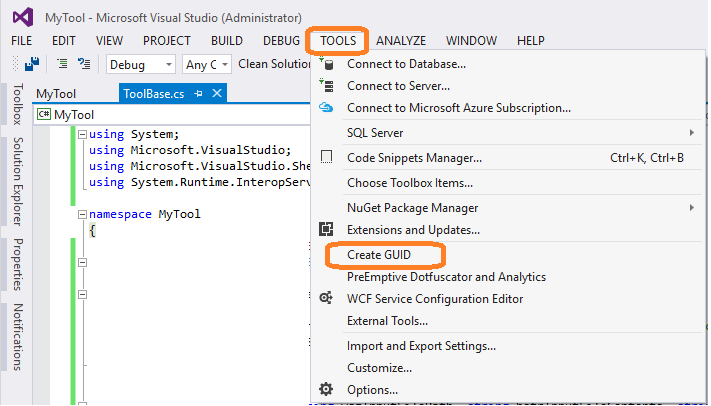
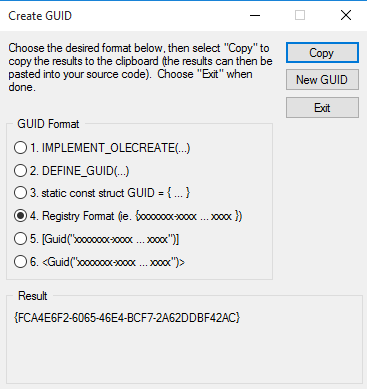
The dialog which pops up allows selection of a GUID format; the best format for our purposes is the “Registry Format” which requires only minimal modifications when pasting the new GUID into the several required locations. The new GUID is created after a click on button “New GUID”.
Step 4: Coding and Building of the Tool
Create a single file, e.g. “ToolBase.cs”; all other source files which had been created with creation of the project can be removed. This file contains now the code for a (formally) complete tool:
using System;
using Microsoft.VisualStudio;
using Microsoft.VisualStudio.Shell.Interop;
using System.Runtime.InteropServices;


namespace MyTool
{
  // use the GUID from "Create GUID" without the curly braces
  [Guid("FCA4E6F2-6065-46E4-BCF7-2A62DDBF42AC")]
  public class ToolBase : IVsSingleFileGenerator
  {
    public int DefaultExtension (out string InputfileRqExtension)
    {
      InputfileRqExtension = ".txt"  // the extension must include the leading period
      return VSConstants.S_OK; // signal successful completion
    }


  public int Generate (string wszInputFilePath, string bstrInputFileContents, string wszDefaultNamespace,
    IntPtr[] rgbOutputFileContents, out uint pcbOutput, IVsGeneratorProgress pGenerateProgress)
    {
      pcbOutput = 0;  // no output is being generated
      return VSConstants.S_FALSE;  // force an error message
    }
  }
}
The is the most simple version of such a tool I can think of. It accepts an input file which must have the extension ".txt" (method "DefaultExtension"). However, method "Generate" which has to read the input file and produce data on output does immediately return an error message.
Note that the GUID which leads the class declaration is the GUID we had just created with the GUID tool. Now build the project but keep in mind that the tool is only formally acceptable but would throw an exception if you attempt to run it. But it should be good enough to proceed to registration of the tool.
Step 5: Copy the Tool DLL to a Persistent Location
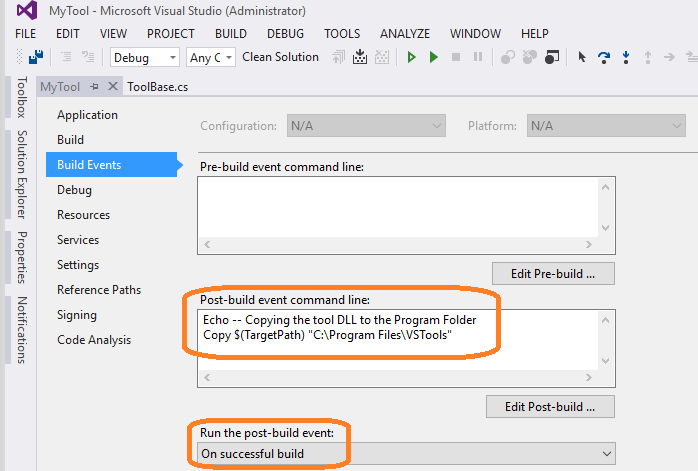
To make the tool available for other projects (and for the Test Project which needs to be done later), we must copy it into some persistent place, e.g. "C:\Program Files\MyTool\". This step can be automated in VS and executed after a successful build. Please note that the copy command fails if the folder “C:\Program Files\VSTools” does not exist; so we have to create that folder manually before we run the first build with this copy command.
Step 6: Register the Tool DLL in the System
The tool DLL must now be registered in order to make it "executable". This is done via Command Line which must be launched with admin privileges and must be done only after the first build or after the DLL name or (persistent) path have changed. We enter the following command:
C:\Windows\Microsoft.Net\Framework\v4.0.30319\regasm.exe /codebase "C:\Program Files\VSTools\MyTool.dll"
The target folder in the “Program Files” is the one we had created before we started the first build run; “MyTool.dll” is the name of the DLL we create in every build run. Feel free to change names according to your own requirements.
My attempt to use the regasm resulted in a warning:
RA0000: Registering an unsigned assembly with /codebase can cause your assembly to interfere
with other applications that may be installed on the same computer. The /codebase switch is intended
to be used only with signed assemblies. Please give your assembly a strong name and re-register it.
Types registered successfully
(I do not know about possible side effects of this warning, but since the types have been registered successfully, I will ignore this message and continue. Refer to “How to: Sign an Assembly with a Strong Name”).
Step 7: Register the Tool in Visual Studio 2015 IDE
Another one-time step is the installation of the tool in the VS IDE environment. The easiest way to accomplish this is the creation and execution of a text file which has the extension “.reg” and contains the following text:
Windows Registry Editor Version 5.00

;  Here: use the CLSID from the tool class
[HKEY_CURRENT_USER\SOFTWARE\Microsoft\VisualStudio\14.0_Config\CLSID\{FCA4E6F2-6065-46E4-BCF7-2A62DDBF42AC}]

"InprocServer32"="C:\\Windows\\System32\\mscoree.dll"
"ThreadingModel"="Both"

;  Here: use namespace name and class name of the tool
"Class"="MyTool.ToolBase"

;  Here: use assembly name from tool properties, assembly version info,
and culture info from the assembly settings
"Assembly"="MyTool, Version=1.0.0.0, Culture=neutral"

;  Here: use the path to the DLL file  (duplicate the backslashes)
"CodeBase"=file:///C:\\Program Files\\VSTools\\MyTool.dll
;  Here: The GUID refers to usage of the tool in C# assemblies (do not change);
use the namespace name of the tool
[HKEY_CURRENT_USER\Software\Microsoft\VisualStudio\14.0_Config\Generators\{FAE04EC1-301F-11D3-BF4B-00C04F79EFBC}\MyTool]

;  Here: use the CLSID from the tool class
"CLSID"="{FCA4E6F2-6065-46E4-BCF7-2A62DDBF42AC}"
"GeneratesDesignTimeSource"=dword:00000001
Note: It may happen that the registry editor rejects to merge this file into the registry (Message: “The specified file is not a registry script”). This may be caused by an invalid encoding of this file. The best way to overcome this situation is to export some small entry from the registry and paste the above text into that file. The new tool is now complete and ready to run; we can close this project.
Part 2: Formal Test of the Single File Generator
Step 1: Create the Test Project and a Test File
Restart Visual Studio normally with a standard project; we do not need admin privileges. Create a test file with the extension “.txt” required by the above tool, and we are ready to request that this file shall be read by the new tool and create some output from that.
The test file in this example is named “TestFile.txt”; it contains just a few random characters.
(Bear in mind that the tool does not really execute any meaningful operations yet.)
Step 2: Allocate the Test Tool to the Test File
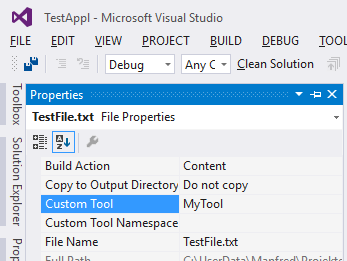
Go into the Solution Explorer and open the properties of the test file:
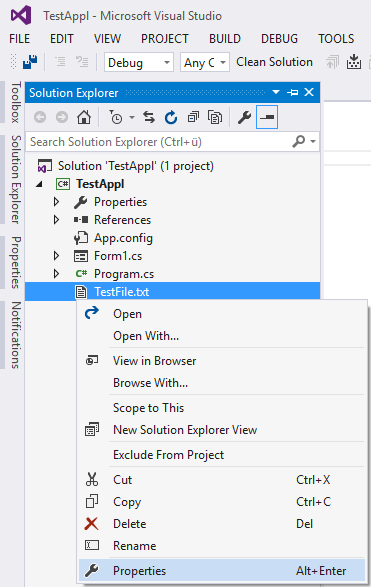
Change the properties settings to the following:
- Build Action: Content
- Copy to Output Directory: Do not copy
- Custom Tool: TestTool
- ("
TestTool" is the namespace name of the new tool which had been registered previously)
Step 3: Test Run Using the New Tool
An attempt to execute a build for the project, including the test file handled by our new custom tool should result in the following message:
"The custom tool 'MyTool' failed. The method or operation is not implemented."
That is ok since the tool throws a NotImplementedException. Though, Visual Studio comes back with the message “Build succeeded”; I would consider this a bug.
We are now ready to go back to the development of the tool and make it perform more meaningful operations.
