Introduction
I always wanted to be part of this community to provide my services so here is my first tip and trick to make MahApps.Metro provided Flyout work with PRISM Library.
PRISM Library provides the guidance to build easy to maintain modular applications. I am already working on PRISM Library but recently came across MahApps.Metro in my search to enhance the user experience of my application. MahApps.Metro is a cool UI based toolkit to enhance the look and feel and layout of your WPF application. I liked the Flyout feature of MahApps so I started to lookout for the solution to embed it in my PRISM application. Though this topic was under discussion on multiple forums including MahApps forum as well but there was no solution available. So I decided to incorporate it with PRISM Library to have a blend of modular application with rich UI experience. So in this tip and trick, I am presenting my own discovered way to make Flyouts work with PRISM Library.
Background
- MahApps.Metro is an extremely cool UI toolkit for WPF. GitHub Source Code
- PRISM Library is a guidance to easily design and build rich, flexible, and easy to maintain WPF composite applications, GitHub Source Code
Flyout is a part of MahApps.Metro window. It’s an overlay for Metro Window that can render custom contents. Flyout has the ability to slide in and out from any side of the window.
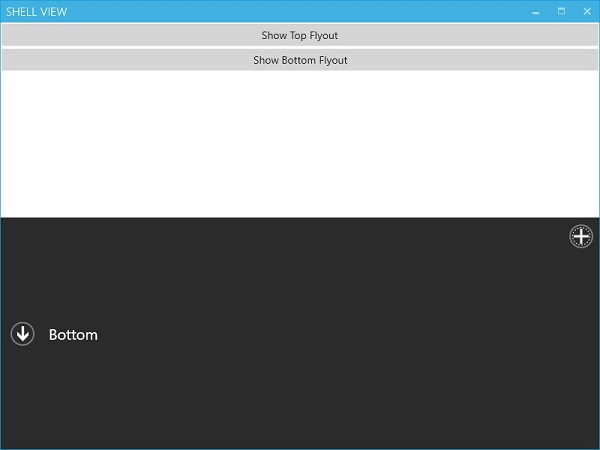
In this sample, I am going to show how to slide in/out the Flyout from Top and Bottom.
Using the Code
The challenge was to define the region on FlyoutsControl collection to render the flyout content. This required me to create a custom region adapter, FlyoutsControlRegionAdapter that can help in creating flyout control, wire it up with the Content and DataContent of the input control and finally place it inside the FlyoutControl's collection.
- I have created the Shell based on
MetroWindow of MahApps.Metro and defined the MetroWindow.Flyouts section and decorated the FlyoutControl with Prism's RegionManager.RegionName attached property, let's say we name it FlyoutRegion, as shown below: - Inside
FlyoutsControl, I have added ItemContainerStyle to specify the Style for Flyout control items and wired up the Bindings of Header, IsOpen, Position from ViewModel class to Flyout control.
Shell
<mahApps:MetroWindow x:Class="FSX.Prism.Bootstrapper.ShellMetro"
                     xmlns="http://schemas.microsoft.com/winfx/2006/xaml/presentation"
                     xmlns:x="http://schemas.microsoft.com/winfx/2006/xaml"
                     xmlns:mahApps="clr-namespace:MahApps.Metro.Controls;assembly=MahApps.Metro"
                     xmlns:d="http://schemas.microsoft.com/expression/blend/2008"
                     xmlns:mc="http://schemas.openxmlformats.org/markup-compatibility/2006"
                     xmlns:prism="http://prismlibrary.com/"
                     Title="Shell"
                     Width="800" Height="600"
                     mc:Ignorable="d">
    <mahApps:MetroWindow.Flyouts>
        <mahApps:FlyoutsControl prism:RegionManager.RegionName="FlyoutRegion">
            <mahApps:FlyoutsControl.ItemContainerStyle>
                <Style TargetType="{x:Type mahApps:Flyout}">
                    <Setter Property="Header" Value="{Binding Header}" />
                    <Setter Property="IsOpen" Value="{Binding IsOpen}" />
                    <Setter Property="Position" Value="{Binding Position}" />
                </Style>
            </mahApps:FlyoutsControl.ItemContainerStyle>
        </mahApps:FlyoutsControl>
    </mahApps:MetroWindow.Flyouts>
    <Grid>
        <ContentControl prism:RegionManager.RegionName="MainRegion" />
    </Grid>
</mahApps:MetroWindow>
FlyoutsControlRegionAdapter
[Export]
public class FlyoutsControlRegionAdapter : RegionAdapterBase<FlyoutsControl>
{
    [ImportingConstructor]
    public FlyoutsControlRegionAdapter(IRegionBehaviorFactory factory)
        : base(factory)
    {
    }

    protected override void Adapt(IRegion region, FlyoutsControl regionTarget)
    {
        region.ActiveViews.CollectionChanged += (s, e) =>
        {
            if (e.Action == NotifyCollectionChangedAction.Add)
            {
                foreach (FrameworkElement element in e.NewItems)
                {
                    Flyout flyout = new Flyout();
                    flyout.Content = element;
                    flyout.DataContext = element.DataContext;
                    regionTarget.Items.Add(flyout);
                }
            }
        };
    }

    protected override IRegion CreateRegion()
    {
        return new AllActiveRegion();
    }
}
- Registered the
FlyoutsControlRegionAdapter in the Bootstrapper code.
protected override RegionAdapterMappings ConfigureRegionAdapterMappings()
{
    var mappings = base.ConfigureRegionAdapterMappings();
    mappings.RegisterMapping(typeof(FlyoutsControl),
		Container.GetExportedValue<FlyoutsControlRegionAdapter>());
    return mappings;
}
- Now I move on to show how to trigger the Flyout in and out of Metro Window. For that, I have created a View with two buttons, Show Top Flyout and Show Bottom Flyout binding them with
ToggleFlyoutCommand passing commond parameters Top and Bottom to distinguish which button has originated the command.
MainView (render in MainRegion)
<UserControl x:Class="PrismMahAppsModule.MainView"
             xmlns="http://schemas.microsoft.com/winfx/2006/xaml/presentation"
             xmlns:x="http://schemas.microsoft.com/winfx/2006/xaml"
             xmlns:mc="http://schemas.openxmlformats.org/markup-compatibility/2006"
             xmlns:d="http://schemas.microsoft.com/expression/blend/2008"
             mc:Ignorable="d"
             d:DesignHeight="300" d:DesignWidth="300">
    <Grid>
        <StackPanel>
            <Button MinWidth="90"
                    Margin="2"
                    Command="{Binding ToggleFlyoutCommand}" CommandParameter="Top"
                    Content="Show Top Flyout" />
            <Button MinWidth="90"
                    Margin="2"
                    Command="{Binding ToggleFlyoutCommand}" CommandParameter="Bottom"
                    Content="Show Bottom Flyout" />
        </StackPanel>
    </Grid>
</UserControl>
- Register the desired view with
FlyoutRegion.
IRegionManager regionManager = ServiceLocator.Current.GetInstance<IRegionManager>();
regionManager.RegisterViewWithRegion("FlyoutRegion", typeof(FlyoutBottomView));
MainViewModel
[Export]
public class ShellViewModel
{
    [ImportingConstructor]
    public ShellViewModel()
    {
        ToggleFlyoutCommand = new DelegateCommand<object>(ToggleFlyout);
        IRegionManager regionManager = ServiceLocator.Current.GetInstance<IRegionManager>();
        if (regionManager == null) throw new ArgumentNullException("regionManager");
        regionManager.RegisterViewWithRegion("FlyoutRegion", typeof(FlyoutBottomView));
        regionManager.RegisterViewWithRegion("FlyoutRegion", typeof(FlyoutTopView));
    }

    public ICommand ToggleFlyoutCommand { get; private set; }

    public void ToggleFlyout(object param)
    {
        var side = (string)param;
        if (side == "Top")
        {
            var vm = ServiceLocator.Current.GetInstance<FlyoutTopViewModel>();
            vm.IsOpen = !vm.IsOpen;
        }
        else
        {
            var vm = ServiceLocator.Current.GetInstance<FlyoutBottomViewModel>();
            vm.IsOpen = !vm.IsOpen;
        }
    }
}

Wrapping Up
In this tip and trick, I tried to present my own idea of making MahApps.Metro Flyout work with Prism Library. Obviously, there could be other ways, but I find it quite flexible enough.
I hope you find this useful. Please rate and leave your valuable feedback.
Thank you!
History
- October 2015 - Initial release
