Introduction
Breadcrumb is a very useful option in SharePoint. It helps users to get current location in the site and navigate back to the start. By default, this feature is not enabled in SharePoint 2013. We can enable it from the master page, but it does not look good. So, this document aims to show how we can start customizing it.
Current Problem
There are so many tutorials for enabling breadcrumb in SharePoint 2013. So let's see what it is. In the html master, we need to modify the following div.
<div class="ms-breadcrumb-dropdownBox" style="display:none;">
<!--
<!--
<div class="ms-breadcrumb-top">
<!--
</div>
<!--
<!--
<!--
<!--
<!--
</div>
From the above div, we need to change the following things:
- Removing
style="display:none;" from the div - Setting
Visible="true" in SharePoint:PopoutMenu
After changing everything, the above div should look like the following:
<div class="ms-breadcrumb-dropdownBox">
<!--
<!--
<div class="ms-breadcrumb-top">
<!--
</div>
<!--
<!--
<!--
<!--
<!--
</div>
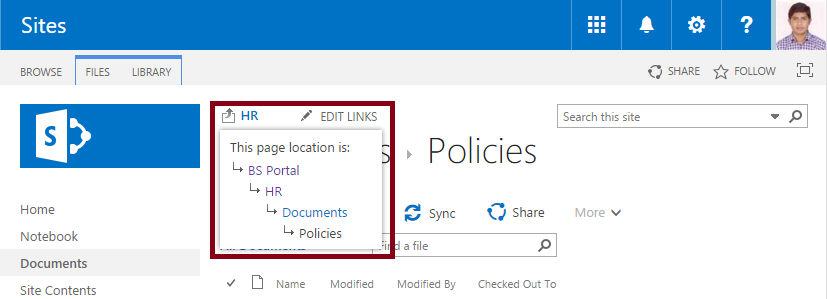
If we apply this in an html master page, we will get the following look and feel.

So the problem is: Nobody is going to be happy with this look & feel!! They must ask for something customized!!
Let's Start Customizing
For a good staring, I wish to give the following look & feel instead of the default. In SharePoint 2010, we had a nice look & feel. So, I have just tried to bring it back.

To accomplish the above look & feel, we need some JS & CSS.
CSS
#pageTitle{
    display: none;
}
JavaScript
SP.SOD.executeOrDelayUntilEventNotified(addBreadcrumb, "sp.bodyloaded");

function addBreadcrumb() {

    if (!document.querySelector("#pageTitle span span span")) {
        document.querySelector("#pageTitle").style.display = 'block';
        return;
    }

    var elementsInPageTitle = document.querySelector("#pageTitle span").outerHTML;
    var breadcrumbDivider = '<span style="height:16px;width:16px;
    position:relative;display:inline-block;overflow:hidden;">
    <img src="/_layouts/15/images/spcommon.png?rev=42"
    alt=":" style="position:absolute;left:-109px
    !important;top:-232px !important;"></span>';
    var allBreadcrumbElements = "";
    var siteTitle = _spPageContextInfo.webTitle;

    var elementIsExistsPageTitle = function(el) {
        return [].some.call(document.querySelectorAll
        ("#pageTitle span span span"), function(sEl) {
            return el.innerText == sEl.innerText;
        });
    };

    var breadcrumbClassName = "";

    if (document.querySelectorAll(".s4-breadcrumb li a").length) {
        breadcrumbClassName = ".s4-breadcrumb li a";
    } else {
        breadcrumbClassName = ".ms-breadcrumb li a";
    }

    var indexOfTheLastElement = document.querySelectorAll(breadcrumbClassName).length - 1;

    [].forEach.call(document.querySelectorAll(breadcrumbClassName), function(el, index) {
        if (el.innerText == siteTitle) {
            el.style['font-weight'] = 'bold';
        }

        if (!(index == indexOfTheLastElement && elementIsExistsPageTitle(el))) {
            allBreadcrumbElements += '<span>' +
            el.outerHTML + '</span>' + breadcrumbDivider;
        }
    });

    allBreadcrumbElements += elementsInPageTitle;

    document.querySelector("#pageTitle").innerHTML = allBreadcrumbElements;
    document.querySelector("#pageTitle").style.display = 'block';
}
Deployment
Deployment is very easy. All we need is: creating a .css & .js file and adding them in the html master page. So now create the following two files:
- breadcrumb.css
- breadcrumb.js
Now upload the above files in any library according to your liking. I have uploaded them into Style Library. So in html master page, they should look like:
<!--
<!--
Now, everything should work fine in the browser.
Conclusion
This is just the starting of breadcrumb customization. Hope you will dig into it more. Any feedback/suggestion is always welcome.
