Introduction
This is the first tutorial of a series of tutorials of how to build a graphics program using C# in Windows Form that exports the artwork in a vector format.... also, you would understand how to move, delete, Ctrl z your vector art and save it in a special format to be read by your program again.
We will also learn how to save XML files... how to export in verilog format... how to use a star algorithm... how to use hand tool... how to manually create the Ctrl z technique.
What you will be capable of building:
Here in this tutorial, we will start by going through how to make your C# program draw a specific svg path.
Background
Simple concepts of object oriented (specially inheritance)... and general knowledge in C#.
WHAT is SVG and WHY Would We Use It in This Program??
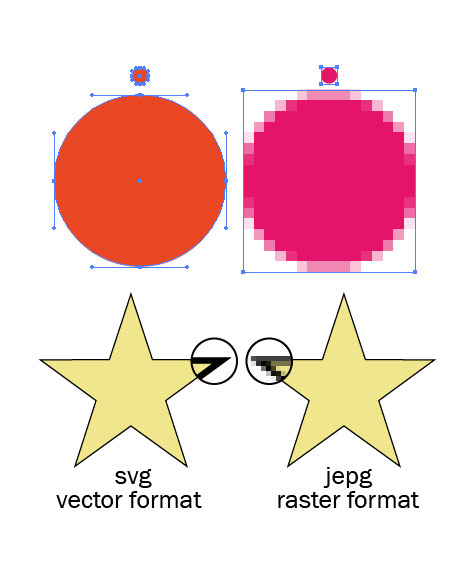
- SVG is short for Scalable Vector Graphics... which is simply a way to preserve your graphics in a way that they never pixilate.
- As normal images are saved pixel by pixel... so by scaling them, the resolution of your original work would decrease.
- While in vector formats like svg, the objects are saved mathematically by points that describe them (called in svg path data). So what actually is saved is the points of your graphics, not their pixels... so when scale your graphics, these points are multiplied by factors ...so your graphics won't ever pixalate.

But why are we using the svg concept in our project:
- Firstly, this would enable you to draw anything in an svg format and import it your application as here in this tutorial, we are learning how to use a library that converts the path data (the points describing your graphics into GDI that can be easily drawn to your program).
- Learn how to export our GDI drawings in this format (SVG is written in an XAML format so in the coming tutorials, we will discuss how to iterate on all your objects and save them in an XAML SVG file). This would enable editability of your drawings outside your program in any program that supports SVG (like Adobe illustrator).
- This will preserve editability of your graphics so if you would need to print them on a bigger paper size, they will never pixalate.
Using the Code
- Start by creating a C# Windows Form application.
- We are going to use GDI+ library to draw our graphics ...
So start by creating this function in the back code of your first form. In form.cs:
protected override void OnPaint(PaintEventArgs e)
{
Graphics g = e.Graphics;
}
- We will start by creating a general base class which would contain all our inherited children... this base class would be named shapes to indicate that it would contain many shapes within.
public class shapes
   {
      public shapes() { }

       public int translateX;
       public int translateY;

       public string id_layer_name;
   }
translateX and translateY are just general int to be used when moving shapes.
- Our goal is to insert any shape we desire into the program in the coding phase so that our program would be able to draw it to the user... the library that I have found only works with path data of the svg... so there is a way around this... first draw whatever you desire on this website http://editor.method.ac/ and save your drawings in an SVG format... then open the downloaded SVG file in Notepad and you would find inside the path tag a property named d="copy what is inside".


- Now let's return back to Visual Studio... now let's create a simple class that will inherit from our base class. Let's name it
star and copy the path data.
class star : shapes
    {
        private string<code> </code>sData = "F1M160.209,181.975L160.209,
        83.016 0.338,0.555 0.338,99.518 48.289,132.496 0.338,165.476 0.338,264.436z";
    }
- Now to draw this shape inside Windows forms from this path data, we will use a library called svg Rendering Library. From nuget, just type svg... it would be the first library.

- Then our goal would be to use this library to convert svg path data to graphics path to be understood by GDI+.
So modify the star class to be:
private Region region;
{
Svg.SvgPath pa = new Svg.SvgPath();
Svg.Pathing.SvgPathSegmentList svgSvgPathSegmentList =
new Svg.Pathing.SvgPathSegmentList();
var converter = TypeDescriptor.GetConverter
(typeof(Svg.Pathing.SvgPathSegmentList));
pa.PathData = (Svg.Pathing.SvgPathSegmentList)converter.ConvertFrom(sData);
Svg.ISvgRenderer render = null;
region = new Region(pa.Path(render));
return pa;
}</span>
Here, you simply use our old path data string to create an svg path and by doing some operations, you simply convert it to svg path... this function overrides a function in the base class so let's create the virtual function back in the base class.
- Add a virtual function: to the base class shapes.cs
public class shapes
   {
      public shapes() { }

       public int translateX;
       public int translateY;

       public string id_layer_name;

   public virtual Svg.SvgPath draw_svg()
       {
           Svg.SvgPath pa = new Svg.SvgPath();
           return pa;
       }
   }
- Now let's draw this star when the application starts ...so going back to your
form.cs.
Svg.ISvgRenderer render = null;
protected override void OnPaint(PaintEventArgs e)
{
Graphics g = e.Graphics;
shapes shape = new shapes();
star st = new star();
shape = st;
e.Graphics.DrawPath(new Pen(Brushes.Black, 2),
shape.draw_svg().Path(render));
e.Graphics.FillPath(Brushes.Khaki,
shape.draw_svg().Path(render));
}
- Now, we just call this function in the constructor of the form.cs and don't forget to define specific size.
public Form1()
{
InitializeComponent();
Size = new Size(1000, 700);
Invalidate();
}
Now, you are capable of putting any drawing you desire into your Windows form:

In the next tutorial, we will go through how to define and add many instances of the same object in a good form... we will discuss how to move color... many to come.
I invite you to read
[tut 2] how to interactively add multiple different shapes using input from the user
[tut 3] graphics program using C# Drag & Drop & Delete objects
History
- 2nd March, 2016: Initial version
