Introduction
In the open source world, it's always difficult to identify the appropriate plug-in/ package to serve the business requirements. More so often when it involves, exporting of data within certain boundaries defined by the strict business rules and user readability driven by decorative css styling.
Background
Following the business defined rules and styles, exporting data to excel for reporting purpose, carves out its own importance. Here are the clear steps for exporting data into excel using the third party components from within Angular/cli framework.
Using the code
The pre-requisites is to download the below mentioned packages:
1- <code>ExcelJs</code>:- using commapnd'<code>npm install exceljs</code>'
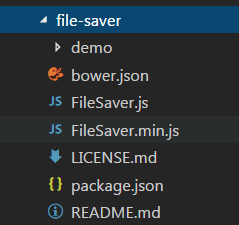
2- <code>FileSaver.js</code>:- using command '<code>npm install file-saver</code>' --save
Once the packages are being installed, it would sit in the folder node_modules of your project file as mentioned below:-


Following steps will take you closer to the implementation of Excel to Export feature:-
1- Import the package in app.module.ts file, unlike other straight-forward ways, it requires two imports as mentioned below:-
import * as Excel from "exceljs/dist/exceljs.min.js";
import * as ExcelProper from "exceljs";
2- Create a service typescript file i.e. export-excel.service.ts to handle all the excel export requests within the application
ng g service export-excel
Follow below lines of code in export-excel.service.ts file from Step 3 to 5.
3- Import relevant packages as mentioned below:
import * as Excel from "exceljs/dist/exceljs.min.js";
import * as ExcelProper from "exceljs";
import * as FileSaver from 'file-saver';
4- Create a variable blobType, which indicates the excel format and will be later fed to FileSaver class along with the blob data (data which has to be exported into Excelsheet)
blobType: string = 'application/vnd.openxmlformats-officedocument.spreadsheetml.sheet;charset=UTF-8';
5- Write a function to create an excel workbook followed by adding worksheets to it along with associated information i.e. creator, last modified by, created Date, Modified Date. Signature of the method should accept primarily two parameters, one is the column names array i.e. cols and json data i.e. rows.
workbook.addWorksheet can be used to add worksheet to the excel file by providing the sheet name i.e. sName. showGridLines property indicates whether to display the gridlines within the sheet. Inserted sheet can be fetched using it's order as var sheet = workbook.getWorksheet(1); and then can be used to add text/ styles to any cell of it by providing the address of that specific cell. sheet.addRow can be used for adding any text related information within the preadsheet. sheet.columns used to assign the keys for each specific column, which should match with the exact column names within the json data. sheet.addRows(rows); helps in adding the json data into the sheet, it will automatically match with the column names according to the keys specified in sheet.columns assignment. Finally, workbook.xlsx.writeBuffer will create a blob object of all the data workbook holds and write that in-memory data on the browser using FileSaver package as follows:-
var workbook = new Excel.Workbook();
workbook.creator = <code><<AppName>></code>;
workbook.lastModifiedBy = <code><<AppName>></code>;
workbook.created = <code><<CurrentDate>></code>;
workbook.modified = <code><<CurrentDate>></code>;
workbook.addWorksheet(sName, { views: [{ activeCell: 'A1', showGridLines: false }] })
var sheet = workbook.getWorksheet(1);
sheet.addRow("Any Information");
sheet.addRow("Any Information");
sheet.addRow("Any Information");
sheet.getRow("");
sheet.getRow(5).values = <code>cols</code>;
sheet.columns = [
{ key: 'Col1' },
{ key: 'Col2' },
{ key: 'Col3' },
{ key: 'Col4' },
{ key: 'Col5' }
];
sheet.addRows(rows);
workbook.xlsx.writeBuffer().then(data => {
const blob = new Blob([data], { type: this.blobType });
FileSaver.saveAs(blob, excelFileName);
});
6- Import this service in app.module.ts file and in the providers as well.
<....>
import * as Excel from "exceljs/dist/exceljs.min.js";
import * as ExcelProper from "exceljs";
import {ExportExcelService} from './services/export-excel.service';
@NgModule({
declarations: [<....>],
imports: [<....>],
providers: [ExportExcelService]
})
7- We have already created excel service and imported into app module file, now the last thing is to call it from the component.
Importing the previously created excel service into the desired component's type script file
import { ExportExcelService } from '../../services/export-excel.service';
Injecting the same into the constructor of that component.
constructor(private excelJsService: ExportExcelService) {...}
And, finally calling the excel service by providing the column list and the json data to be exported to excel spreadsheet.
ExportToExcel(){
  this.excelJsService.exportExcelFile(this.columnNamesArray, this.jsonRowData);
}
With all the pieces together, you have now added an export to excel feature in Angular 2+ application.
Additional Details
PlunkerURL:- https:
YouTubeURL:- https:
Happy Coding! :)
