Introduction
In this tutorial, we will use LinqToTwitter package to get tweets from Twitter. Then, we will expose it as a backend service using Web API framework. Finally, we will host this service as a Cloud Service inside Windows Azure.
1. Getting the tweets
LinqToTwitter is an open source project that uses Twitter API to get tweets, in a simple way. We'll use it to get a number of tweets of a given user name. First we'll have to get keys from https://dev.twitter.com/apps to allow LinqToTwitter to access Twitter API.
public IEnumerable<TweetItem> GetTweets(string userName, int numberOfTweets)
{
    var tweets = _twitterContext.Status.Where(tweet => tweet.ScreenName == userName
                 && tweet.Type == StatusType.User).Take(numberOfTweets).ToList();
    return tweets.Select(item => new TweetItem
    {
        Text = item.Text,
        UserName = item.User.Name,
        ScreenName = "@" + item.ScreenName,
        PublishDate = item.CreatedAt.ToString(),
        ImageUrl = item.User.ProfileImageUrl
    }).ToList();
}
2. Exposing the service via Web API
Web API is a framework for building HTTP services. To expose this method as a service, we need just to place it in an ApiController inside an ASP.NET Web API project.One of the good features of Web API is that we can choose the Route we want for each method/service. For that we'll choose /api/tweets/. In addition to that, we can also pass parameters of the method in the Url. As GetTweets needs 2 parameters of type String and int, we'll specify that in the attribute routing. The rule is to use "{" + the same parameter name + ":" + parameter type + "}". In our case it's /{userName}/{numberOfTweets:int}/. So, the full route will be
[Route("api/tweets/{userName}/{numberOfTweets:int}/")]
3. Hosting the service as a Cloud Service
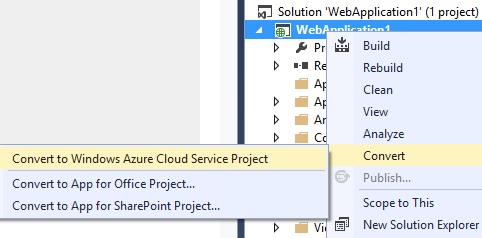
Windows Azure provides many services, one of the is Cloud Services. It makes it possible to choose the number of virtual machines we need for our service. First of all, we need to convert the Web API project to Cloud Service project. To do that, right click on the Web API project, choose Convert, then Convert to Windows Azure Cloud Service project. This will add another project, right click on it and choose Package. This will generate two files : a .csdef and a .cscfg file. Now, we go to the Windows Azure portal and create a Cloud Service. We'll need the generated files to upload them to the Cloud Service.

4. Calling the service
To use the service, just use the following URL: tweets.cloudapp.net/api/tweets/HoussemDellai/5 and replace HoussemDellai with another Twitter user name. The number 5 in the url indicates how many tweets to get. You will get a json file containing tweets if you use Internet Explorer, or an XML file if you use Google Chrome.
