Introduction
This tip explains how to add "zooming" (i.e. scaling) to a WPF application. The code is simple and applicable to most WPF apps. The download demonstrates three ways of allowing the user to control the zoom factor.
Why Do This?
Have you ever had to sit in the back of the room when somebody was presenting an application, and the text in the app was too small to read easily? Another scenario is when several people gather around a monitor to discuss something on the screen. The person sitting directly in front of the monitor can see clearly, but what about the people behind him? I was thinking about this while preparing to present an application I had just developed when I had this idea...
I realize there are other ways to address this, such as changing the resolution of the monitor/projector. However, the relatively smooth zooming demonstrated below is a pretty cool visual affect that's easily implemented.
Demonstration
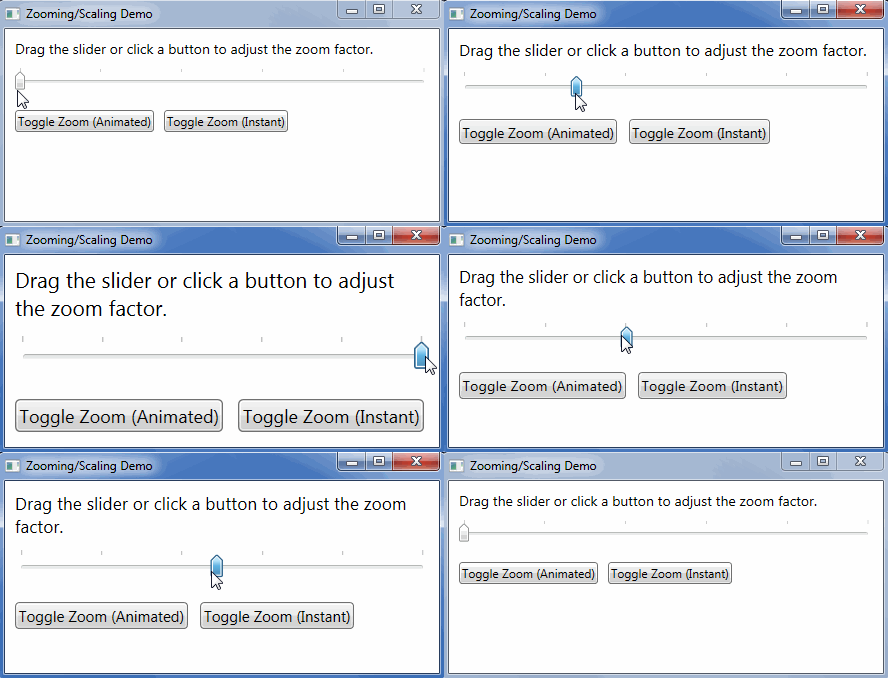
In the download app, the minimum zoom factor is hard-coded to 1.0 and the max is 1.5. The GIFs below were created from the download app to demonstrate three ways of controlling the zoom factor. Of course, many other ways are possible. For example, you might use the mouse wheel or have separate "Zoom In" and "Zoom Out" buttons.
The first GIF demonstrates the use of a Slider to control the zoom factor.

The second GIF demonstrates the use of WPF animation to smoothly toggle between min and max zoom when the user clicks a button. The position of the slider varies automatically with the zoom factor due to data binding. The speed is determined by the duration of the animation, which in this case is set to 600 milliseconds.

The third GIF demonstrates the use of a button to toggle instantly between zoom factor 1.0 and 1.5. It's a bit jarring, but the code is dead simple.

Notice how in all three of the above GIFs the text at the top, which is in a TextBlock control, reflows (word-wraps) as needed and the other controls move down to accommodate the taller TextBlock. This is done automatically by WPF's layout engine. If your app can handle being resized, it can probably handle being zoomed in this fashion because making the window smaller has the same affect on the layout as making the contents bigger.
The GIF below is of a production application zooming between a factor of 0.7 and 1.2 (chosen to fit CodeProject's width limit of 640 pixels). The duration of the animation is set to 2 seconds to make it easier to follow. Notice that the controls just above the data grid reflow from one row to two when they become too wide to fit the window and scroll bars appear when and where needed. That occurs because I designed the app to accommodate being resized by the user. I added the zoom feature as an afterthought and it "just worked"!

Using the Code
The code in this article depends on the WPF window having a single child control that in turn contains all the other controls. Let's name that immediate child control "mainPanel". Zooming is just a matter of setting mainPanel.LayoutTransform to an instance of ScaleTransform and setting that object's ScaleX and ScaleY properties to the desired scale factor.
Visual Studio always creates new windows with a Grid control as the window's immediate child. I often replace the Grid with a DockPanel or StackPanel, but any control that has the LayoutTransform property should work (i.e., any class derived from FrameworkElement).
In the download app, the zooming/scaling of the mainPanel control is done in code-behind.
Instantly changing the scale factor from, for example, 1.0 to 1.5 can produce a startling or even confusing effect for the user. A smooth change versus a sudden jump lets the user see what's going on and looks more sophisticated. This is easily accomplished using the DoubleAnimation class, which applies to double properties such as ScaleX and ScaleY. For example, the following C# method (found in the download) is all the code-behind needed to smoothly toggle the zoom factor between 1.0 and 1.5 whenever it's called.
private void btnAnimate_Click(object sender, RoutedEventArgs e)
{
var scaler = mainPanel.LayoutTransform as ScaleTransform;
if (scaler == null)
{
scaler = new ScaleTransform(1.0, 1.0);
mainPanel.LayoutTransform = scaler;
}
DoubleAnimation animator = new DoubleAnimation()
{
Duration = new Duration(TimeSpan.FromMilliseconds(600)),
};
if (scaler.ScaleX == 1.0)
{
animator.To = 1.5;
}
else
{
animator.To = 1.0;
}
scaler.BeginAnimation(ScaleTransform.ScaleXProperty, animator);
scaler.BeginAnimation(ScaleTransform.ScaleYProperty, animator);
}
Points of Interest
One thing I learned while writing the demo code for this article is that when a Dependency Property like ScaleX is set via animation, as in the above code, it isn't normally possible to set the property to another value after the animation completes. That's because in the Dependency Property Setting Precedence List, animations have a higher precedence than almost everything else including explicitly assigned local values. Because of this, some extra code was required in the implementation of the Slider control and "Instant Zoom" button that wouldn't have been required if no animation was used.
For example, here's the code for the "Instant Zoom" button. The "if (scaler.HasAnimatedProperties)" check is only needed due to the possibility that the user may have clicked the "Animated Zoom" button earlier. In that case, simply setting scaler.ScaleX = 1.5 (or 1.0) will have no effect without first removing the animation that's currently keeping the property set to the final "To" value of the animation.
private void btnInstant_Click(object sender, RoutedEventArgs e)
{
var scaler = mainPanel.LayoutTransform as ScaleTransform;
if (scaler == null)
{
mainPanel.LayoutTransform = new ScaleTransform(1.5, 1.5);
}
else
{
double curZoomFactor = scaler.ScaleX;
if (scaler.HasAnimatedProperties)
{
scaler.BeginAnimation(ScaleTransform.ScaleXProperty, null);
scaler.BeginAnimation(ScaleTransform.ScaleYProperty, null);
}
if (curZoomFactor == 1.0)
{
scaler.ScaleX = 1.5;
scaler.ScaleY = 1.5;
}
else
{
scaler.ScaleX = 1.0;
scaler.ScaleY = 1.0;
}
}
}
